Playback Quickstart for JavaScript v2
Playing videos via websites, is one of the most common ways for users to consume video content today. Bitmovin provides a web player that you can embed into your web pages via JavaScript, so users can play videos. Playback can include both streaming and non-streaming, depending on how the video was encoded.
This Quickstart shows how to use Bitmovin's Web API to load and stream a DASH-encoded video on a simple web page, hosted by a local web server running on your development machine.
It builds on the Encode Quickstart via the Simplified API that generated both HLS and DASH-encoded videos to our CDN for streaming, using Bitmovin's simplified REST API.
The following subsections describe everything necessary to playback this video on a web page:
- Prerequisites
- Step 1 – Set up a Web Server
- Step 2 – Prepare Your HTML File
- Step 3 – Add Bitmovin's Player SDK
- Step 4 – Embed the Player
- Step 5 – Locate Your Bitmovin Player License Key
- Step 6 – Configure and Instantiate the Player
- Step 7 – Specify the Source Video
- Step 8 – Load the Video
- Step 9 – Test Video Playback
Prerequisites
The following items are required to complete this tutorial:
- DASH-encoded video files successfully created as per the Encode Quickstart via the Simplified API.
- Functional web server that can host HTML files. This Quickstart uses this http-server npm package which you can download for free to follow along with.
- Your player license key.
Step 1: Set up a Web Server
This Quickstart uses the free http-server npm package to host web files locally (i.e., via localhost:8080) on your development machine.
Follow the steps below to set up http-server so you can play back an encoded video on a locally-hosted web server:
- Install http-server.
- Create a directory named test on your machine where you will host web pages from.
- Create an index.html file in test that contains some text (e.g.,
hello world). - Open a command line and run
http-serverto start the web server passing in the location of your test directory. For example:
http-server /Users/me/Documents/test
- Open a web browser, enter localhost:8080, and verify that you can see the text.
You now have a functional web server to use for local testing when following this tutorial. The following sections show how to modify your index.html file to use Bitmovin's web API for video playback.
Step 2 – Prepare Your HTML file
This section provides the templated HTML code that will be used in subsequent sections to play a video in your browser.
Edit the index.html file that you created in the previous section and replace the contents with the following:
<!DOCTYPE html>
<html lang="en">
<head>
  <title>Bitmovin SDK - Getting Started WEB SDK</title>
  <meta charset="UTF-8"/>
  <meta http-equiv="X-UA-Compatible" content="IE=edge,chrome=1">
  <meta name="viewport" content="width=device-width, initial-scale=1.0">

  <!-- SDK Installation-->

</head>
<body>
  <!-- Provide a player container element-->

  <script>
    //<!-- Configure and Initialize the player-->

    //<!-- Configure a Source for the player -->

    //<!-- Load the player -->

  </script>
</body>
</html>
Tip
The code comments provide the outline of the code changes that you will make in the sections below.
Step 3 – Add Bitmovin's Player SDK
Start by adding the Bitmovin player SDK module to your HTML file. Add <script src="https://cdn.bitmovin.com/player/web/8/bitmovinplayer.js" type="text/javascript"></script> below <!-- SDK Installation--> as shown in the following code example:
<!DOCTYPE html>
<html lang="en">
<head>
  <title>Bitmovin SDK - Getting Started WEB SDK</title>
  <meta charset="UTF-8"/>
  <meta http-equiv="X-UA-Compatible" content="IE=edge,chrome=1">
  <meta name="viewport" content="width=device-width, initial-scale=1.0">

  <!-- SDK Installation-->
  <script src="https://cdn.bitmovin.com/player/web/8/bitmovinplayer.js" type="text/javascript"></script>

  ...
Step 4 – Embed the Player
The player SDK needs to know which container to render its video and UI components. The following code example shows how to add this as a div element in the body with the unique ID: my-player:
<!DOCTYPE html>
<html lang="en">

  ...

<body>
  <!-- Provide a player container element-->
  <div id="my-player"></div>

  ...
Step 5 – Locate Your Bitmovin Player License Key
You will need your Bitmovin Player Key in order to render videos with the player. This key is available via your Bitmovin Dashboard.
Follow the steps below to locate and copy your key:
- Open your Bitmovin Dashboard in a browser and log in.
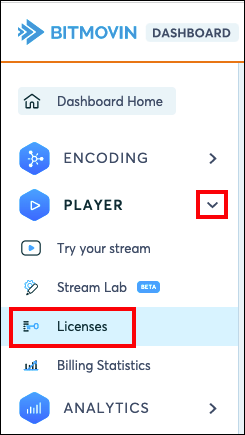
- Navigate to Player in the left-hand navigation bar, expand the dropdown, and select Licenses:

- Click on default-license in the list.
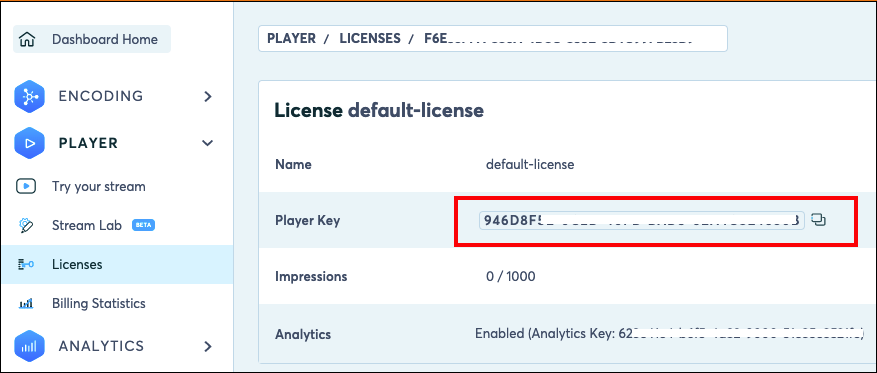
- Locate the Player Key and hover your mouse over it to display the copy icon:

- Click the copy icon to copy the key. This key will be used in the next section.
Step 6 – Configure and Instantiate the Player
In order to play a video, the player must be configured with your player license key. It can also be configured with several other settings as listed here.
Follow the steps below to create a player configuration and then instantiate a player:
- Add the following
playerConfigto the<script>section of your HTML file:
<!DOCTYPE html>
<html lang="en">

...

<body>
  ...

  <script>
    //<!-- Configure and Initialize the player-->
    var playerConfig = {
      "key": "<PLAYER_LICENSE_KEY>",
      "playback": {
        "muted": true,
        "autoplay": false
      }
    }

    ...
- Replace
<PLAYER_LICENSE_KEY>with the player license key you copied in the previous section. - Add the following code below the configuration to get the player container using its
divID:
<body>
  ...

  <script>
    //<!-- Configure and Initialize the player-->
    var playerConfig = {
      "key": "<PLAYER_LICENSE_KEY>",
      "playback": {
        "muted": true,
        "autoplay": false
      }
    }

    var container = document.getElementById('my-player');

    ...
- Instantiate a Bitmovin
Playerpassing in the container and configuration:
<body>
  ...

  <script>
    //<!-- Configure and Initialize the player-->
    var playerConfig = {
      "key": "<PLAYER_LICENSE_KEY>",
      "playback": {
        "muted": true,
        "autoplay": false
      }
    }

    var container = document.getElementById('my-player');
    var player = new bitmovin.player.Player(container, playerConfig);

    ...
Step 7 – Specify the Source Video
This section shows how to specify the encoded source video stored on Bitmovin's CDN to play. This is done by creating a source configuration that specifies details like:
- where to load content from;
- available streaming formats;
- DRM configurations;
- additional subtitles or thumbnail tracks;
- metadata (e.g., title and description for the player UI to display); and
- source-specific Bitmovin analytics configurations.
Follow the steps below to set up this source configuration:
- Add the following code to the
<script>section in your HTML file to create a source configuration object:
<!DOCTYPE html>
<html lang="en">
...
<body>
   ...
  <script>
    ...

    //<!-- Configure a Source for the player -->
    var sourceConfig = {
      "title": "Default Demo Source Config",
      "description": "Select another example in \"Configure a Source for the player\" to test it here",
      "dash": "https://d29dbmjjdvrvy1.cloudfront.net/726934d5-3fcc-456.../stream.mpd",
      "poster": "https://bitmovin-a.akamaihd.net/content/MI201109210084_1/poster.jpg"
    }
- Set the value of
dashto the manifest URL you copied in the final step of Encode Quickstart via the Simplified API.
The configuration in this example specifies the title, description, URL of your DASH-encoded video stored in Bitmovin's CDN, and a (publicly-accessible) JPG to use for the poster (i.e., the initial display image).
Step 8 – Load the Video
The final step is to load the video using the source configuration defined in the previous step. Add a call to player.load() below the sourceConfig definition to load the video:
<!DOCTYPE html>
<html lang="en">
...

<body>
   ...

  <script>
    ...

    //<!-- Configure a Source for the player -->
    var sourceConfig = {
      "title": "Default Demo Source Config",
      "description": "Select another example in \"Configure a Source for the player\" to test it here",
      "dash": "https://d29dbmjjdvrvy1.cloudfront.net/726934d5-3fcc-456.../stream.mpd",
      "poster": "https://bitmovin-a.akamaihd.net/content/MI201109210084_1/poster.jpg"
    }

    //<!-- Load the player -->
    player.load(sourceConfig).then(function() {
        console.log('Successfully loaded Source Config!');
      }).catch(function(reason) {
        console.log('Error while loading source:', reason);
      }
    );

    ...
Step 9 – Test Video Playback
Everything is now in place to test playback of the encoded video:
- Save your index.html file.
- Ensure you web server is running.
- Navigate in your web browser to localhost:8080. You should see the player displayed using the poster defined above:

- Click the play button to verify that the video streams and renders correctly, and that audio is working.
Note
The player was configured above to mute the audio by default, so you will need to turn up the volume using the player's volume control.
You've now successfully streamed a DASH-encoded video. The next step is to set up analytics to monitor video viewing trends and behaviors.
Updated over 3 years ago