Deinterlacing Content with Bitmovin Encoding
Background: Progressive vs. Interlaced Video
Display Methods
Progressive Mode: Modern digital displays show each video frame sequentially, one pixel row after another from top to bottom.
Interlaced Mode: Older CRT displays split each frame into two fields:
- Odd field: Contains odd-numbered pixel rows (1, 3, 5, 7...)
- Even field: Contains even-numbered pixel rows (2, 4, 6, 8...)
Interlacing was introduced 70 years ago for TV standards like NTSC and PAL to reduce flicker and improve brightness distribution on CRT screens. This is unnecessary for modern digital displays.
Current Usage
Many cameras and broadcast systems still output interlaced video, especially in broadcast environments. Interlaced files are marked with an "i" in their frame rate (e.g., 1080i).
| 1080i/25 (or 1080i50) | 1080p/25 (or 1080p25) |
|---|---|
| video of 1080 pixels height with 25 interlaced frames (=50 fields) per second | video of 1080 pixels height with 25 progressive frames per second |
The Deinterlacing Problem
Converting interlaced to progressive video creates challenges because the two fields are recorded at different times (with a gap of half the frame interval). Fast-moving objects create a "comb effect" where odd and even rows appear misaligned, resulting in blurred video quality.
Solution: Deinterlacing filters intelligently combine the fields into coherent progressive frames. The Bitmovin Encoder includes built-in deinterlacing capabilities.
| Interlaced Picture | De-interlaced picture |
|---|---|
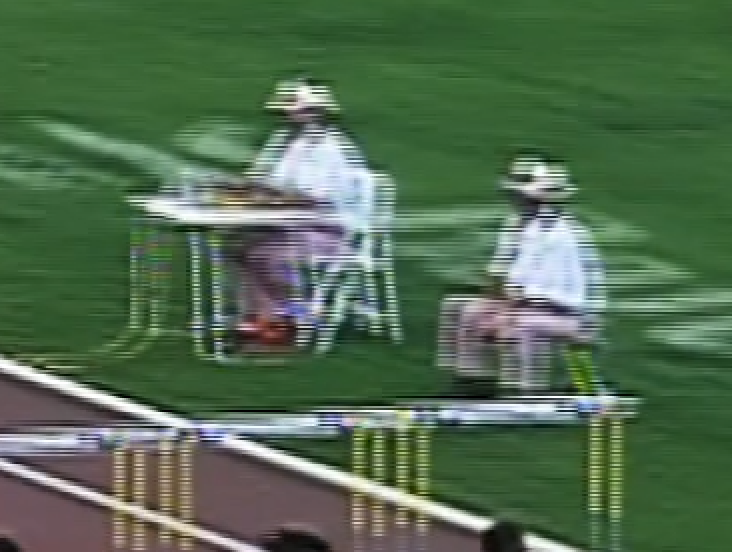 | 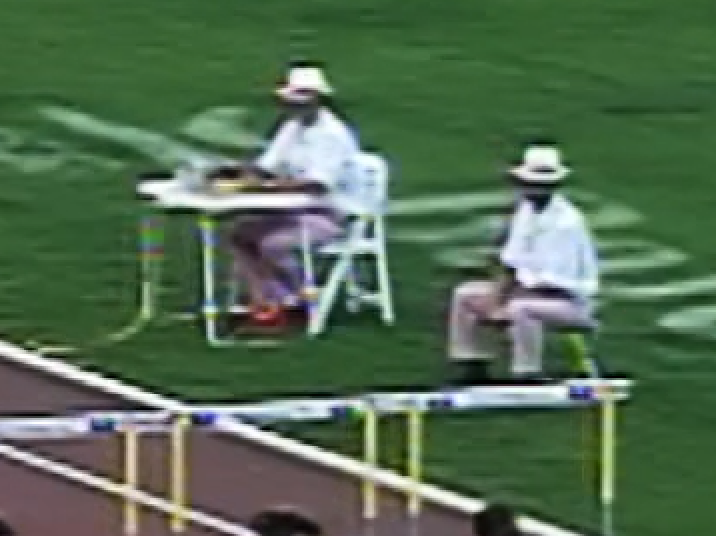 |
Best Practice
Important: Request progressive source material from your content provider whenever possible. Native progressive video delivers superior quality compared to even the best deinterlaced conversion.
The Deinterlacing Filters
Bitmovin offers two different deinterlacing filters: Create Deinterlace Filter and Create Enhanced Deinterlace Filter (see Point 6.5 for pricing details).
A Java SDK example that uses the Deinterlace filter can be found here: https://github.com/bitmovin/bitmovin-api-sdk-examples/Filters.java (also available for other languages).
Filter Comparison: Standard vs. Enhanced Deinterlace Filter
Standard Deinterlacing: Best for general-purpose video processing, fast turnaround times
- Uses temporal and spatial interlacing checks with edge-directed interpolation
- Very fast processing speed - excellent for batch operations
- Considered the “best and fastest choice” for general deinterlacing
- Good quality for most content types
Enhanced Deinterlace filter: Best for maximum quality and fine detail preservation (see Point 6.5 for pricing details)
- Enhanced edge-directed interpolation that resizes by 2x vertically and interpolates missing fields
- Specifically designed for edge-directed interpolation for deinterlacing
- Higher quality output with superior edge preservation
- More sophisticated interpolation algorithms
Using a Deinterlace Filter
If you are new to Bitmovin encoding, please refer to our tutorials, such as Get started with the Bitmovin API, and closely check the examples we provide in your preferred language: SDKs.
metadata:
  type: VOD
  name: VOD Deinterlace Workflow

# defines the deinterlace filter
filters:
  deinterlace:
    my-deinterlace-filter:
      properties:
        name: My deinterlace filter
        autoEnable: ALWAYS_ON
        frameSelectionMode: ALL
        mode: FRAME
        parity: AUTO

encodings:
  main-encoding:
    properties:
      name: VOD Deinterlace Workflow
      # ...

    streams:
      my-streams:
        properties:
          # ...

        # adds the deinterlace filter to a stream
        filters:
          properties:
            - id: $/filters/deinterlace/my-deinterlace-filter
              position: 0 # defines the order of filters
Configuring the Standard Deinterlace Filter
mode
The mode parameter controls how the deinterlacing process handles frame output and spatial interlacing detection. This parameter fundamentally affects both the output frame rate and the quality of the deinterlacing process.
| Value | Description | Frame Rate Impact | Recommendations |
|---|---|---|---|
| FRAME (default) | Output one frame for each frame (e.g., 25i will be encoded into 25p) | Maintains original frame rate | Best for most content where maintaining original frame rate is important |
| FIELD | Output one frame for each field (e.g., 25i will be encoded into 50p) | Doubles the frame rate | Ideal for sports, action content, or when smooth motion is prioritized over file size |
| FRAME_NOSPATIAL | Like FRAME, but it skips the spatial interlacing check. | Maintains original frame rate | When processing speed is critical and source is confirmed interlaced |
| FIELD_NOSPATIAL | Like FIELD, but it skips the spatial interlacing check. | Doubles the frame rate | Maximum motion smoothness with fastest processing for confirmed interlaced sources |
Temporal vs Spatial Analysis
Temporal Analysis examines pixels across multiple frames (previous, current, next) to reconstruct missing field data using edge-directed interpolation algorithms. This method analyzes motion between frames to predict pixel values.
Spatial Analysis examines pixel patterns within a single frame to detect genuine interlacing artifacts versus content that may appear interlaced but isn't (such as horizontal lines in progressive content). This prevents unnecessary processing and artifacts.
frameSelectionMode
| Value | Description |
|---|---|
| ALL (default) | Deinterlace all frames |
| INTERLACED | Only deinterlace frames marked as interlaced |
parity
The parity parameter sets the picture field parity assumed for the input interlaced video. As said above, in interlaced video streams, a frame comprises of two fields. One includes the odd pixel rows (1, 3, 5,...). This is called the top field. The other includes the even pixel rows (2, 4, 6...) This is called the bottom field. When reconstructing a frame from a stream of alternating fields (top, bottom, top, bottom...), it is important to understand whether a frame starts with a top field or a bottom field.
| Value | Description |
|---|---|
| TOP_FIELD_FIRST | Assume the top field is first |
| BOTTOM_FIELD_FIRST | Assume the bottom field is first |
| AUTO (default) | Enable automatic detection of field parity. If the interlacing is unknown or the decoder does not export this information, top field first will be assumed. |
autoEnable
The autoEnable parameter controls the application of the filter per se. With this comes, in certain cases, an alteration of some configured parameters.
The possible values of this field are:
- ALWAYS_ON (default)
- METADATA_BASED
- META_DATA_AND_CONTENT_BASED
Advice:
- If you know exactly what your input is, and you know how to set mode, parity, and other settings, then set autoEnable to
ALWAYS_ON(default). - If you don't, or want to allow for variable input files, then it's safest to use
META_DATA_AND_CONTENT_BASED. This may overwrite other settings if the source file analysis indicates a contradiction.
Options matrix for autoEnable
This table shows the consequences of each value
| Parameter | ALWAYS_ON | METADATA_BASED | META_DATA_AND_CONTENT_BASED |
|---|---|---|---|
| (the filter itself) | Deinterlacing will always be applied as configured | Deinterlacing might be removed depending on metadata probing | Deinterlacing might be removed depending on metadata probing and content analysis. The content analysis is the backup solution if the metadata probing fails. |
| mode | not touched | not touched | not touched |
| frameSelectionMode | not touched | not touched | This is forced to ALL if the content analysis detects interlaced input |
| parity | not touched | If parity is AUTO, then it will be overwritten with the result of the metadata probing | If parity is AUTO, then the parity will be overwritten with the result of the metadata probing. However, if the content analysis detects interlacing, then the parity will always be overwritten with the result of the analysis |
Updated 2 months ago