Node.js / JavaScript SDK
The Bitmovin API enables you to build cutting edge video workflows while leveraging emmy-award winning encoding solutions, that automatically optimize your catalog for high quality and cost efficient video streaming.
Quick Start Guide
This Quick Start Video will demonstrate different approaches to setup an encoding workflow using a
- Watch Folder Workflow (No Code Required) and a
- full Python API SDK example using this Colabortory Notebook.
Get Started with your own Project
The following steps will walk you through adding the SDK to an new or existing Project step by step.
Overview
Starting an encoding triggers a request for encoding instances. Once available, the input file will be downloaded, divided into chunks, and distributed between all of them. Those instances transcode each chunk into segments for all configured video/audio representations (muxings) in parallel and write them to the designated output destination. This approach makes Bitmovin's encoding the fastest in the world.
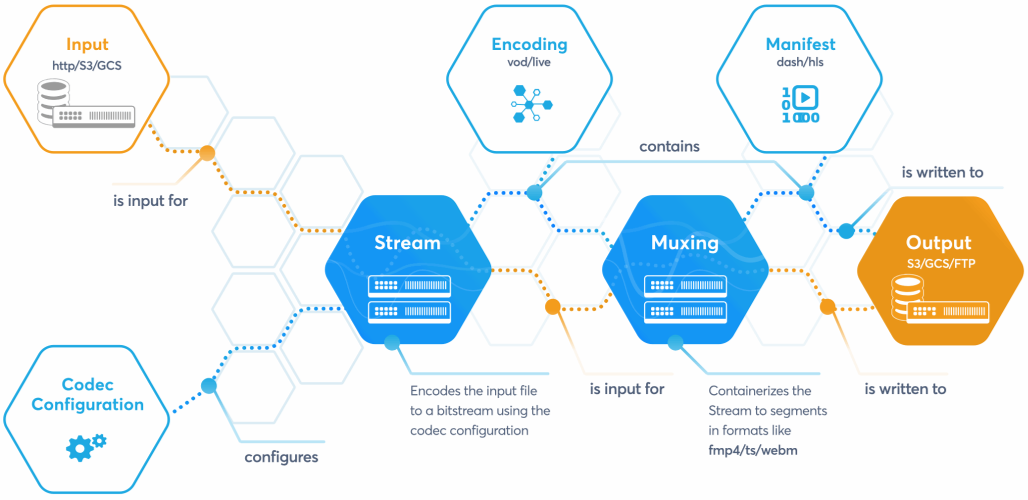
In this tutorial you will implement a simple VOD online streaming scenario, where an input file containing a video stream and stereo audio stream is transcoded into ...
- a fixed ladder of 3 video representations at different resolutions and bitrates using the H264 codec, and
- an audio rendition with the AAC codec.
Each individual stream is wrapped into fragmented MP4 (fMP4) containers. HLS and DASH manifests are generated so the encoded content is stream- and playable on the majority of modern devices and browsers out there today.
Step 1: Add Bitmovin SDK to Your Project
To get started add the Bitmovin SDK to your project.
For the latest version please refer to the GitHub repository or check the changelog of the Bitmovin API. Open API SDK versions and the Bitmovin API share the same versioning.
// with yarn
yarn add @bitmovin/api-sdk

// with npm
npm install @bitmovin/api-sdk --save
Step 2: Set up a Bitmovin API Client Instance
The Bitmovin API client instance is used for all communication with the Bitmovin REST API, pass your API key to authenticate with the API. You can find your API_KEY in the dashboard in your Account Settings. TENANT_ORGANISATION_ID shall be replaced by the ID of the organisation you want to execute the API calls in.
const { ConsoleLogger,} = require('@bitmovin/api-sdk');
const BitmovinApi = require('@bitmovin/api-sdk').default;

const bitmovinApi = new BitmovinApi({
    apiKey: '<API_KEY>',
    tenantOrgId: '<TENANT_ORGANISATION_ID>',
    logger: new ConsoleLogger()
});
Step 3: Create an Input
Create Input
An input holds the configuration to access a specific file storage, from which the encoder will download the source file.
We support various types of input sources including HTTP(S), (S)FTP, Google Cloud Storage (GCS), Amazon Simple Storage Service (S3), Azure Blob Storage, and all cloud storage vendors that offer an S3 compatible interface.
Below we are creating an input. You can change the input type on the top right of the code panel.
const input = await bitmovinApi.encoding.inputs.https.create(
    new HttpsInput({
        host: '<HTTPS_INPUT_HOST>',
        name: '<INPUT_NAME>'
    })
);
Reuse Inputs
Inputs refer to a location, not a specific file.
This makes them easily reusable. Create an input once and reuse it for all your encodings.
Hint: All resources in our API are identified by a unique id which enables you to reuse many resources. So you only have to create one input for each location and can reuse it for all encodings.
const input = await bitmovinApi.encoding.inputs.https.get(
  '<INPUT_ID>'
);
Step 4: Create an Output
Create Output
Outputs define where the manifests and encoded segments will be written to.
Like inputs, outputs represent a set of information needed to access a specific storage. From this storage players can access the content for playback.
const output = await bitmovinApi.encoding.outputs.gcs.create(
    new GcsOutput({
        name: '<GCS_OUTPUT_NAME>',
        accessKey: '<GCS_ACCESS_KEY>',
        secretKey: '<GCS_SECRET_KEY>',
        bucketName: '<GCS_BUCKET_NAME>'
    })
);
const outputId = output.id;
Reuse Output
Similar to inputs, outputs also refer to a location, not a specific file.
So they're exactly as reusable as inputs. Create it once and reuse it for all your encodings.
const output = await bitmovinApi.encoding.outputs.gcs.get(
    '<OUTPUT_ID>'
);
Step 5: Create Codec Configurations
Codec Configurations
Codec configurations specify the codec and its parameters (eg. media codec, bitrate, frame rate, sampling rate).
They are used to encode the input stream coming from your input file.
Video Codec Configurations
Below we are creating video codec configurations. We support a multitude of codecs, including H264, H265, VP9, AV1 and many more.
For simplicity, we use H264 now, but you can easily change that after finishing the getting started.
const videoCodecConfiguration1 = await bitmovinApi.encoding.configurations.video.h264.create(
    new H264VideoConfiguration({
        name: 'Getting Started H264 Codec Config 1',
        bitrate: 1500000,
        width: 1024,
        presetConfiguration: PresetConfiguration.VOD_STANDARD
    })
);

const videoCodecConfiguration2 = await bitmovinApi.encoding.configurations.video.h264.create(
    new H264VideoConfiguration({
        name: 'Getting Started H264 Codec Config 2',
        bitrate: 1000000,
        width: 768,
        presetConfiguration: PresetConfiguration.VOD_STANDARD
    })
);

const videoCodecConfiguration3 = await bitmovinApi.encoding.configurations.video.h264.create(
    new H264VideoConfiguration({
        name: 'Getting Started H264 Codec Config 3',
        bitrate: 750000,
        width: 640,
        presetConfiguration: PresetConfiguration.VOD_STANDARD
    })
);
Audio Codec Configurations
As audio codec configuration we are creating one AAC configuration.
We also support many more audio codecs including Opus, Vorbis, AC3, E-AC3 and MP2.
const audioCodecConfiguration = await bitmovinApi.encoding.configurations.audio.aac.create(
    new AacAudioConfiguration({
        name: 'Getting Started Audio Codec Config',
        bitrate: 128000
    })
);
Reusing Codec Configurations
As inputs and outputs, codec configurations can also be reused.
To use existing video or audio codec configurations, loading them with their id.
const videoCodecConfiguration = await bitmovinApi.encoding.configurations.video.h264.get(
  '<H264_CC_ID>'
);

const audioCodecConfiguration = await bitmovinApi.encoding.configurations.audio.aac.get(
  '<AAC_CC_ID>'
);
Step 6: Create & Configure an Encoding
Create Encoding
An encoding is a collection of resources (inputs, outputs, codec configurations etc.), mapped to each other.
The cloud region defines in which cloud and region your encoding will be started.
If you don't set it, our encoder takes the region closest to your input and output.
Inputs, outputs and codec configurations can be reused among many encodings. Other resources are specific to one encoding, like streams, which we'll create below.
const encoding = await bitmovinApi.encoding.encodings.create(
    new Encoding({
        name: 'Getting Started Encoding',
        cloudRegion: CloudRegion.GOOGLE_EUROPE_WEST_1
    })
);
Streams
A stream maps an audio or video input stream of your input file (called input stream) to one audio or video codec configuration.
The following example uses the selection mode AUTO, which will select the first available video input stream of your input file.
You can choose an input file from 3 predefined examples on the top right of the code panel.
Video Stream
const inputPath = '<INPUT_PATH>';

const videoStreamInput = new StreamInput({
  inputId: input.id,
  inputPath: inputPath,
  selectionMode: StreamSelectionMode.AUTO,
});

const videoStream1 = await bitmovinApi.encoding.encodings.streams.create(
  encoding.id,
  new Stream({
    codecConfigId: videoCodecConfiguration1.id,
    inputStreams: [videoStreamInput],
  }),
);

const videoStream2 = await bitmovinApi.encoding.encodings.streams.create(
  encoding.id,
  new Stream({
    codecConfigId: videoCodecConfiguration2.id,
    inputStreams: [videoStreamInput],
  }),
);

const videoStream3 = await bitmovinApi.encoding.encodings.streams.create(
  encoding.id,
  new Stream({
    codecConfigId: videoCodecConfiguration3.id,
    inputStreams: [videoStreamInput],
  }),
);
Audio Stream
const audioStreamInput = new StreamInput({
    inputId: input.id,
    inputPath: inputPath,
    selectionMode: StreamSelectionMode.AUTO
});

const audioStream = await bitmovinApi.encoding.encodings.streams.create(
    encoding.id,
    new Stream({
        codecConfigId: audioCodecConfiguration.id,
        inputStreams: [audioStreamInput]
    })
);
Step 7: Create a Muxing
Muxings
A muxing defines which container format will be used for the encoded video or audio files (segmented TS, progressive TS, MP4, FMP4, ...). It requires a stream, an output, and the output path, where the generated segments will be written to.
FMP4 muxings are used for DASH manifest representations, TS muxings for HLS playlist representations.
FMP4
const aclEntry = new AclEntry({
    permission: AclPermission.PUBLIC_READ
});

const segmentLength = 4;
const outputPath = '<OUTPUT_PATH>';
const segmentNaming = 'seg_%number%.m4s';
const initSegmentName = 'init.mp4';

const videoMuxing1 = await bitmovinApi.encoding.encodings.muxings.fmp4.create(
    encoding.id,
    new Fmp4Muxing({
        segmentLength: segmentLength,
        segmentNaming: segmentNaming,
        initSegmentName: initSegmentName,
        streams: [new MuxingStream({streamId: videoStream1.id})],
        outputs: [
            new EncodingOutput({
                outputId: outputId,
                outputPath: outputPath + '/video/1024_1500000/fmp4/',
                acl: [aclEntry]
            })
        ]
    })
);

const videoMuxing2 = await bitmovinApi.encoding.encodings.muxings.fmp4.create(
    encoding.id,
    new Fmp4Muxing({
        segmentLength: segmentLength,
        segmentNaming: segmentNaming,
        initSegmentName: initSegmentName,
        streams: [new MuxingStream({streamId: videoStream2.id})],
        outputs: [
            new EncodingOutput({
                outputId: outputId,
                outputPath: outputPath + '/video/768_1000000/fmp4/',
                acl: [aclEntry]
            })
        ]
    })
);

const videoMuxing3 = await bitmovinApi.encoding.encodings.muxings.fmp4.create(
    encoding.id,
    new Fmp4Muxing({
        segmentLength: segmentLength,
        segmentNaming: segmentNaming,
        initSegmentName: initSegmentName,
        streams: [new MuxingStream({streamId: videoStream3.id})],
        outputs: [
            new EncodingOutput({
                outputId: outputId,
                outputPath: outputPath + '/video/640_750000/fmp4/',
                acl: [aclEntry]
            })
        ]
    })
);
Audio Muxings
const audioMuxing = await bitmovinApi.encoding.encodings.muxings.fmp4.create(
    encoding.id,
    new Fmp4Muxing({
        segmentLength: segmentLength,
        segmentNaming: segmentNaming,
        initSegmentName: initSegmentName,
        streams: [new MuxingStream({streamId: audioStream.id})],
        outputs: [
            new EncodingOutput({
                outputId: outputId,
                outputPath: outputPath + '/audio/128000/fmp4/',
                acl: [aclEntry]
            })
        ]
    })
);
Hint: To optimize your content for a specific use-case you can also provide a custom segment length. Further, you can also customize the naming pattern for the resulting segments and the initialization segment as well.
Step 8: Create a Manifest
DASH & HLS Manifests
Its recommended to use Default Manifests, one each for DASH (API-Reference) and HLS (API-Reference). They are a construct that leaves it to the encoder to determine how to best generate the manifest based on what resources have been created by the encoding. This simplifies the code greatly for simple scenarios like this guide is about.
Create a DASH Manifest
const manifestOutput = new EncodingOutput({
    outputId: outputId,
    outputPath: outputPath,
    acl: [
        new AclEntry({
            permission: AclPermission.PUBLIC_READ,
            scope: '*'
        })
    ]
});
let dashManifest = new DashManifestDefault({
    manifestName: 'stream.mpd',
    encodingId: encoding.id,
    version: DashManifestDefaultVersion.V2,
    outputs: [manifestOutput]
});

dashManifest = await bitmovinApi.encoding.manifests.dash.default.create(dashManifest);
Create a HLS manifest
let hlsManifest = new HlsManifestDefault({
    manifestName: 'stream.m3u8',
    encodingId: encoding.id,
    version: HlsManifestDefaultVersion.V1,
    outputs: [manifestOutput]
});

hlsManifest = await bitmovinApi.encoding.manifests.hls.default.create(hlsManifest);
Step 9: Start an Encoding
Let's recap - We have defined:
- an input, specifying the input file host
- an output, specifying where the manifest and the encoded files will be written to
- codec configurations, specifying how the input file will be encoded
- streams, specifying which input stream will be encoded using what codec configuration
- muxings, specifying the containerization of the streams
- manifests, to play the encoded content using the HLS or DASH streaming format.
Now we can start the encoding with one API call, including additional configuration so the DASH and HLS Default-Manifests are created as part of the encoding process too:
const startEncodingRequest = new StartEncodingRequest({
    manifestGenerator: ManifestGenerator.V2,
    vodDashManifests: [
        new ManifestResource({manifestId: dashManifest.id})
    ],
    vodHlsManifests: [
        new ManifestResource({manifestId: hlsManifest.id})
    ]
});

await bitmovinApi.encoding.encodings.start(encoding.id, startEncodingRequest);
What happens next: After the successful start of the encoding, it will change its state from CREATED to STARTED, and shortly after that to QUEUED. RUNNING it will be in as soon as the input file starts to get downloaded and processed. Eventually FINISHED will indicate a successful encoding and upload of the content to the provided Output destination. More details about each encoding status can be found here.
Step 10: Final Review
Congratulations! You successfully started your first encoding :) and this is only the beginning. The Bitmovin Encoding API is extremely flexible and allows many customizations and provides with access to the latest codecs and video streaming optimizations and technologies out there. Have a look at the API Reference to learn more.
More Examples
You can find many more fully functional code examples in our Github Repository: Github
Updated 4 months ago