Live Encoding captions generation with Azure Speech Services
This is a Live Encoding tutorial about generating captions automatically using Bitmovin’s integration of Azure Speech Services
Overview
Azure Speech Services provides a transcribing service with speech-to-text capabilities with high accuracy. Bitmovin Live encoding service integrates Azure Speech Services to create auto-generated captions in realtime with a simple setup. A full Java code example for starting a Live Encoding with HLS manifest is linked.
Requirements
- Encoder Version: v2.200.0 or higher
- Bitmovin Encoding API SDK Version: v1.195.0 or higher
- Azure Speech Services account
- Subscription key and region
How to Setup
Using the Dashboard UI
The Live Wizard will allow you to create a simple manifest with some defaults applied, for more customised options we recommend using the API.
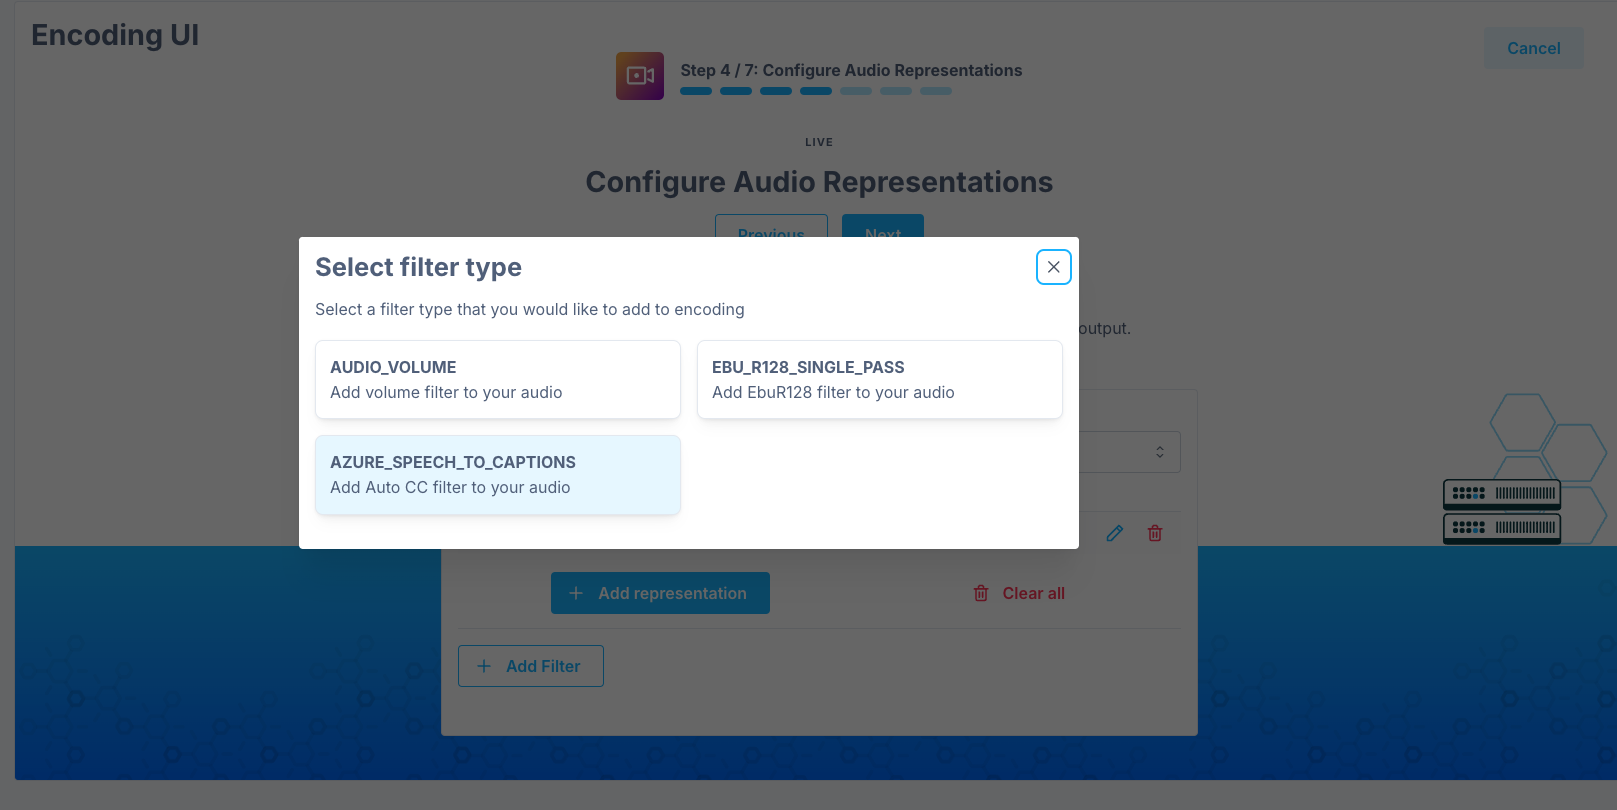
Open the Live Encoding Wizard and in Step 3 select Add Filter.
From the available list select AZURE_SPEECH_TO_CAPTIONS
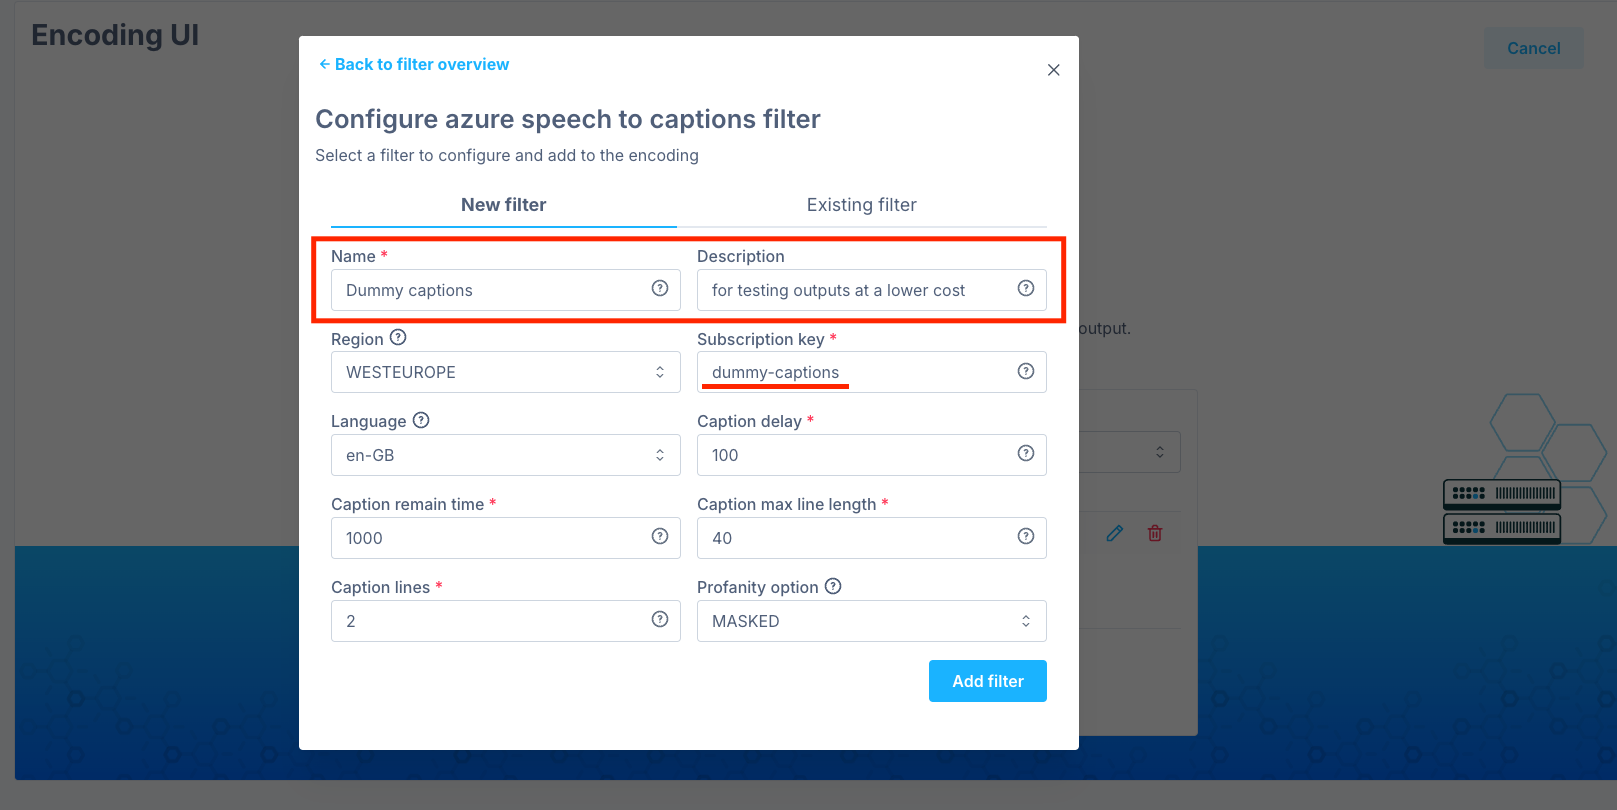
Next you will see the configuration options, you will need to use your Subscription key for the Azure Cognitive Services with this, then match the settings with the service configuration such as the region and language.

Testing without a subscription
For testing purposes, to modify the style options for example, we offer the option to use Dummy Captions.
To enable this, in the subscription key field, just enter dummy-captions instead.
Using the API
- Start a Bitmovin Live encoder using the Java API code example from SRT Live Encoding HLS with Azure Speech To Captions Filter
- You can configure the Live Input in any of the supported formats detailed in Live Inputs
- After adding the properties needed to create an encoding detailed in other tutorials, it’s time to add the different streams and codec configurations
- Add Video and Audio Codec Configurations as usual
- Follow the instructions in the following section to [Add a subtitle stream with AzureSpeechToCaptionsFilter](#Add a subtitle stream with AzureSpeechToCaptionsFilter)
- Start the Live Encoding and start streaming into it once it is ready
Add a subtitle stream with AzureSpeechToCaptionsFilter
As detailed in the example SRT Live Encoding HLS with Azure Speech To Captions Filter , in order to use Azure Speech Services to create auto-generated captions we need to configure first a subtitle stream for our encoding.
Create WebVTT subtitle configuration
In this example we are going to create a WebVTT subtitle configuration for our encoding to store the captions produced by the live encoder. We are setting the default values cueIdentifierPolicy to INCLUDE_IDENTIFIERS and appending zeroes when hours = 0 by setting the appendOptionalZeroHour to True. For more details check the WebVTT configuration documentation.
private static SubtitleConfiguration createWebVttConfig(String name) {
    WebVttConfiguration webVttConfiguration = new WebVttConfiguration();
    webVttConfiguration.setName(name);
    webVttConfiguration.setCueIdentifierPolicy(WebVttCueIdentifierPolicy.INCLUDE_IDENTIFIERS);
    webVttConfiguration.setAppendOptionalZeroHour(Boolean.TRUE);

    return bitmovinApi.encoding.configurations.subtitles.webvtt.create(webVttConfiguration);
}
Add AzureSpeechToCaptionsFilter to a subtitle stream
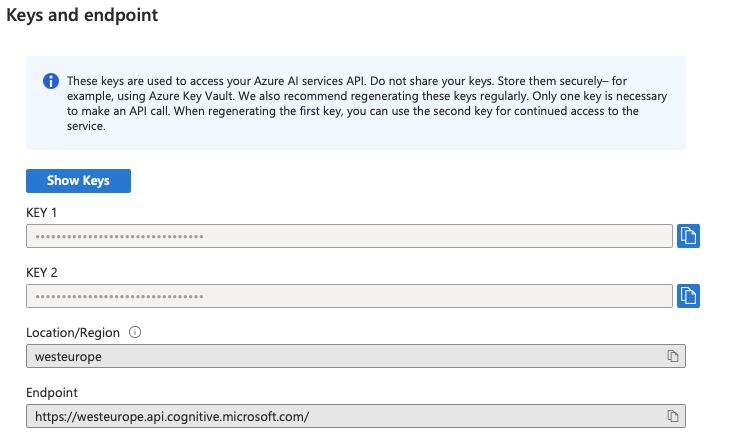
In order to create the AzureSpeechToCaptionsFilter we first need to gather the credentials from the Azure Speech Services. This is an example of what we can find in the azure portal:
With this information we can configure the filter as follows:
private static AzureSpeechToCaptionsFilter createAzureSpeechToCaptionsFilter() {
     AzureSpeechServicesCredentials azureSpeechServicesCredentials = new AzureSpeechServicesCredentials();
     azureSpeechServicesCredentials.setSubscriptionKey(configProvider.getAzureSpeechSpeechServicesSubscriptionKey());

     AzureSpeechToCaptionsSettings azureSpeechToCaptionsSettings = new AzureSpeechToCaptionsSettings();
     azureSpeechToCaptionsSettings.setAzureSpeechServicesCredentials(azureSpeechServicesCredentials);
     azureSpeechToCaptionsSettings.setRegion(configProvider.getAzureSpeechSpeechServicesRegion());
     azureSpeechToCaptionsSettings.setLanguage("en-US");
     azureSpeechToCaptionsSettings.setCaptionDelay(100L);
     azureSpeechToCaptionsSettings.setCaptionRemainTime(1000L);
     azureSpeechToCaptionsSettings.setCaptionMaxLineLength(40L);
     azureSpeechToCaptionsSettings.setCaptionLines(2L);
     azureSpeechToCaptionsSettings.setProfanityOption(AzureSpeechToCaptionsProfanity.MASKED);

     AzureSpeechToCaptionsFilter azureSpeechToCaptionsFilter = new AzureSpeechToCaptionsFilter();
     azureSpeechToCaptionsFilter.setAzureSpeechToCaptionsSettings(azureSpeechToCaptionsSettings);

     return bitmovinApi.encoding.filters.azureSpeechToCaptions.create(azureSpeechToCaptionsFilter);
}- The
configProvidergets thesubscriptionKeyandregionfor the filter - The
languageis set toen-US(IETF BCP 47 language tag) as documented in the list of supported languages of Azure's official documentation . - The
captionDelayis set to100MILLISECONDS to delay the display of each caption, to mimic a real-time experience - The
captionTemainTimeis set to remain1 secondon screen - The
profanityOptionis configured so it replaces letters in profane words with asterisk(*)characters.
Now the filter can be added to the created subtitle stream
Stream subtitleStream = createStream(encoding, input, webVttConfig);
addFiltersToStream(encoding, subtitleStream, getStreamFilterList(Collections.singletonList(azureSpeechToCaptionsFilter)));
Create Chunked Text Muxing
In order to have the webVTT subtile packaged correctly we create a Chunked Text muxing which is creating a segmented webVTT segmented output where the manifest playlist will load the segments from.
 private static ChunkedTextMuxing createChunkedTextMuxing(
      Encoding encoding,
      Output output,
      String outputPath,
      Stream stream,
      Double segmentLength,
      Integer startOffset) {

    MuxingStream muxingStream = new MuxingStream();
    muxingStream.setStreamId(stream.getId());

    ChunkedTextMuxing chunkedTextMuxing = new ChunkedTextMuxing();
    chunkedTextMuxing.addOutputsItem(buildEncodingOutput(output, outputPath));
    chunkedTextMuxing.addStreamsItem(muxingStream);
    chunkedTextMuxing.setSegmentLength(segmentLength);
    chunkedTextMuxing.setSegmentNaming("webvtt_segment_%number%.vtt");
    chunkedTextMuxing.setStartOffset(startOffset);

    return bitmovinApi.encoding.encodings.muxings.chunkedText.create(encoding.getId(), chunkedTextMuxing);
  }
In this example we set the parameters to have a chunkLenght of 4.0 seconds, which matches the one of Video and Audio. Also the segments will have a segment naming webvtt_segment_%number%.vtt which will translate to webvtt_segment_0.vtt, webvtt_segment_1.vtt, webvtt_segment_2.vtt…
createChunkedTextMuxing(encoding, output, "/subtitles", subtitleStream, 4.0, 10);Summary
In this page we learned how to configure a Live encoding using SRT as an input, adding a subtitle stream with the Azure Speech Services Filter and creating auto-generated captions with an HLS manifest output using our default HLS manifest creation.
This powerful combination ensures your live streams are more accessible and engaging for all viewers with a seamless integration of Azure's highly accurate speech-to-text capabilities and Bitmovin's live encoding. So now you can provide real-time captions, making your content more inclusive and professional.
Updated 6 months ago