SRT API Configuration
Introduction
The Bitmovin cloud encoding service is a powerful tool for live streaming, and our API makes it easy to implement. This tutorial concentrates on feeds contributed with the SRT protocol.
SRT is a transport protocol, based on UDP, that enables the secure, reliable transport of data across unpredictable networks, such as the Internet. While any data type can be transferred via SRT, it is particularly optimized for audio/video streaming. Initially developed by Haivision Systems Inc., the SRT protocol was released as open source in April 2017 in partnership with Wowza Media Systems Inc.
There are basically 4 steps involved when it comes to using SRT with our live streaming service in the cloud.
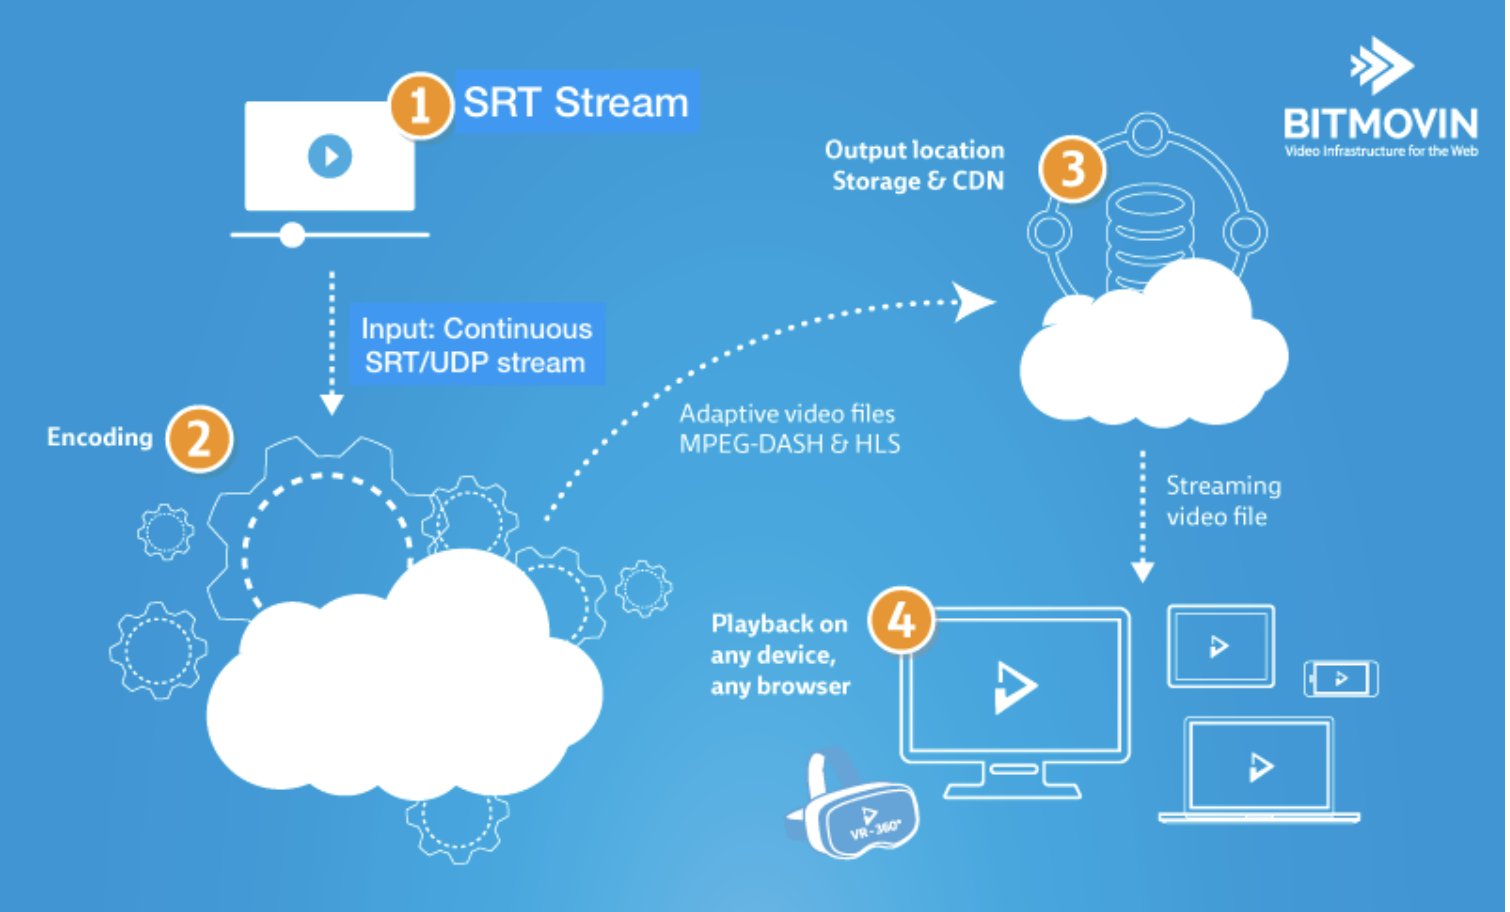
1. Ingest SRT Stream to our Live Encoder
Usually a mezzanine or "contribution" encoder that is processing the live signal will transcode this signal to a high quality mezzanine format and ingest it at the SRT ingest point in our live encoder.
In this tutorial, the contribution encoder will act as an SRT Caller, while our live encoder will act as an SRT Listener which waits for a connection from the Caller.
If your contribution encoder supports SRT Caller mode, you stream its live stream directly to our live encoder. If your contribution encoder supports only standard protocols such as RTMP, you can send its RTMP output live stream to a Wowza Media Server which will convert the stream into SRT and send it to our live encoder.
2. Encoding of the Input Stream to MPEG-DASH and HLS
You can define multiple output resolutions and bitrates for MPEG-DASH and HLS, define if you want to encode to H.264 (AVC) or H.265 (HEVC). There are literally no limits in defining what output you want from our live encoder, e.g. it can easily handle multiple 4k 60FPS streams encoded to HEVC.
In this tutorial, we will create a simple adaptive stream with three video renditions (H.264, 1080p/720p/480p) and one audio rendition (AAC, 128kbps). The stream will be playable using the DASH or HLS streaming protocols.
3. Direct Output to Your Storage
Our live encoder writes the encoded files directly to your AWS S3 or GCS bucket. You could use this output storage as origin for your CDN or for multiple CDNs. This works well with GCS as Google offers a CDN Interconnect for several CDNs such as Akamai, Fastly, Level3, HighWinds, CloudFlare, Limelight, and Verizon. AWS S3 could also easily be connected with their Cloudfront CDN and provides you an out-of-the-box solution in one cloud.
In this tutorial, we will write the encoded files to an AWS S3 bucket of yours, from where you will be able to stream it using DASH or HLS.
4. Playback on any Device, or Browser
If you are using the Bitmovin HTML5 player your content will playback on any device or browser. However, you are not limited to use our player and can also choose among others as described in our recent blog post on encoding for multiple HTML5 Players. You can also use the other Bitmovin Player SDKs if you want to build native apps on iOS, Android, Roku and other devices.
In this tutorial, we will play back the DASH and HLS versions of the encoded live stream in our online demo player.
Preparation
To run the example in this tutorial, you need a Bitmovin API Key and credentials for an Amazon AWS S3 bucket.
Starting With The API
Now, let’s see how we can start a live stream that will generate MPEG-DASH and HLS streams from an SRT input.
The following example shows the setup of an SRT live stream, and will be utilizing our Open API SDK for Java. The full example can be found in our Open API Example Repository on Github.
Setting up Your Properties file
First we need to setup the Bitmovin API client with your API key and S3 bucket credentials. For this, create a directory named .bitmovin in your user’s home directory. Then, create a text file named examples.properties in the .bitmovin directory, with the following content:
BITMOVIN_API_KEY=<YOUR_API_KEY>
S3_OUTPUT_BUCKET_NAME=<YOUR_S3_BUCKET_NAME>
S3_OUTPUT_ACCESS_KEY=<YOUR_S3_ACCESS_KEY>
S3_OUTPUT_SECRET_KEY=<YOUR_S3_SECRET_KEY>
S3_OUTPUT_BASE_PATH=/output/encoding_test/doc/srt
Using ConfigProvider to Initialize the API
The OpenAPI client includes a configProvider object which has access to your examples.properties file and thus, to your Bitmovin and S3 credentials. Before we can do anything, we must set up the configProvider.
Next, we set up bitmovinApi, the basic object accessing the Bitmovin API. It gets the API key from configProvider.
configProvider = new ConfigProvider(args);
bitmovinApi =
    BitmovinApi.builder()
        .withApiKey(configProvider.getBitmovinApiKey())
        .withLogger(
             new Slf4jLogger(), Level.BASIC)
        .build();
You will find this code in the main() method of the SrtLiveEncoding class. This is the method where the main workflow resides. It is also the method you later will run in order to start the encoding.
Create an Encoding
Create an encoding object with the simple line
Encoding encoding =
    createEncoding("Live Encoding Test with SRT Input Listener Mode", "Live encoding with HLS and DASH manifest");
This initializes a default encoding which is sufficient for a start.
Please note: For production, to guarantee a stable connection between the contribution encoder and our live encoder, it is crucial to carefully select the cloud and region in which your live encoder will run to reduce latencies.
Our encoder uses Western Europe as the default region. You can set cloud regions by adding attributes to the encoding object in the createEncoding() method.
Create the Live SRT Input
Bitmovin's live encoding service supports SRT ingestion in both Caller and Listener modes. The code below initializes your encoding as SRT Listener, listening at port 2088/udp, ready to receive a stream from your contribution encoder or Wowza server acting as an SRT Caller.
SrtInput input = createSrtInput(SrtMode.LISTENER, 2088, null);If you are interested in the details, please read on. Otherwise you may skip the rest of the section and continue with Create an Output.
Details
The code above calls a method named createSrtInput() which looks like this:
private static SrtInput createSrtInput(SrtMode mode, int port, String host) throws BitmovinException {
    SrtInput srtInput = new SrtInput();
    srtInput.setMode(mode);
    srtInput.setPort(port);
    srtInput.setHost(host);
    SrtInput input = bitmovinApi.encoding.inputs.srt.create(srtInput);
    return input;
  }
The method accepts three parameters, which are explained here:
SrtMode modemust be eitherSrtMode.LISTENERorSrtMode.CALLER. This determines in which SRT Mode the Bitmovin live encoder will run.- It is also possible to configure the latency (in milliseconds) for the SrtInput (e.g.:
srtInput.setLatency(1000);). The default value is 120 ms.
If you experience picture artifacts in the output frames, SRT packet loss could be a cause. Increasing this value can help mitigate this issue.
If the Bitmovin live encoder is running in Listener mode
As a Listener, Bitmovin will wait for a contribution encoder to connect as a Caller. In this case, the other two parameters have the following meaning:
int portis the UDP port at which the Bitmovin live encoder listens for connections from the contribution encoder.
Please note: Currently, port 2088/udp is the only supported port for SRT Listener inputs. Therefore please make sure your contribution encoder calls the Bitmovin encoder on that port, and your firewalls allow outgoing traffic on that port.
String hostmust benull. This is because the Bitmovin live encoder does not need to know the IP address of the calling contribution encoder upfront.
Please note: The IP address of the Bitmovin live encoder (where it listens to incoming SRT calls) will only be determined after you start the encoding, as you will later see. The Bitmovin live encoder's address is chosen by Bitmovin and will typically be different for every new encoding, even if you stop and start the encoding to change parameters. You cannot configure the Bitmovin encoder to assume a certain IP address.
If Bitmovin live encoder is running in Caller mode
As a Caller, Bitmovin live encoder will reach out for the contribution encoder which must run in Listener mode. In this case, the other two parameters have the following meaning:
int portis the UDP port at which the Bitmovin encoder tries to reach the contribution encoder. Please make sure you configure your contribution encoder to listen at this port.String hostis the contribution encoder's IP address, in string format.
Please note: In this tutorial, we are using Bitmovin live enocder in Listener mode.
Create an Output
In this tutorial we are using an AWS S3 bucket as output location of our live encoder. However, it's a simple change to use an Google Cloud Storage bucket as output instead if you prefer.
The output object gets the credentials for the bucket from the configProvider.
Output output = createS3Output(
                    configProvider.getS3OutputBucketName(),
                    configProvider.getS3OutputAccessKey(),
                    configProvider.getS3OutputSecretKey());
Add Video and Audio Codec Configurations
In this section, you will determine the formats into which your live stream will be encoded.
The encoding, or transcoding, will happen in the following steps:
- Select the video and audio tracks of the input stream
- Configure the video resp. audio renditions into which the input tracks will be encoded
Selecting the video and audio tracks from the input stream An input stream can have multiple video and multiple audio tracks, e.g for different angles and languages. For this tutorial, we assume that the input stream (coming from the contribution encoder) only contains one video and one audio track.
For this simple but widely used track layout it is sufficient to tell Bitmovin encoder to select the first available track as source for the video renditions, and the second available track as source for the audio renditions. The first available track has the number 0 and the second has the number 1. We will meet these numbers later in the process.
Configure Video and Audio Renditions A rendition is a way to encode content. For adaptive streaming we typically use multiple video renditions - high quality for fast networks and low bandwidth for slow networks. We only use one audio rendition because audio bandwidth is low compared to video and can be used for both fast and slow network conditions.
A codec configuration contains the configuration for a video rendition or an audio rendition. We will link the video input track to three codec configurations for three different video renditions. We will link the audio input track to one codec configuration.
The following code defines a set of three H264 video profiles. The parameters are the name, the bandwidth (in bps), the height, and the output path. The last parameter is always 0 to select the first track of the input stream, which is the video track.
private static List<VideoConfig> videoProfile =
  Arrays.asList(
    new VideoConfig("480p", 800_000L, 480, "/video/480p", 0),
    new VideoConfig("720p", 1_200_000L, 720, "/video/720p", 0),
    new VideoConfig("1080p", 3_000_000L, 1080, "/video/1080p", 0));
The code below transforms the video profiles into codec configurations of type H264VideoConfiguration. This will encode the input stream's video part using the H.264 codec. Of course it is possible to use other codecs as well, such as VP9 or H.265/HEVC.
for (VideoConfig videoConfig : videoProfile) {
      H264VideoConfiguration h264Configuration =
          createH264VideoConfig(videoConfig.height, videoConfig.bitRate);
      Stream stream =
          createStream(encoding, input, h264Configuration, videoConfig.inputStreamPosition);

      createFmp4Muxing(encoding, stream, output, videoConfig.outputPath);
    }
Here the lines mean the following:
H264VideoConfiguration h264Configuration =
          createH264VideoConfig(videoConfig.height, videoConfig.bitRate)
This line creates a h264Configuration object which uses the height and the bitrate of the video profile. Because the aspect ratio of the source is kept, with height you can control the resolution of the rendition and with bitRate the bandwith and hence, quality.
Stream stream =
           createStream(encoding, input, h264Configuration, videoConfig.inputStreamPosition);
This line links the h264Configuration object to the input stream's track which is depicted by the video profile's inputStreamPosition (Remember that this is 0 for the video track). The line basically defines a task to "encode the input stream's video track with the given H.264 configuration". Also, this task is linked to the encoding object we created earlier, making it part of the encoding. The whole encoded video rendition is referenced as a stream.
createFmp4Muxing(encoding, stream, output, videoConfig.outputPath);This line is explained in the next section of this tutorial.
For audio it works pretty much the same way as for video as you can see in this code sample:
First, the predefined audio profile:
private static List<AudioConfig> audioProfile =
     Collections.singletonList(new AudioConfig("128kbit", 128_000L, "/audio/128kb", 1));
Then, the code that creates an AAC audio configuration out of the profile and links it to the audio track of the input stream
for (AudioConfig audioConfig : audioProfile) {
      AacAudioConfiguration aacConfig = createAacAudioConfig(audioConfig.bitrate);
      Stream audioStream =
          createStream(encoding, input, aacConfig, audioConfig.inputStreamPosition);

      createFmp4Muxing(encoding, audioStream, output, audioConfig.outputPath);
    }
Again, the line createFmp4Muxing(..) is explained in the next section.
Create Muxings for MPEG-DASH and HLS
In the previous section we have explained how the input stream is encoded, but in order to write down the encoded data it must be packaged into a container format.
As the content will be used for MPEG-DASH and HLS streaming, we choose a container format that supports both, named Fragmented MP4 or fMP4. This format cuts the stream in multiple small, numbered files called Segments.
The following line of code, which was already seen in the previous section, defines an fMP4 container format. Because writing an encoded stream into a container is also known as "multiplexing", or short muxing, container formats are also known as muxings.
createFmp4Muxing(encoding, stream, output, videoConfig.outputPath);This line takes an encoded video rendition (stream) from an encoding, and packages it into the fMP4 format. Then it writes the fMP4 segments to the output, which is the S3 bucket we configured earlier. The segments are written into the outputPath defined in the video profile.
Define the MPEG-DASH and HLS Live Manifests
So far we have defined how to encode the input streams and package the encoded streams into fMP4 segements which will reside on your output bucket.
In order to playback content using MPEG-DASH or HLS, we also need to have manifests. A manifest is a text or XML file which describes the adaptive output stream so a player always knows which segments to retrieve and playback next. Manifests tell the player which renditions are available and where to get them. Typically a stream has a set of interlinked manifests. HLS and MPEG-DASH manifests differ in format. But both formats eventually retrieve and playback the fMP4 segments created by the Bitmovin live encoder.
With the Bitmovin API you have full control over creating manifests, e.g. create multiple manifests with different renditions.
When creating the Live MPEG-DASH or Live HLS manifest (or manifests), you also specify where it is output, with path location and filename for the manifest.
DashManifest dashManifest = createDashManifest(output, "/", encoding);
HlsManifest hlsManifest = createHlsManifest(output, "/", encoding);

LiveDashManifest liveDashManifest = new LiveDashManifest();
liveDashManifest.setManifestId(dashManifest.getId());
liveDashManifest.setTimeshift(300D);
liveDashManifest.setLiveEdgeOffset(90D);

LiveHlsManifest liveHlsManifest = new LiveHlsManifest();
liveHlsManifest.setManifestId(hlsManifest.getId());
liveHlsManifest.setTimeshift(300D);
You also have the option to set specific live options, such as the timeshift parameter that defines how many seconds a user will be able to seek back in time. In the example below we allow the users to seek back 5 minutes. For MPEG-DASH you can also define how far away from the real live signal the player will start to playback the segments. If you are not aiming for low latency live streams, choose a value between 60 and 120 seconds to give the player enough room for buffering.
Start the Live Encoding
Now that we have defined every aspect of the live encoding, we can finally start the live stream using both created manifests in the start call.
For this, we define a new StartLiveEncodingRequest object named startRequest and add both manifests to it:
StartLiveEncodingRequest startRequest = new StartLiveEncodingRequest();
startRequest.addDashManifestsItem(liveDashManifest);
startRequest.addHlsManifestsItem(liveHlsManifest);
Automatic shutdown
Optionally an automatic shutdown can be defined for the live encoding. The automatic shutdown can be defined via the LiveAutoShutdownConfiguration. There are two possible settings. The bytesReadTimeoutSeconds defines how long the live stream will run after an input loss and the streamTimeoutMinutes defines the time after which the live stream will be automatically shut down.
LiveAutoShutdownConfiguration shutdownConfig = new LiveAutoShutdownConfiguration();
shutdownConfig.setStreamTimeoutMinutes(240L);
shutdownConfig.setBytesReadTimeoutSeconds(600L);
startRequest.setAutoShutdownConfiguration(shutdownConfig);
Starting the Example
The startLiveEncodingAndWaitUntilRunning() method with both the configured encoding and the startRequest will start the encoding.
startLiveEncodingAndWaitUntilRunning(encoding, startRequest);To start the example and actually run a live encoding with SRT input, run the main() method of the SrtLiveEncoding class in the SrtLiveEncoding.java file.
Retrieve SRT Ingest Point Information
After starting the live encoding, you need to wait for it to be ready before you can ingest your SRT stream. This may take a few minutes.
Once it is ready you can easily query the live stream details and (for example) print it to the console:
 LiveEncoding liveEncoding = waitForLiveEncodingDetails(encoding);
 logger.info(
         "Live encoding is up and ready for ingest. SRT URL: srt://{}:{}",
         liveEncoding.getEncoderIp(),
         input.getPort());
The SRT URL will look like this: srt://123.45.67.89:2088
If Bitmovin is running in Listener Mode
The SRT URL is the URL that the Bitmovin live encoder is listening on. Your contribution encoder needs to call the SRT URL and send the SRT stream to it.
If Bitmovin is running in Caller Mode
The SRT URL is the URL that your contribution encoder needs to listen on, waiting for calls from the Bitmovin live encoder.
Please note that in this tutorial we are running the Bitmovin live encoder in Listener mode.
After retrieving the SRT URL, please start your contribution encoder and send the live stream via SRT to the Bitmovin live encoder.
Playback the Live Stream
The live stream can be played back with a compatible player. Bitmovin has a test player page: https://bitmovin.com/demos/stream-test
In this page, enter your DASH or HLS URL in order to play back your live stream.
Provided you use your S3 bucket and the settings in this example, the URLs will look like this:
DASH
https\://\<your\_bucket\_name>.s3-\<cloud\_region>.amazonaws.com/output/encoding\_test/doc/srt/SrtLiveEncoding/stream.mpdHLS
https\://\<your\_bucket\_name>.s3-\<cloud\_region>.amazonaws.com/output/encoding\_test/doc/srt/SrtLiveEncoding/master.m3u8Shutdown the Live Encoding
Because of this mechanism to provide a continuous output, the live encoding won't stop automatically when the input feed stops. You therefore have to shut the encoding down at the end of your event, to avoid generating unnecessary costs in your account. The following code shows how to stop a live encoding:
logger.info("Shutting down live encoding!");
bitmovinApi.encoding.encodings.live.stop(encoding.getId());
waitUntilEncodingIsInState(encoding, Status.FINISHED);
You can also use the Bitmovin dashboard to stop the encoding. The controls are shown in the Live Encoding details.
Updated 6 months ago