Using Bitmovin Cloud Connect with Azure
This document explains how to set up Bitmovin Encoding on Azure Cloud infrastructure so that the Bitmovin platform can run encoders using the Azure API.
The instructions in this document for the REST API Services apply to live encoding and file-based encoding. For a complete list of formats and input types, see the Bitmovin website.
Prerequisites
Activation requiredThis feature requires a commercial agreement and needs to be specifically activated for a Bitmovin account, it is not available by default. You will not be able to complete the configuration below without this activation.
- A Bitmovin account enabled for usage of Cloud Connect
- If you want to use Cloud Connect with a sub organization, this sub organization must be enabled for usage of Cloud Connect
- An Azure account
- with a "Microsoft.Compute > Total Regional vCPUs" quota for your region of at least "8" (also see Resource Quotas below)
Note: A free Azure trial subscription is not sufficient for Cloud Connect, as it has a "Total Regional vCPUs" quota of "4". Consider upgrading your subscription at least to an Azure Pay as you go (PAYG) plan and requesting a quota increase in your desired region.
Configure your Azure account
In this section, you will create a separate resource group that will be used by the Bitmovin platform when interacting with your Azure infrastructure. Also, we will create the appropriate infrastructure setup to enable Encoding jobs.
Add the bitmovin-azure-connect application
bitmovin-azure-connect applicationThe bitmovin-azure-connect application is used to access the Azure Compute Gallery (previously Shared Image Gallery) where the images reside that are required to start virtual machines (VMs) for Bitmovin encodings.
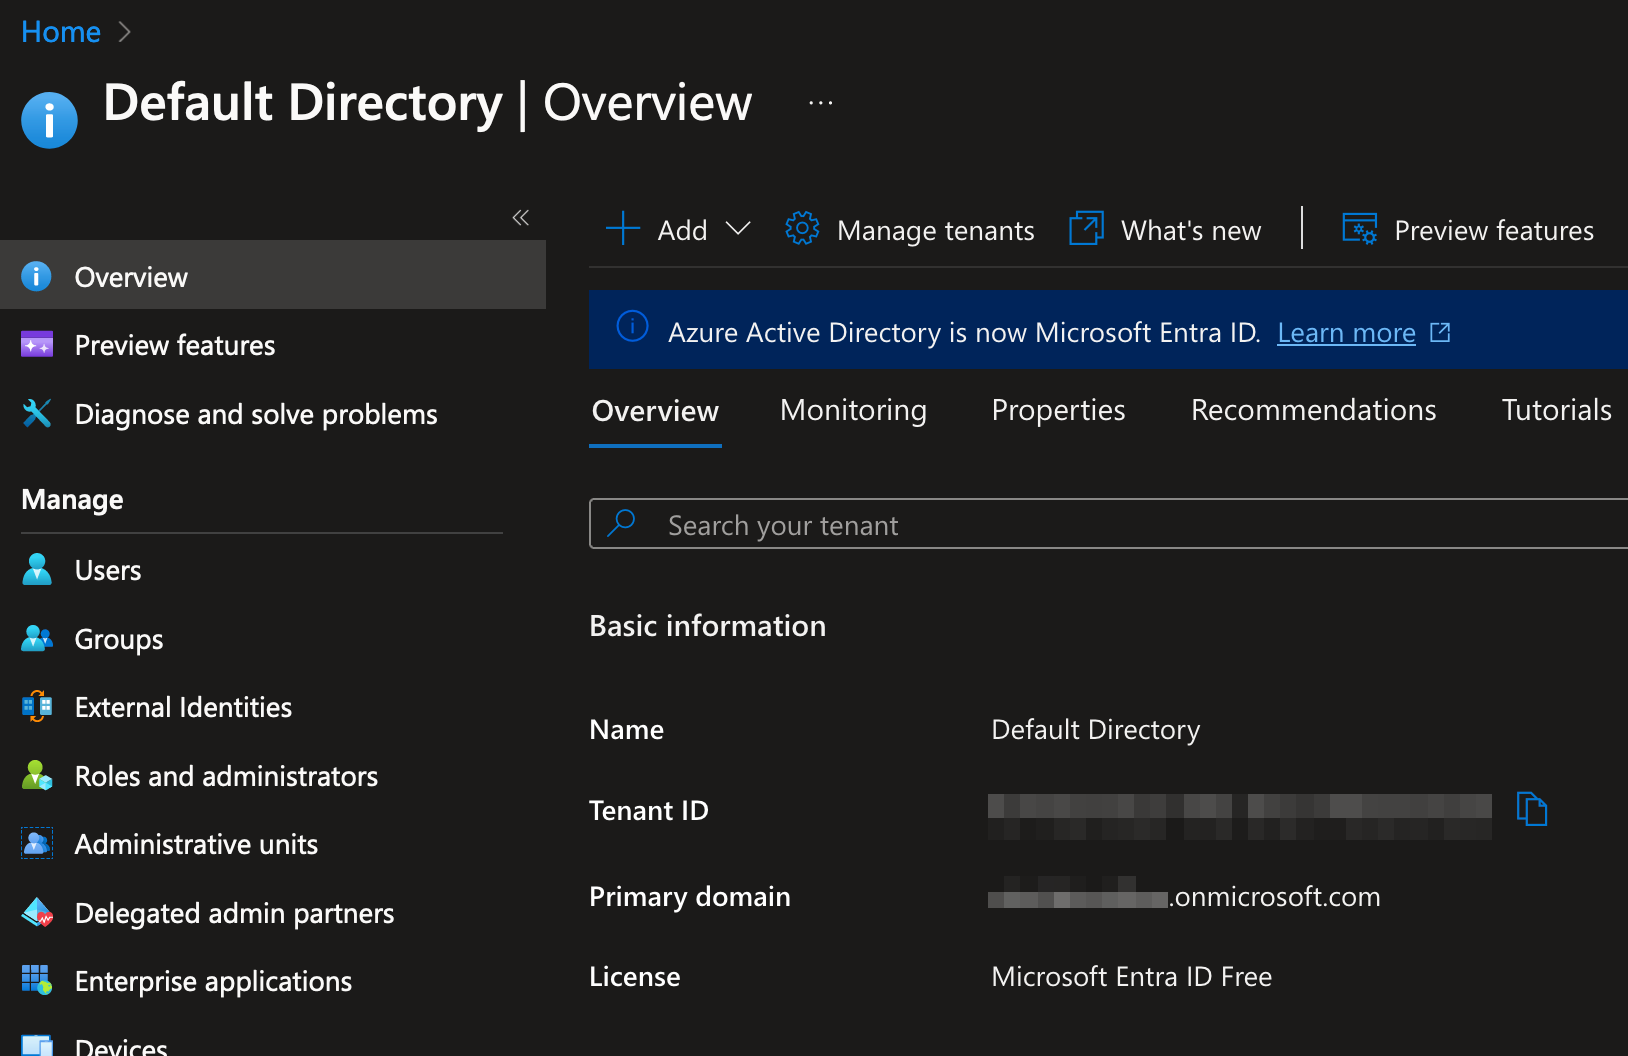
- Open the Azure portal: https://portal.azure.com/#blade/Microsoft_AAD_IAM/ActiveDirectoryMenuBlade/Overview
- Copy your Tenant ID from "Overview > Basic information"
- Replace
<Your Tenant ID>with your Tenant ID in the following link and open it in your browser:
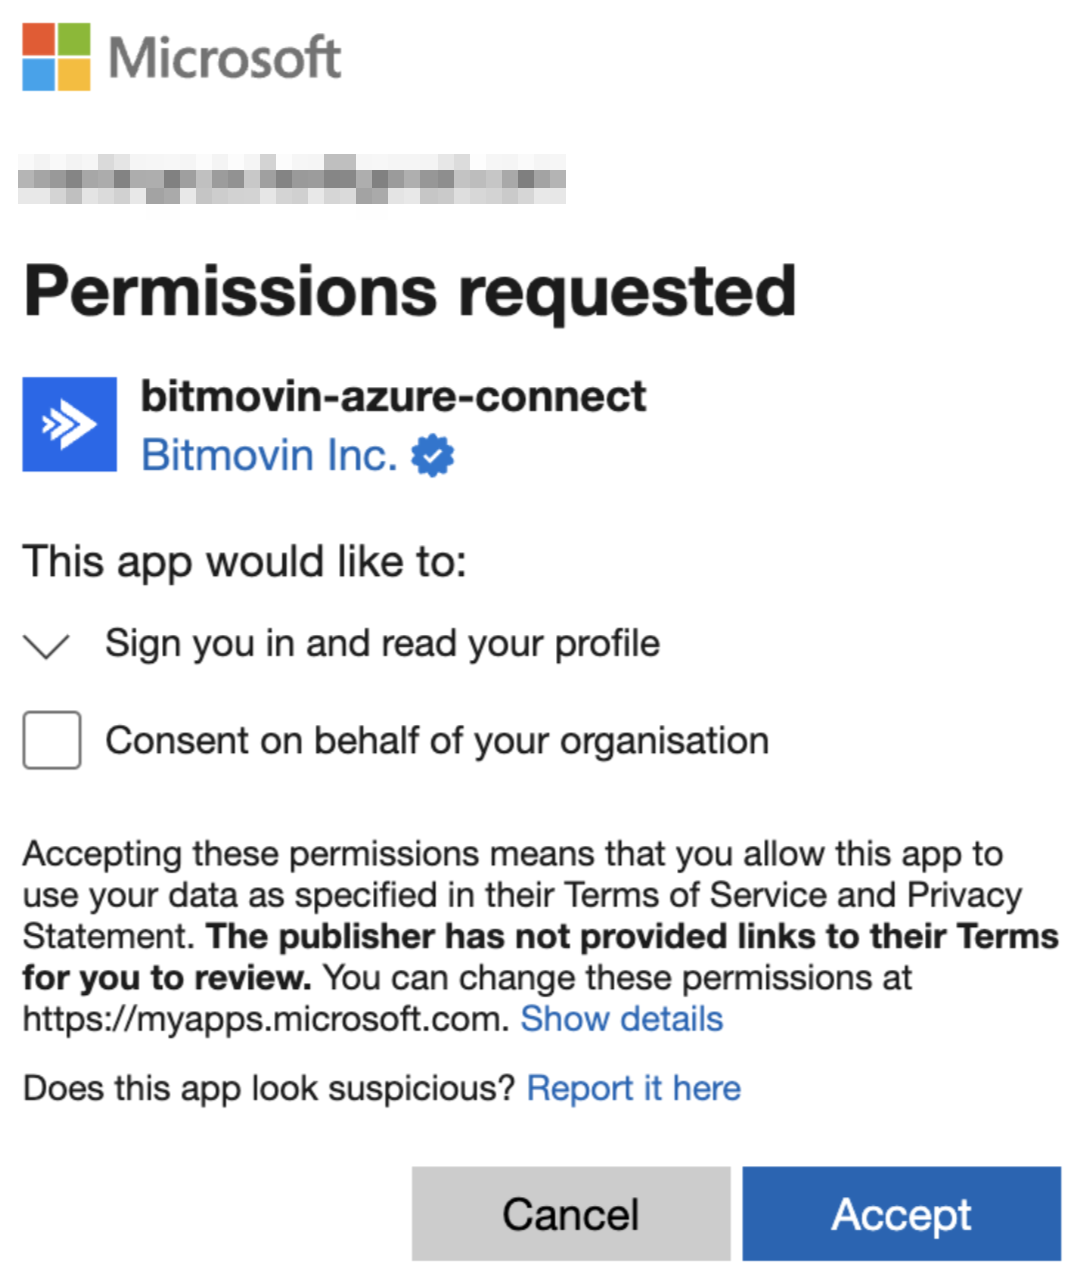
https://login.microsoftonline.com/<Your Tenant ID>/oauth2/authorize?client_id=ad59b58a-9910-409a-909e-cf98258bb566&response_type=code&redirect_uri=https%3A%2F%2Fbitmovin.com%2F- This will will open a "Permissions requested" modal for
bitmovin-azure-connect, then click the "Accept" button
Create a Resource group
This Resource group is a container to hold all Bitmovin-related resources to run Cloud Connect Encoding jobs. (See: https://learn.microsoft.com/azure/azure-resource-manager/management/manage-resource-groups-portal) Additionally, we will add the bitmovin-azure-connect application to the Resource group to manage Virtual machines.
- Open the Subscriptions service and select your subscription: https://portal.azure.com/#view/Microsoft_Azure_Billing/SubscriptionsBladeV2
- Go to "Settings > Resource groups" in the sidebar, then click the "Create" button
- In "Basics" (Step 1), provide a "Resource group" name and "Region" of your choice, then click the "Review + create" button
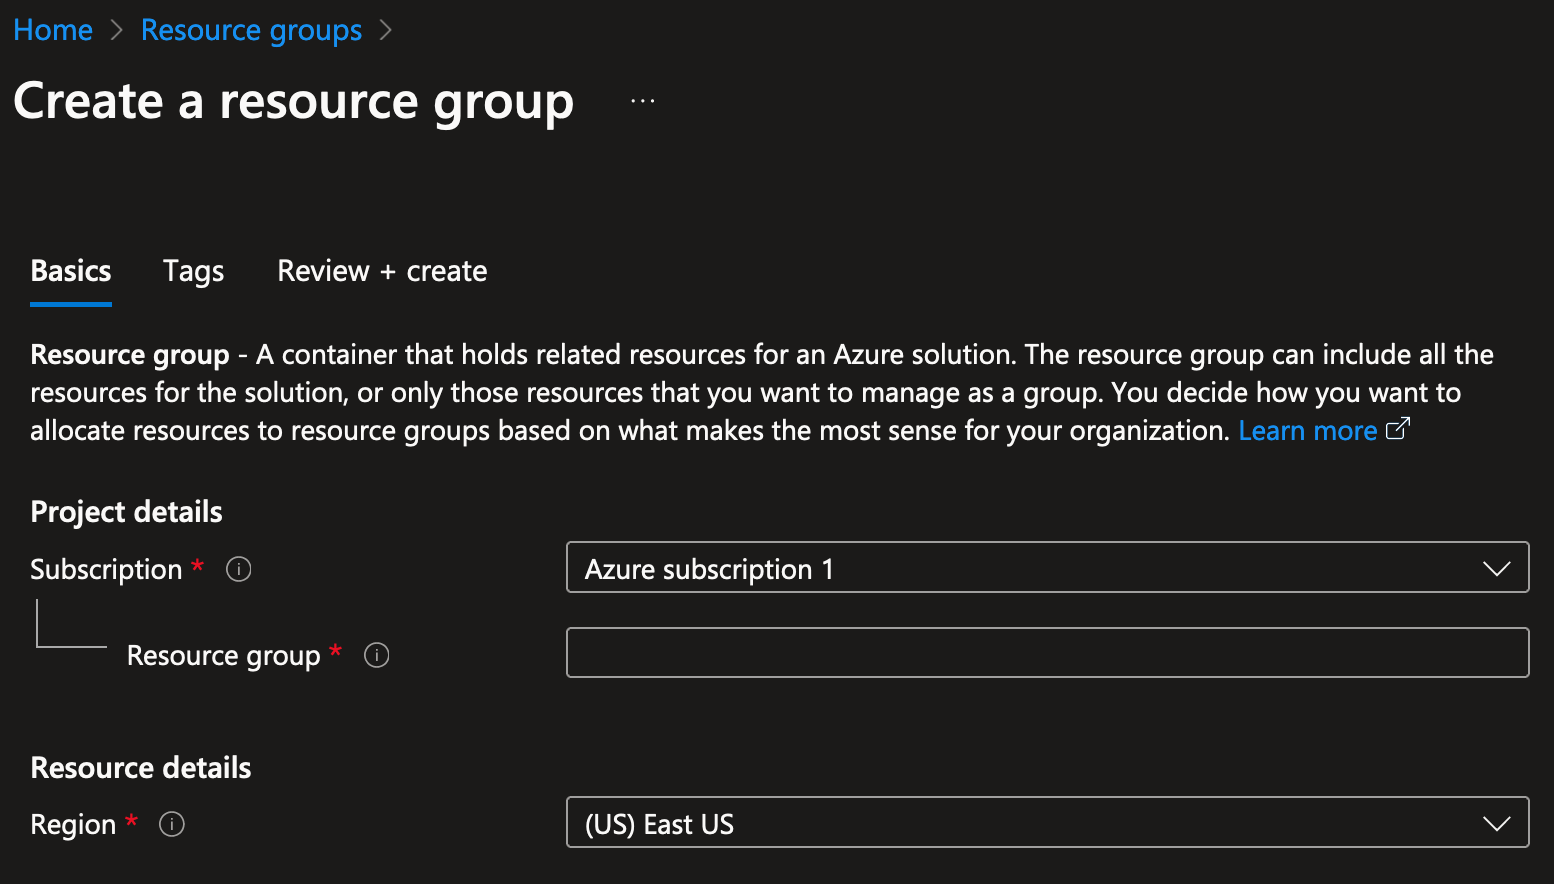
- In "Review + create" (Step 3), wait until the validation passed, then click the "Create" button
Allow the bitmovin-azure-connect application to run Virtual machines
bitmovin-azure-connect application to run Virtual machines- Within your Subscription, open the newly created Resource group
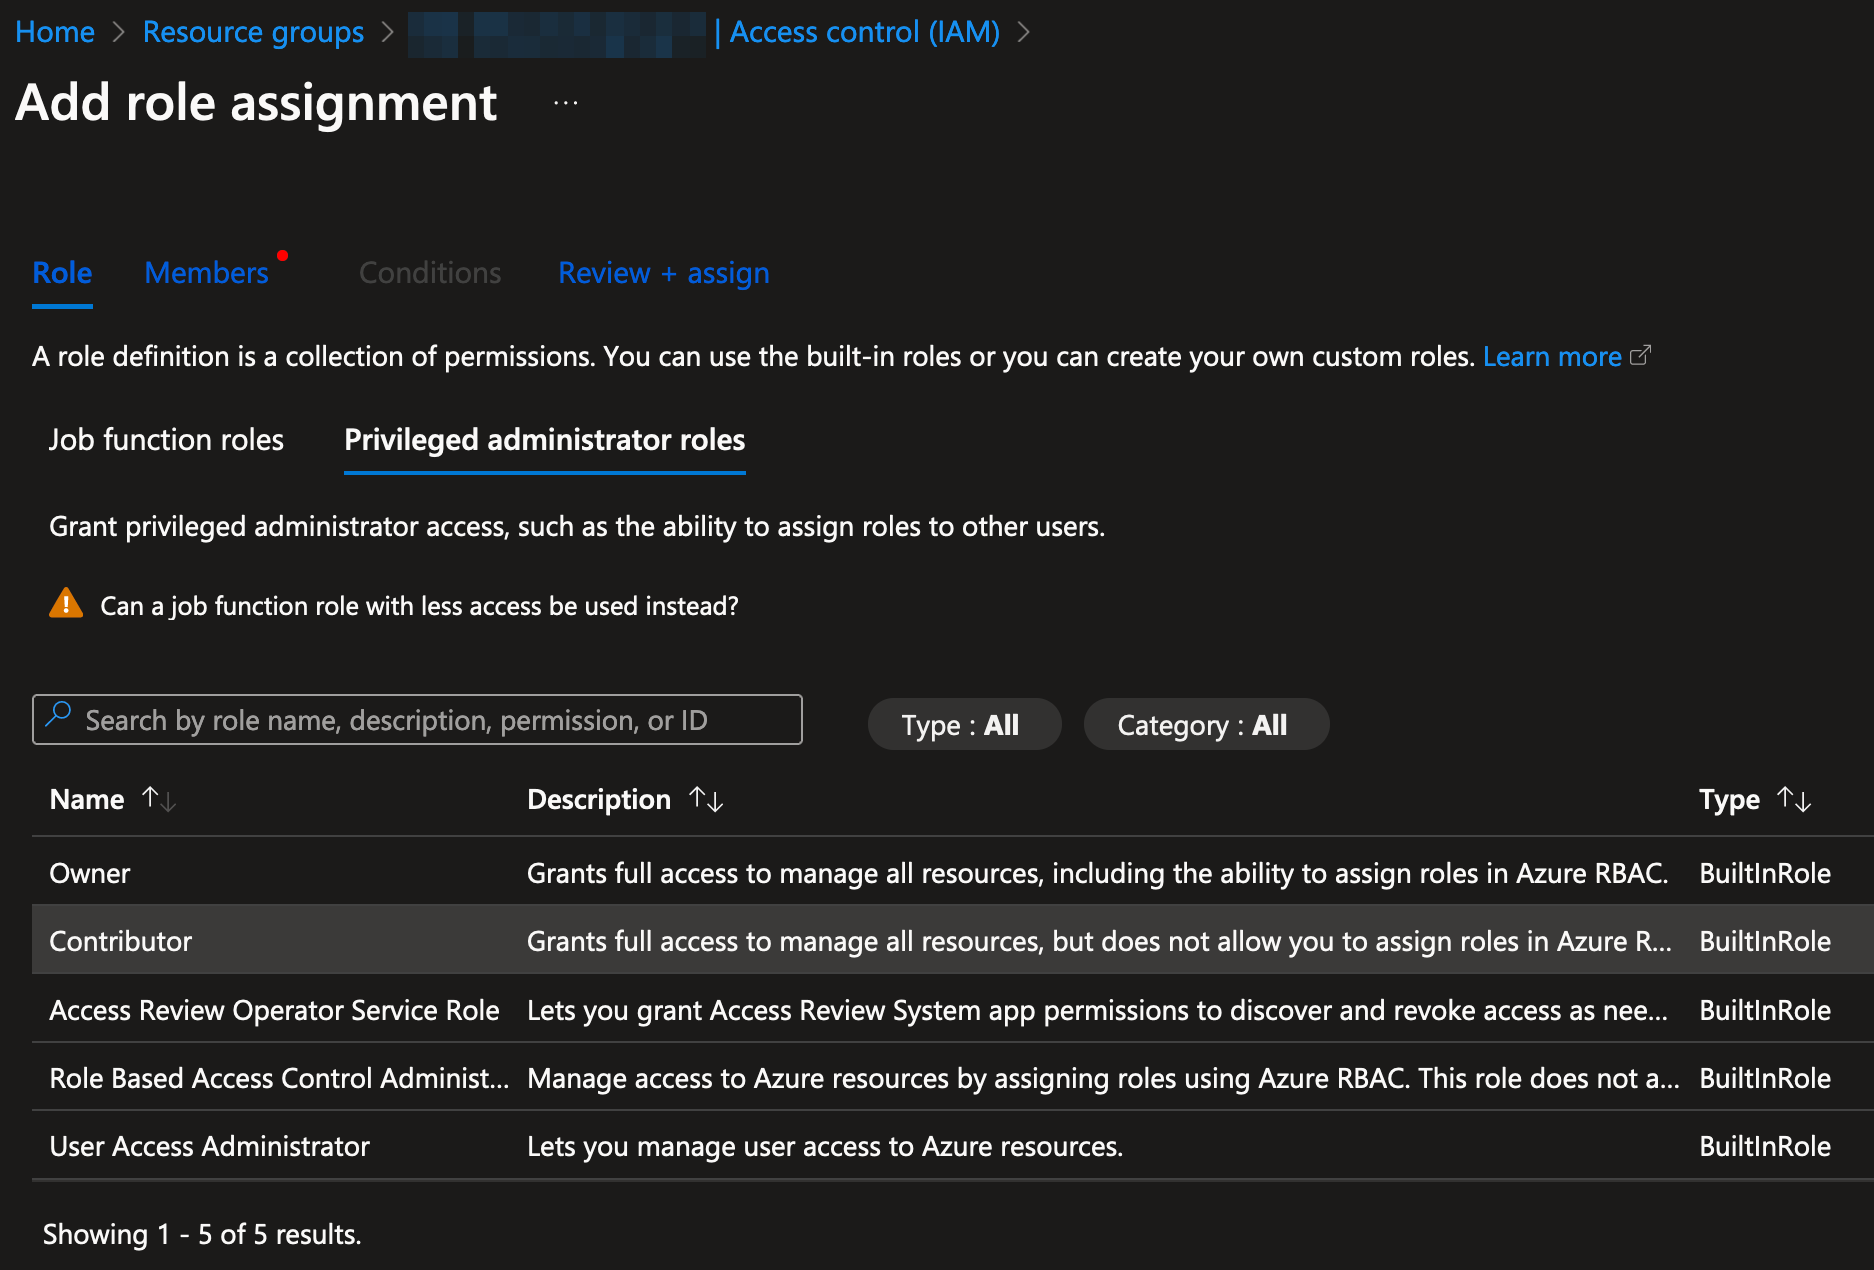
- Go to "Access control (IAM)" in the sidebar, click the "Add" button and select "Add role assignment"
- In "Role" (Step 1), select the "Privileged administrator roles" tab and select the "
Contributor" role, then click the "Next" button
- In "Members" (Step 2), click the "Select members" button. Search for and select the "
bitmovin-azure-connect" application, then click the "Select" button. Then click the "Review + assign" button
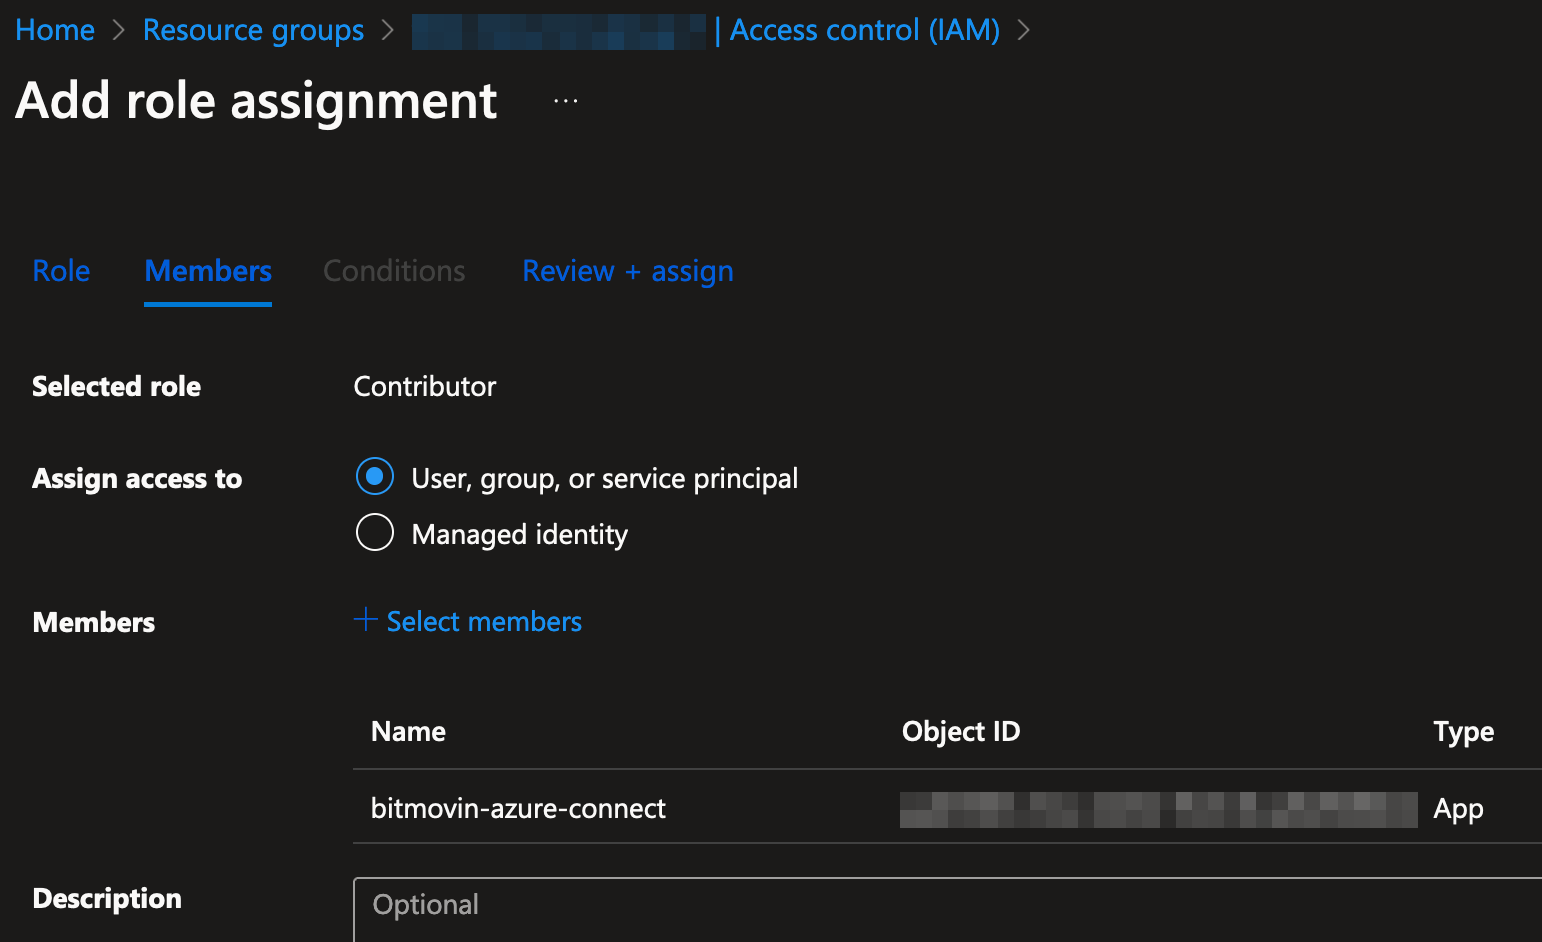
- In "Review + create" (Step 3), click the "Review + assign" button
Tighten permissions for productionIf you want to define and use a fine-grained custom role to narrow down the permissions on that resource group please reach out to the support team to get guidance on the required permissions.
Create a Network security group (per region)
"A network security group contains security rules that allow or deny inbound network traffic to, or outbound network traffic from, several types of Azure resources." (Source: https://learn.microsoft.com/azure/virtual-network/network-security-groups-overview)
Running Encodings in different regionsIf you need to run different Encoding jobs in different regions, repeat the following steps for every region.
- Within your Subscription, open your previously created Resource group, then click the "Create" button
- In the Resource group "Marketplace", search for "
Network security group" - Select "Network security group" (Microsoft Azure Service), then select "Create" and click "Network security group"
- In "Basics" (Step 1), provide a "Name" and "Region" of your choice, then click the "Review + create" button

- In "Review + create" (Step 3), wait until the validation passed, then click the "Create" button
- This will open the "Network security group" after creation, then click the "Go to resource" button
- Go to "Settings > Inbound security rules" in the sidebar, create new rules for each of the following tables by clicking the "Add" button:
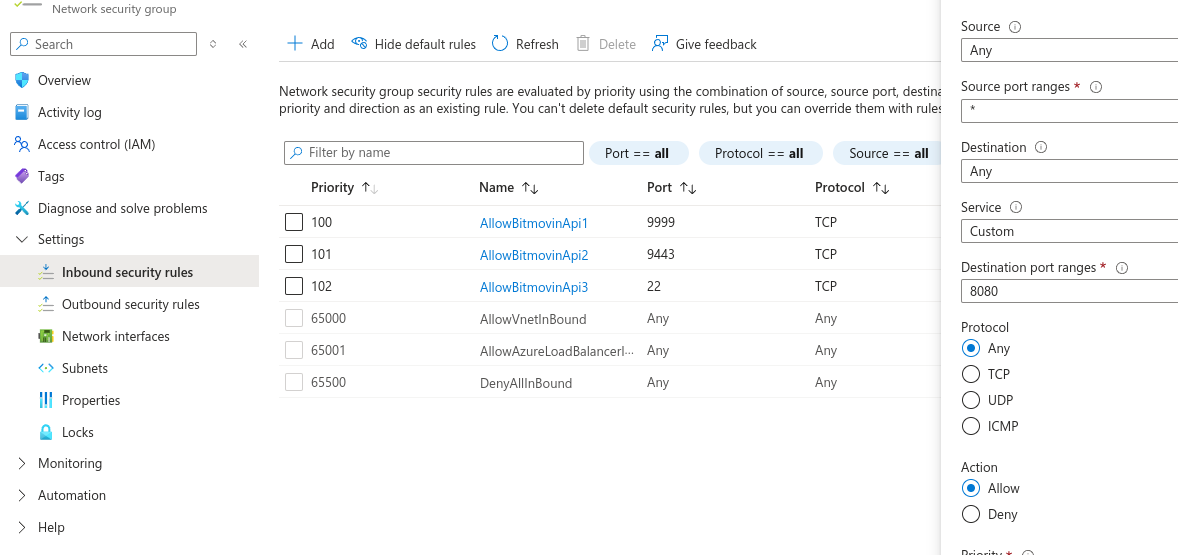
| Key | Value |
|---|---|
| Source | IP Addresses |
| Source IP addresses/CIDR ranges | 104.199.97.13/32, 35.205.157.162/32 |
| Source port ranges | - |
| Destination | Any |
| Service | Custom |
| Destination port ranges | 9999 |
| Protocol | TCP |
| Action | Allow |
| Priority | 100 |
| Name | AllowBitmovinApi1 |
| Key | Value |
|---|---|
| Source | IP Addresses |
| Source IP addresses/CIDR ranges | 104.199.97.13/32, 35.205.157.162/32 |
| Source port ranges | - |
| Destination | Any |
| Service | Custom |
| Destination port ranges | 9443 |
| Protocol | TCP |
| Action | Allow |
| Priority | 101 |
| Name | AllowBitmovinApi2 |
| Key | Value |
|---|---|
| Source | IP Addresses |
| Source IP addresses/CIDR ranges | 104.199.97.13/32, 35.205.157.162/32 |
| Source port ranges | - |
| Destination | Any |
| Service | Custom |
| Destination port ranges | 22 |
| Protocol | TCP |
| Action | Allow |
| Priority | 102 |
| Name | AllowBitmovinApi3 |
Live encodingsAdditional inbound rules are required if you are encoding live streams transported over RTMP, SRT or Zixi.
Additional inbound rules for RTMP live streams
| Key | Value |
|---|---|
| Destination port ranges | 1935 |
| Protocol | TCP |
| Priority | 300 |
| Name | rtmp-listener |
| Description | For RTMP live streams |
| Key | Value |
|---|---|
| Destination port ranges | 443 |
| Protocol | TCP |
| Priority | 302 |
| Name | AllowRTMPSInbound |
| Description | For RTMPS live streams |
Additional inbound rules for SRT live streams
| Key | Value |
|---|---|
| Destination port ranges | 2088 |
| Protocol | TCP |
| Priority | 400 |
| Name | srt-listener-tcp |
| Description | For SRT live streams |
| Key | Value |
|---|---|
| Destination port ranges | 2088 |
| Protocol | UDP |
| Priority | 500 |
| Name | srt-listener-udp-2088 |
| Description | For SRT live streams |
| Key | Value |
|---|---|
| Destination port ranges | 2090 |
| Protocol | UDP |
| Priority | 700 |
| Name | srt-listener-udp-2090 |
| Description | For SRT live streams |
| Key | Value |
|---|---|
| Destination port ranges | 2091 |
| Protocol | UDP |
| Priority | 800 |
| Name | srt-listener-udp-2091 |
| Description | For SRT live streams |
Additional inbound rules for Zixi live streams
| Key | Value |
|---|---|
| Destination port ranges | 4444 |
| Protocol | TCP |
| Priority | 900 |
| Name | zixi-listener |
| Description | For Zixi live streams |
Create a Virtual network (per region)
Running Encodings in different regionsIf you need to run different Encoding jobs in different regions, repeat the following steps for every region.
- Within your Subscription, open your previously created Resource group, then click the "Create" button
- In the Resource group "Marketplace", search for "
Virtual network" - Select "Virtual network" (Microsoft Azure Service), then select "Create" and click "Virtual network"
- In "Basics" (Step 1), provide a "Virtual network name" and "Region" of your choice, then click the "Next" button
- In "IP addresses" (Step 3), delete the default subnet (Name:
default, Size:/24 (256 addresses))
Note: The default IPv4 address space gives you a CIDR notation of
/16with a size of 65,636 IP addresses, which should be sufficient.
- Click the "Add a subnet" button, provide a "Name" of your choice and select "Size" with
/16 (65,536 addresses), then click the "Add" button - Click the "Review + create" button, then finish the creation by clicking the "Create" button
- This will open the "Virtual network" after creation, then click the "Go to resource" button
Assign the Network security group
- Go to "Settings > Subnets" in the sidebar, then select your newly created Subnet
- Select in "Network security group" your previously created Network security group
Configure your Bitmovin account
Before you continue, make sure you have collected the following information from Azure:
- From your Azure account
- Tenant ID
- From your Resource group
- Subscription ID
- Resource group name
- From your Virtual network
- Virtual network name
- Subnet name (under "Settings > Subnets")
Link your Azure account
To enable your Bitmovin account to run encodings in your Azure account, you need to link it with Infrastructure and Region Settings objects.
- Open the Bitmovin Dashboard: https://dashboard.bitmovin.com/
- Go to "VOD/LIVE Encoding > Cloud Connect"
- Click the "Add infrastructure account" button, select the "Microsoft Azure" option, click the "Next" button
- Provide a "Name" of your choice, fill in the Subscription ID, Resource Group ID/Name and Tenant ID, click the "Next" button
- Select the appropriate "Cloud Region" (where the Resource group was created), fill in the Network Name and "Subnet Name", click the "Next" button
Run encoding jobs in Azure
After configuration has been completed, you will be able to run encoding jobs in your own Azure account. To do so, use the Bitmovin API client SDKs to submit encoding jobs, in the same way as you would do for encodings running in the Bitmovin Managed Cloud service. The only difference is that you need to specify the new infrastructure instead of public cloud regions.
Here is a Python snippet demonstrating how to link your encoding to your infrastructure.
    # ID of the Infrastructure object
    infra_id = ‘<infrastructure_id>’

    # Azure region of the Azure-connect setup
    infra_region = CloudRegion.AZURE_EUROPE_WEST
    infrastructure = InfrastructureSettings(infrastructure_id=infra_id,
                            cloud_region=infra_region)

    encoding = Encoding(name='azure connect encoding',
        cloud_region=CloudRegion.EXTERNAL,
        infrastructure=infrastructure,
        encoder_version='STABLE')
Sub Organizations
If you have set up your infrastructure in a sub organization, you must tell the Bitmovin API that you want to run the encoding in that sub organization. Thus, in addition to the code snippet above, make sure to set the tenant_org_id alongside the api_key in the bitmovin_api object:
    # ID of the sub organisation you added the infrastructure to
    organisation_id = '<sub_organisation_id>'

    bitmovin_api = BitmovinApi(api_key=config_provider.get_bitmovin_api_key(),
                       tenant_org_id=organisation_id,
                       logger=BitmovinApiLogger())
Resource Quotas
If you want to run several encodings in parallel, the default limits may not be sufficient. In that case, you will have to request limit increases for the following resource in your Region(s), through the Quotas page:
For the limits to request we will be using these variables:
| Variable name | Explanation |
|---|---|
| (maximum number of encodings) | The maximum number of parallel encodings the infrastructure must be able to run. Typically this is the number of encoding slots assigned to the Bitmovin account or sub-org associated with the infrastructure. |
| (maximum number of instances per encoding) | The number of instances used by one encoding. This number varies depending on the input file size and the number and data rate of the encoder representations. However, we recommend to use 60 as the maximum number of instances per encoding when getting started and to increase this limit if it proves insufficient. For Dolby Vision encodings and conversions, starting from Encoder v2.208.0 , the maximum number of instances have been increased to - 100 instances if the encodingMode configured is STANDARD (which currently maps to TWO_PASS), SINGLE_PASSor TWO_PASS- 200 instances if the encodingMode configured is THREE_PASS |
Using the variables above, please request the following limits:
| Provider | Quota Name | Limit to request |
|---|---|---|
| Microsoft.Network | Public IP Addresses - Basic | (maximum number of encodings) * (max # of instances per encoding) |
| Microsoft.Compute | Standard DSv3 Family vCPUs | (maximum number of encodings) * 8 |
| Microsoft.Compute | Standard FSv2 Family vCPUs | (maximum number of encodings) * 8 |
| Microsoft.Compute | Total Regional vCPUs | (maximum number of encodings) * 8 |
| Microsoft.Compute | Total Regional Spot vCPUs | (maximum number of encodings) (maximum number of instances per encoding) 8 |
| Microsoft.Compute | Virtual Machines | (maximum number of encodings) * (maximum number of instances per encoding) - The default value of 25000 should be sufficient |
| Microsoft.Compute | Virtual Machine Scale Sets | The default value of 2500 should be sufficient |
| Microsoft.Compute | Standard Storage Managed Disks | (maximum number of encodings) * (maximum number of instances per encoding) - The default value of 50000 should be sufficient |
| Microsoft.Compute | Premium Storage Managed Disks | (maximum number of encodings) * (maximum number of instances per encoding) - The default value of 50000 should be sufficient |
This implies the standard case: 8 core instances. If your use case requires instances with a different number of cores, multiply by that.
The maximum number of instances needed depends on the maximum number of parallel encodings running multiplied by the maximum number of instances needed for one encoding. The number of instances used by one encoding varies depending on the input file size and the number and data rate of the encoder Representations and cannot exceed 120.
Generally, it cannot hurt to multiply the expected limit calculated for your current situation by 2, to have some margin in case you need to ramp up.
Updated 6 months ago