Using Bitmovin Cloud Connect with AWS
This document explains how to set up Bitmovin Encoding on AWS infrastructure so that the Bitmovin platform can run VOD / LIVE encoding jobs using the AWS EC2 API. Further details on those usecases can be found here
The instructions in this document for the REST API Services apply to live encoding and file-based encoding. For a complete list of formats and input types, see the Bitmovin website.
Prerequisites
Activation requiredThis feature requires a commercial agreement and needs to be specifically activated for a Bitmovin account, it is not available by default. You will not be able to complete the configuration below without this activation.
- A Bitmovin account enabled for usage of Cloud Connect
- If you want to use Cloud Connect with a sub organization, this sub organization must be enabled for usage of Cloud Connect
- An AWS account
Considerations about the used AWS accountIts not a requirement but a suggestion to create a dedicated AWS account for Bitmovin Cloud Connect only. This allows to properly separate workloads and to easily identify and allocate Bitmovin Cloud Connect related cloud costs.
Do not use the AWS account root user for any Bitmovin integrations or operations. For details about the risks please consider https://docs.aws.amazon.com/IAM/latest/UserGuide/root-user-best-practices.html.
Considerations about Know-how and Setup TimeWith basic knowledge about AWS Resources like VPCs, Security Groups, IAM this can be done within one hour. (e.g. at the level of an AWS Certified Cloud Practitioner)
Considerations about public S3 AccessWe do not require any public access to buckets if not explicitly chosen by the user. Specific parts of the Dashboard might require public access but they are optional.
Deployment Overview
This documentation describes how to set up the following AWS Resources
- VPC
- Security Group (including firewall rules)
- IAM Role (including specific permissions)
It also describes how to utilize those resources when using the Bitmovin API or Dashboard.
Configure your AWS account
In this section, you will create the appropriate infrastructure setup to enable Encoding jobs in your AWS account.
Optional: Configure with TerraformIf you prefer infrastructure-as-code, Bitmovin AWS Cloud Connect is also configurable using Terraform scripts: Bitmovin Terraform Cloud Connect
Configure your Amazon VPC resources (optional)
We recommend that you use the default Virtual Private Cloud (VPC) for the respective region. The default VPC is the only VPC in which you can avoid specifying a subnet, which gives you the advantage that if one availability zone has reached its capacity, your instance will automatically be launched in another (free) zone. If you select a specific subnet on instance launch (which you are required to do if a non-default VPC is used), the instance can only be launched in the Availability Zone of the selected subnet, and if there are no more resources available in that zone, then no instance can be launched.
Recreate a default VPC
If you have deleted the default VPC in your AWS account, you can follow the AWS "Create a default VPC" docs.
Create a custom VPC configuration
Follow the AWS "Create a VPC" docs for your custom configuration.
- The subnet must have
Auto-assign public IPv4 addressenabled - Custom VPCs are supported from Encoder v2.51.0 and above
Create a Security Group
A Security Group defines firewall rules that enable network access into your VPC and to the EC2 instances in particular.
- Open the EC2 Dashboard console: https://console.aws.amazon.com/ec2/home
- Make sure to have your desired region selected at the top right, e.g. "Europe (Frankfurt) eu-central-1"
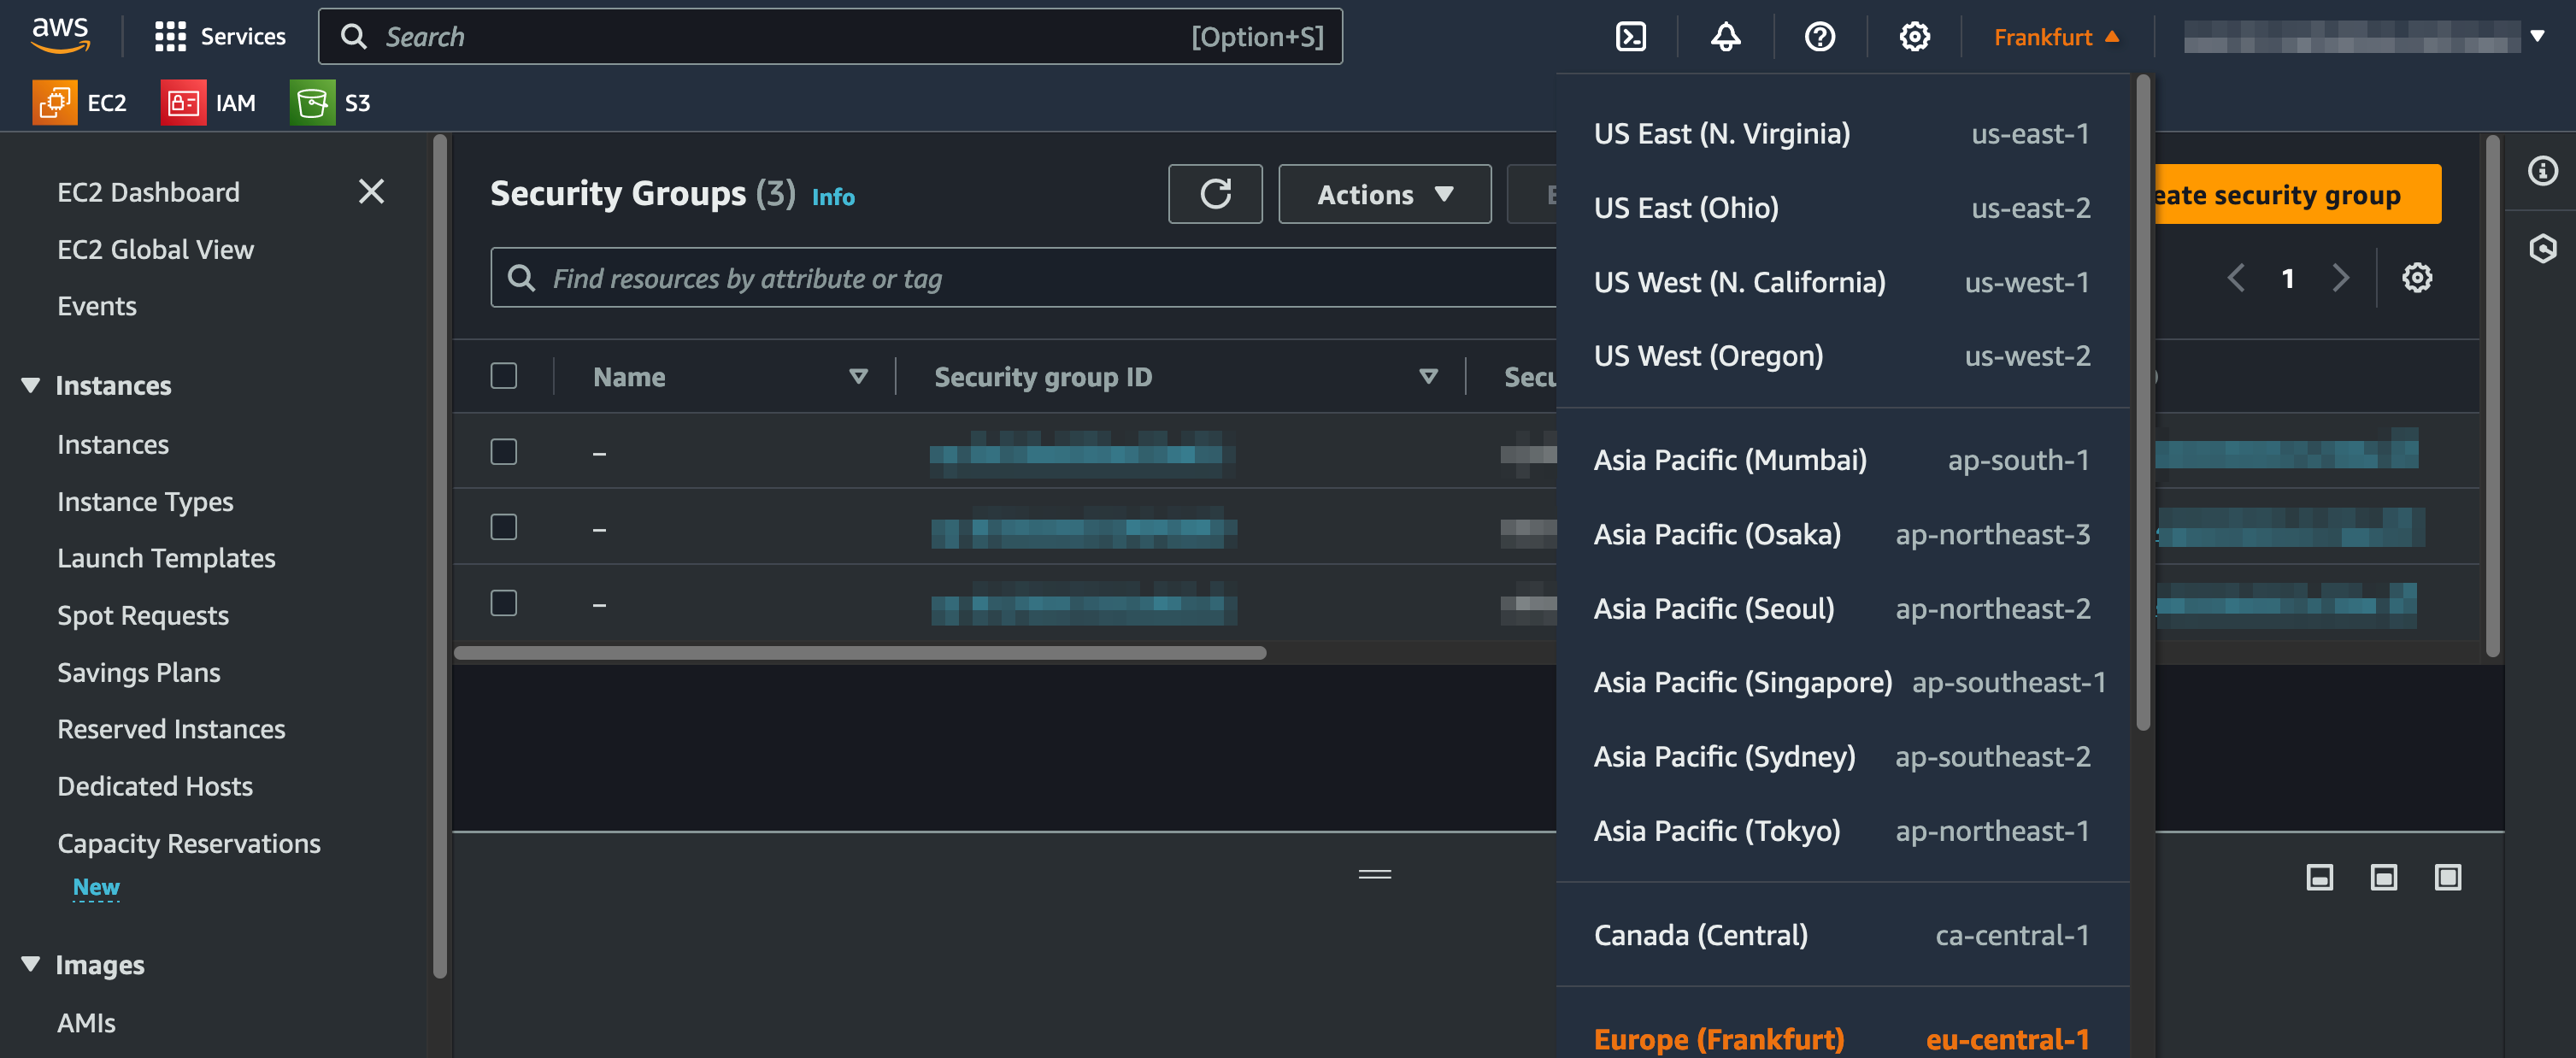
- Go to "Network & Security > Security Groups", click the "Create security group" button
- Under "Basic details", provide a "Security group name" and a "Description" of your choice
- Click the "Create security group" button (the security group needs to be created to be available for selection in the next step)
- On the security group detail view under the "Outbound rules" tab, make sure that the default rule still exists (otherwise, create it according to the table)

| Key | Value |
|---|---|
| Type | All traffic |
| Protocol | All |
| Port range | All |
| Destination | 0.0.0.0/0 |
| Description | - |
- On the security group detail view under the "Inbound rules" tab, click the "Edit inbound rules" button
- Under the "Inbound rules" tab, create new rules for each of the following tables (3 tables will result in 5 rules) by clicking the "Add rule" button:
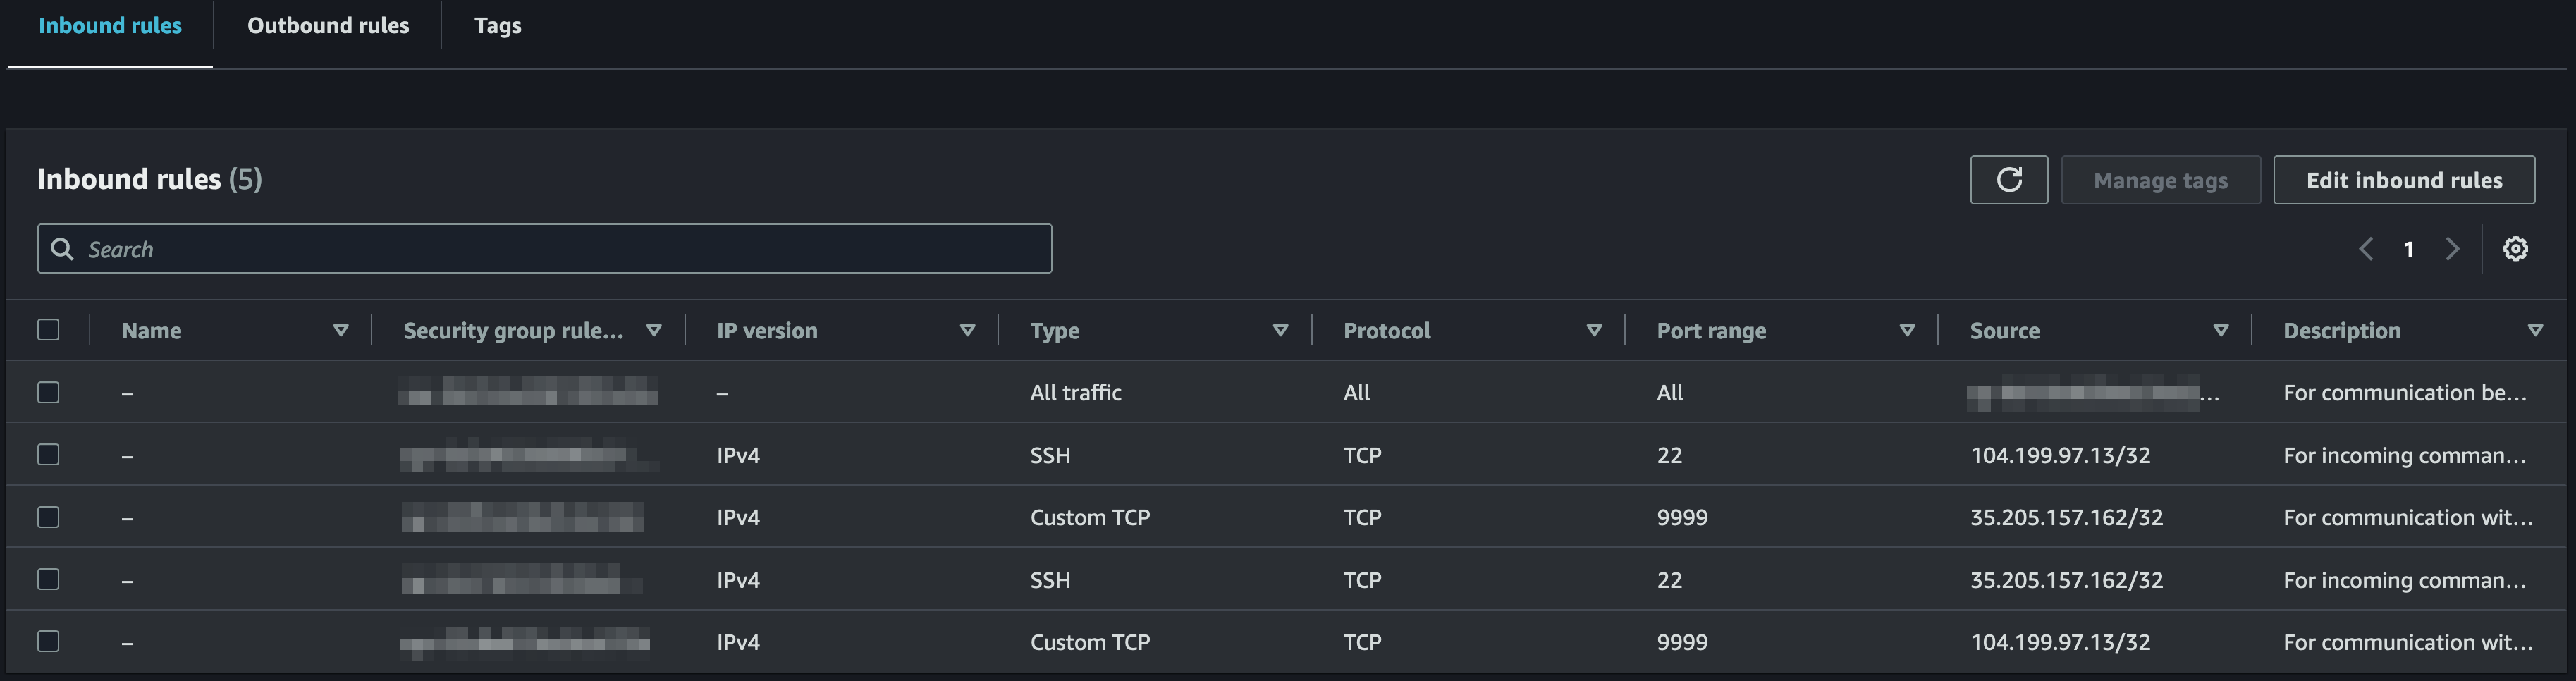
| Key | Value |
|---|---|
| Type | All traffic |
| Protocol | All |
| Port range | All |
| Source | (select the previously created security group) |
| Description | For communication between the session manager VM instance and its instance manager VM instances |
| Key | Value |
|---|---|
| Type | Custom TCP |
| Protocol | TCP |
| Port range | 9999 |
| Source | 104.199.97.13/32, 35.205.157.162/32 (comma-separated Source will create two rules) |
| Description | For communication with the service that manages the encoding |
| Key | Value |
|---|---|
| Type | Custom TCP |
| Protocol | TCP |
| Port range | 9443 |
| Source | 104.199.97.13/32, 35.205.157.162/32 (comma-separated Source will create two rules) |
| Description | For HTTPS communication with the service that manages the encoding |
| Key | Value |
|---|---|
| Type | SSH |
| Protocol | TCP |
| Port range | 22 |
| Source | 104.199.97.13/32, 35.205.157.162/32 (comma-separated Source will create two rules) |
| Description | For incoming commands from the Bitmovin API to control the encoding |
Note: Firewall rules are checked to be limited to the correct source ip addresses, and therefore allowing all ip addresses in source would fail the configuration when adding region settings.
Live encodingsAdditional inbound rules are required if you are encoding live streams transported over RTMP, SRT or Zixi.
Additional inbound rules for RTMP live streams
| Key | Value |
|---|---|
| Type | Custom TCP |
| Protocol | TCP |
| Port range | 1935 |
| Source | Anywhere-IPv4/6 (or the specific set of addresses where streams will originate from) |
| Description | For RTMP live streams |
| Key | Value |
|---|---|
| Type | Custom TCP |
| Protocol | TCP |
| Port range | 443 |
| Source | Anywhere-IPv4/6 (or the specific set of addresses where streams will originate from) |
| Description | For RTMPS live streams |
Additional inbound rules for SRT live streams
| Key | Value |
|---|---|
| Type | Custom TCP and Custom UDP (multiple rules) |
| Protocol & Port range | tcp:2088 udp:2088 udp:2089 udp:2090 udp:2091 |
| Port range | 1935 |
| Source | Anywhere-IPv4/6 (or the specific set of addresses where streams will originate from) |
| Description | For SRT live streams |
Additional inbound rules for Zixi live streams
| Key | Value |
|---|---|
| Type | Custom TCP |
| Protocol | TCP |
| Port range | 4444 |
| Source | Anywhere-IPv4/6 (or the specific set of addresses where streams will originate from) |
| Description | For Zixi live streams |
Configure your Bitmovin account
To enable your Bitmovin account to run encodings in your AWS account, you need to link it with Infrastructure and Region Settings objects. Before you continue, make sure you have collected the following information from your AWS account:
- From your security group
- Security group ID
- (if applicable) From your custom VPC
- Subnet ID
Create an infrastructure account
To enable your Bitmovin account to run encodings in your AWS project, you need to link it with an Infrastructure object.
- Open the Bitmovin Dashboard: https://dashboard.bitmovin.com/
- Go to "VOD/LIVE Encoding > Cloud Connect"
- Click the "Add infrastructure account" button, select the "Amazon Web Services" option, click the "Next" button
- Provide a "Name" of your choice for your project, fill in the Account Number and Role Name, click the "Next" button
- Now, the Cloud Connect wizard should show you instructions to follow in the AWS console
Create an AWS IAM role
- Open the IAM Role console: https://console.aws.amazon.com/iam/home#/roles
- Click "Create role"
- Select "Custom trust policy" as "Trusted entity type" and copy the policy from the instructions, click the "Next" button
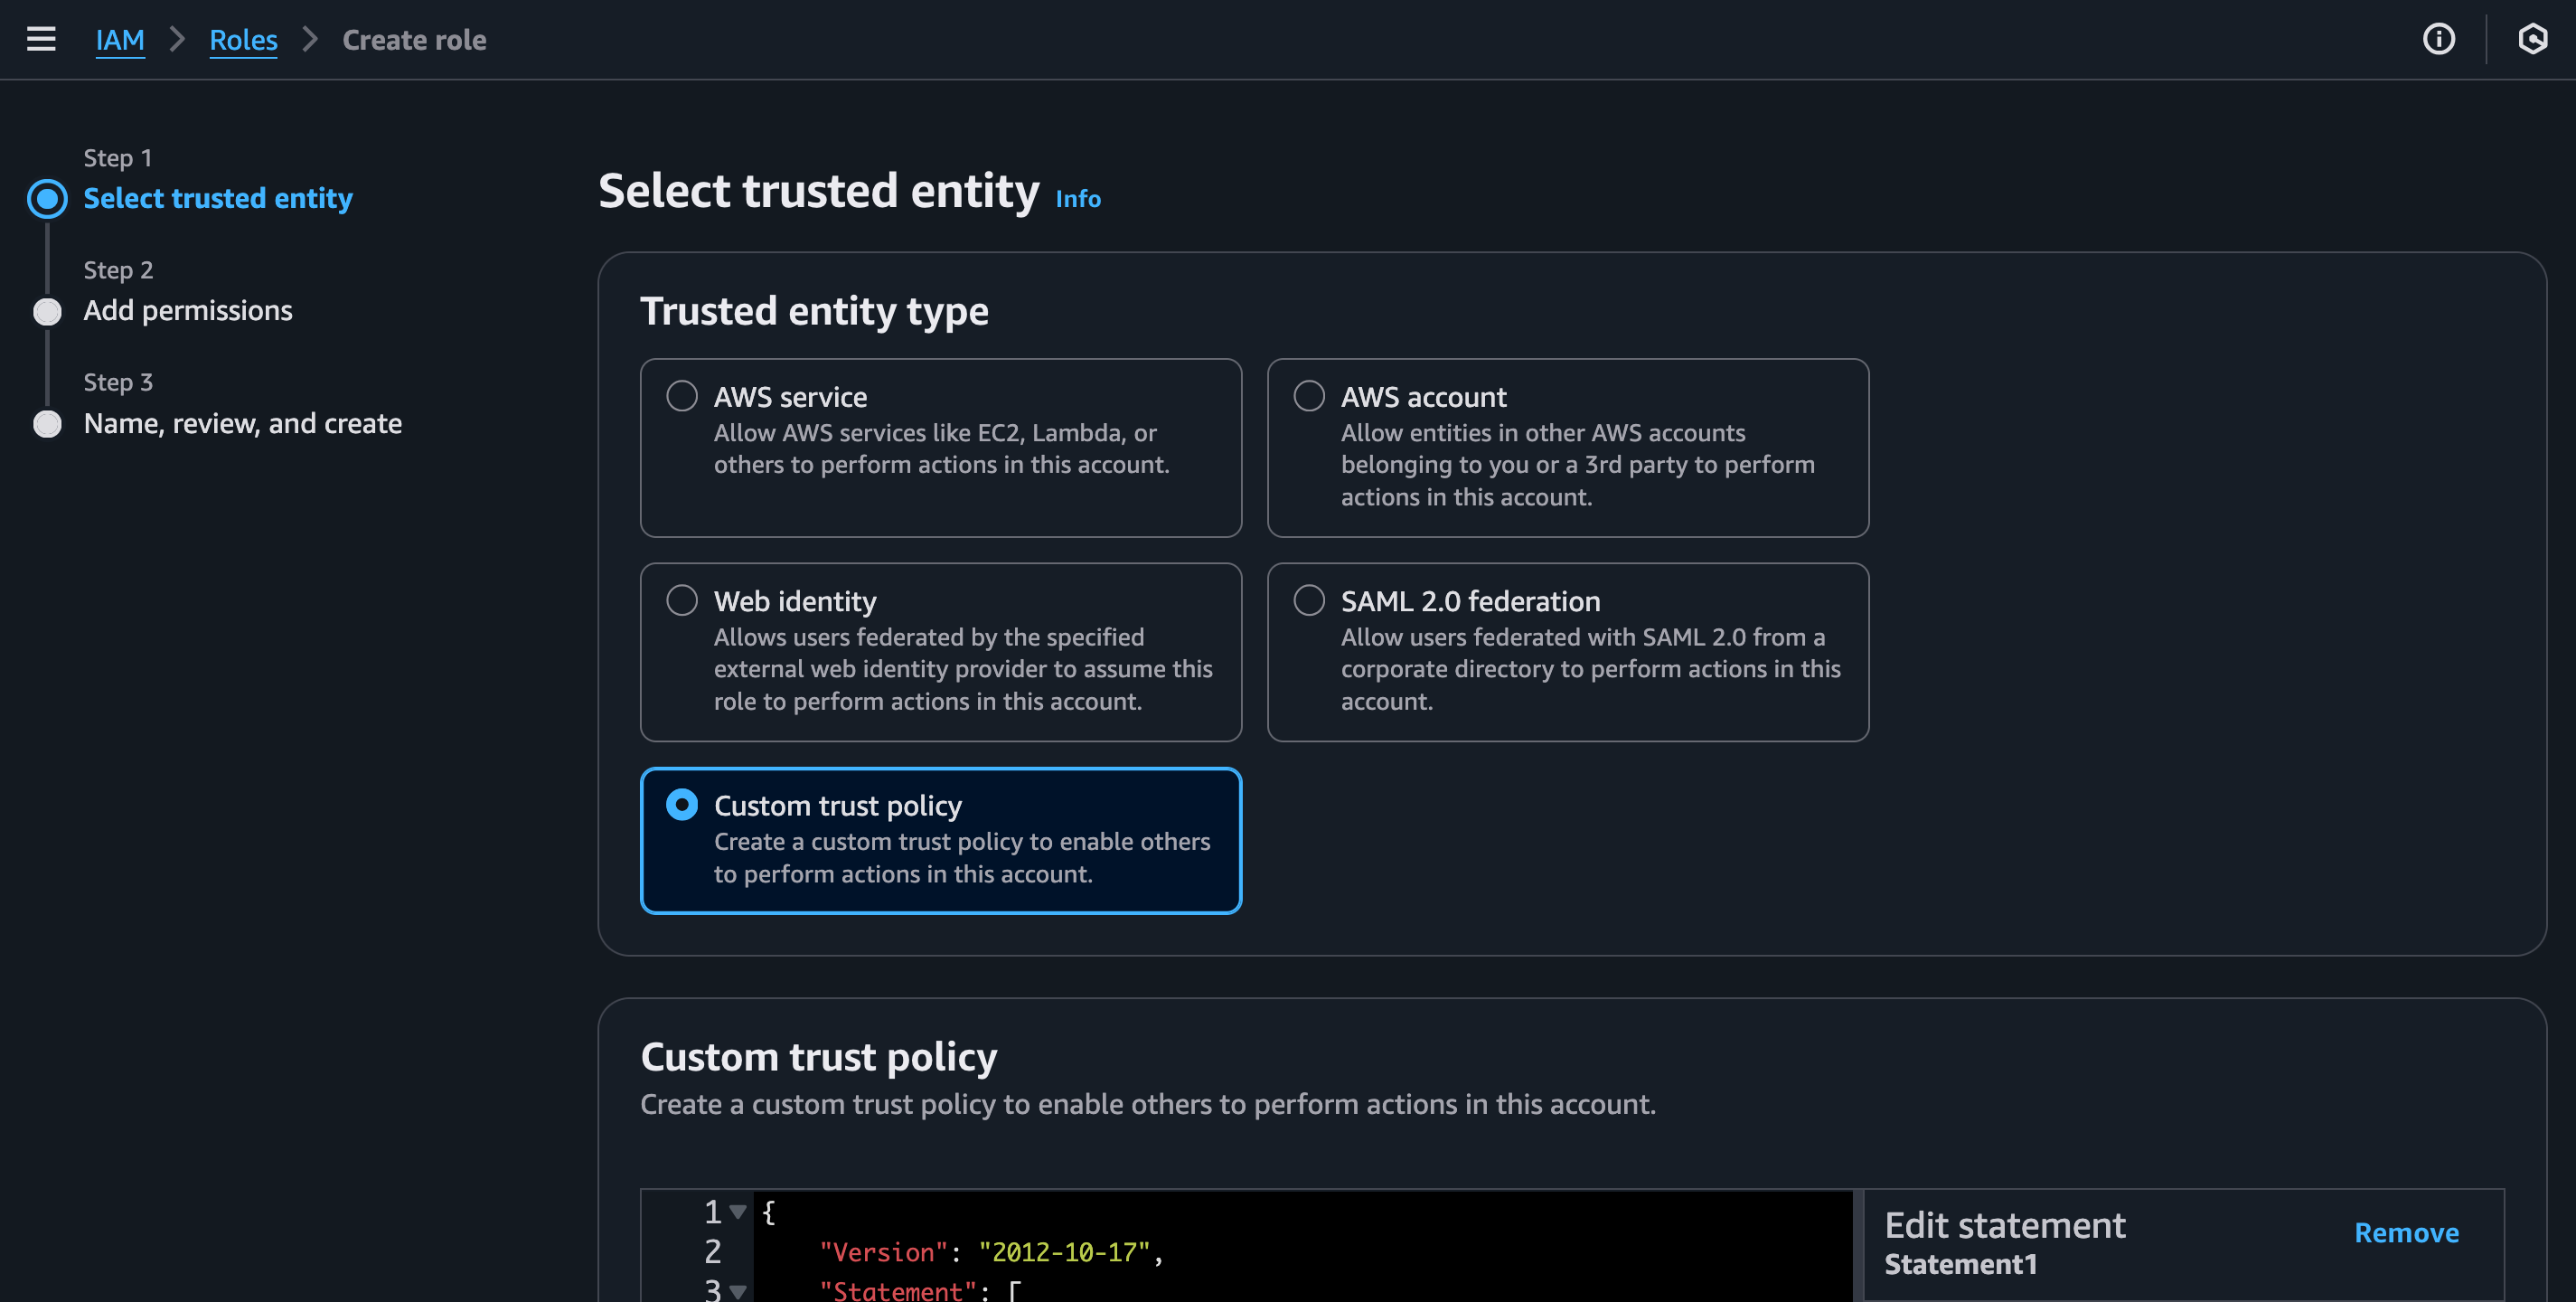
- Select "AmazonEC2FullAccess" or a custom user policy as "Permission policies", click the "Next" button. The purpose of those permissions is also documented in the referenced section.
- Enter the previously chosen "Role name" from the instructions, review all information, click the "Next" button
Create region settings
- After finishing the configuration of an AWS IAM role, progress in the Cloud Connect wizard by clicking the "Next" button
- Select the appropriate "Cloud Region" (where the security group was created), fill in the Security group ID (and if applicable, the Subnet ID), click the "Next" button
Supported AWS Regions and Availability ZonesThe complete list of supported regions is documented in our API docs and is also visible in the Dashboard when creating regions settings.
The Availability Zones are automatically managed by Bitmovin's Scheduling logic.
Getting access to AMIs
The Bitmovin platform uses Amazon Machine Images (AMIs) from which to create encoder instances in AWS.
After you have created an infrastructure object in your Bitmovin account, we will trigger automatic access allow-listing for our AMIs. This process is required to be able to run encodings and can take up to 20 minutes.
Run encoding jobs in AWS
After configuration has been completed, you will be able to run encoding jobs in your own AWS account. To do so, use the Bitmovin API client SDKs to submit encoding jobs, in the same way as you would do for encodings running in the Bitmovin Managed Cloud service. The only difference is that you need to specify the new infrastructure instead of public cloud regions.
Here is a Python snippet demonstrating how to link your encoding to your infrastructure.
    # ID of the Infrastructure object
    infra_id = ‘<infrastructure_id>’

    # AWS region of the AWS-connect setup
    infra_region = CloudRegion.AWS_EU_WEST_1
    infrastructure = InfrastructureSettings(infrastructure_id=infra_id,
                            cloud_region=infra_region)

    encoding = Encoding(name='aws connect encoding',
        cloud_region=CloudRegion.EXTERNAL,
        infrastructure=infrastructure,
        encoder_version='STABLE')
Sub Organizations
If you have set up your infrastructure in a sub organization, you must tell the Bitmovin API that you want to run the encoding in that sub organization. Thus, in addition to the code snippet above, make sure to set the tenant_org_id alongside the api_key in the bitmovin_api object:
    # ID of the sub organisation you added the infrastructure to
    organisation_id = '<sub_organisation_id>'

    bitmovin_api = BitmovinApi(api_key=config_provider.get_bitmovin_api_key(),
                       tenant_org_id=organisation_id,
                       logger=BitmovinApiLogger())
Resource Quotas
If you want to run several encodings in parallel, the default limits may not be sufficient. In that case, you will have to request limit increases for the following resource in your Region(s), through the Service Quotas page:
For the limits to request we will be using these variables:
| Variable name | Explanation |
|---|---|
| (maximum number of encodings) | The maximum number of parallel encodings the infrastructure must be able to run. Typically this is the number of encoding slots assigned to the Bitmovin account or sub-org associated with the infrastructure. |
| (maximum number of instances per encoding) | The number of instances used by one encoding. This number varies depending on the input file size and the number and data rate of the encoder representations. However, we recommend to use 60 as the maximum number of instances per encoding when getting started and to increase this limit if it proves insufficient. For Dolby Vision encodings and conversions, starting from Encoder v2.208.0, the maximum number of instances have been increased to - 100 instances if the encodingMode configured is STANDARD (which currently maps to TWO_PASS), SINGLE_PASSor TWO_PASS- 200 instances if the encodingMode configured is THREE_PASS |
Using the variables above, please request the following limits:
| Quota name | Limit to request |
|---|---|
| Running On-Demand All Standard (A, C, D, H, I, M, R, T, Z) instances | (maximum number of encodings) * 8 vCPUs |
| Provisioned IOPS SSD (io1 & io2) volume storage (TiB) | (maximum number of encodings) * 0.5 |
| Provisioned IOPS SSD (io1 & io2) I/O operations (IOPS) | (maximum number of encodings) * 2000 |
| All Standard (A, C, D, H, I, M, R, T, Z) Spot Instance Requests | (maximum number of encodings) (maximum number of instances per encoding) 8 vCPUs * 3 |
| Network interfaces | (maximum number of encodings) * (maximum number of instances per encoding) |
| General Purpose SSD (gp2 & gp3) volume storage (TiB) | (maximum number of encodings) (maximum number of instances per encoding) 0.05 |
The values above assume 8-core instances. If you believe that your use case requires instances with a different number of cores, this number may need to be increased after discussion with your Bitmovin team.
We recommend requesting a limit increase for spot instance requests of at least 20,000-30,000 to ensure error-free and fast encodings.
Generally, it is a good idea to multiply the expected limit calculated for your current situation by 2, to have some margin in case you need to ramp up.
New Resource Quota requests for encoder versions >= 2.179.0Starting with the Bitmovin Encoder Version 2.179.0, we use the new more performant IO2 SSD storage type for our encodings starting with certain cloud regions. We are going to rollout this change to further regions.
When you're using an encoder version greater or equal to 2.179.0 or
BETAas your configured encoder version in your encoding workflow in combination with Bitmovin Cloud Connect AWS, you need to ensure to request new quota requests for the IO2 storage type in order to ensure a smooth encoding process:
- IOPS for Provisioned IOPS SSD (io2) volumes
- Storage for Provisioned IOPS SSD (io2) volumes, in TiB
In addition to this change, we've also doubled the amount of IOPS used per disk to increase encoding performance. In order to keep your workflow running smoothly with the abovementioned newer encoder versions, you need to request quota increases for double the amount of IO1 (and IO2) than you had configured beforehand. We've already adjusted the values in the table above accordingly.
Note: there is no form for Spot Instance Request Limit increases, so you have to request this in the Use Case description of the Instance Limit increase form.
Appendix
Advanced Configuration Guide
Add custom tags to instances
We do not offer adding custom, user-defined tags through our systems. However, AWS offers the Amazon EventBridge that can be configured to match your specific needs. The EventBridge can trigger events when Bitmovin resources are created. EventBridge can also route the event to a lambda function, which then adds the required tags programmatically.
Troubleshooting Guide
When configuring your Cloud Connect account, several things might go wrong, especially when you are doing it for the first time. Below is a concise list of common issues along with corresponding error messages or behaviors.
Wrong account number, access key, secret key
You will encounter a failure when attempting to create a new region setting for that infrastructure.
Error message: “Got AmazonEC2Exception on retrieval of security group 'sg-12345': AWS was not able to validate the provided access credentials.”
Wrong security group ID
You will encounter a failure when attempting to create a new region setting.
Error message: “Got AmazonEC2Exception on retrieval of security group 'sg-12345': Invalid id: "sg-12345".”
Wrong region for the security group ID
You will encounter a failure when attempting to create a new region setting.
Error message: “Got AmazonEC2Exception on retrieval of security group 'sg-12345': The security group 'sg-12345' does not exist.”
Wrong inbound rule "All traffic" - security group internal
You will encounter a failure when attempting to create a new region setting.
Error message: “No 'All' IpPermission found for Group sg-12345 .”
Wrong inbound rules: "SSH port / Port 22"
The encoding process is stuck in the 'Queue' state, but resolving the inbound rule issue allows the encoding to complete.
Wrong inbound rules: "Port 999"
The encoding process is stuck in the 'Queue' state, but resolving the inbound rule issue allows the encoding to complete.
Wrong outbound rule
The encoding process is stuck in the 'Queue' state, but resolving the inbound rule issue allows the encoding to complete.
Limited-access IAM user policy
The following JSON snippet contains the set of permissions required to perform encodings on EC2 instances. You can assign it to the IAM User, if you prefer not to use the AmazonEC2FullAccess policy.
- Under "IAM > Access management > Users", click on the name of your (newly created) user to open the details view
- Under "Permissions > Permissions policies", click on the "Add permissions > Create inline policy" button
- Select "Policy editor > JSON"
- Paste the following JSON policy into the "Policy editor" window:
{
  "Version": "2012-10-17",
  "Statement": [
    {
      "Effect": "Allow",
      "Action": [
        "ec2:TerminateInstances",
        "ec2:StartInstances",
        "ec2:CreateTags",
        "ec2:RunInstances",
        "ec2:StopInstances"
      ],
      "Resource": [
        "arn:aws:ec2:*:*:subnet/*",
        "arn:aws:ec2:*:*:instance/*",
        "arn:aws:ec2:*:*:volume/*",
        "arn:aws:ec2:*:*:security-group/*",
        "arn:aws:ec2:*:*:network-interface/*",
        "arn:aws:ec2:*::image/*"
      ]
    },
    {
      "Effect": "Allow",
      "Action": [
        "ec2:DescribeInstances",
        "ec2:RequestSpotInstances",
        "ec2:DescribeTags",
        "ec2:DescribeVpnConnections",
        "ec2:DescribeVolumesModifications",
        "ec2:DescribeSpotInstanceRequests",
        "ec2:DescribeSecurityGroups",
        "ec2:GetConsoleOutput",
        "ec2:DescribeSpotPriceHistory",
        "ec2:CancelSpotInstanceRequests",
        "ec2:GetPasswordData",
        "ec2:GetLaunchTemplateData",
        "ec2:DescribeScheduledInstances",
        "ec2:DescribeVpcs",
        "ec2:DescribeScheduledInstanceAvailability",
        "ec2:DescribeElasticGpus",
        "ec2:DescribeInstanceStatus"
      ],
      "Resource": "*"
    }
  ]
}
Purpose of the required ActionsBitmovin requires those actions in order maintain the AWS Resources necessary to process an Encoding job. This means e.g. we need to Run, Start, Stop, Terminate EC2 Instances automatically. We also need access to the related resources like e.g. the VPC, SecurityGroup, ...
Our Encoder is also actively making use of Spot Instances and adapts to the Price.
We also need access to those resources in order to efficiently monitor the usage of the created resources.
- Click the "Next" button
- In "Review and create" (Step 2), provide a "Policy name" of your choice, then click the "Create policy" button
Usage of billable AWS services and Licenses
Bitmovin makes use of the following AWS service families that incur charges on your account:
- EC2-Others
- EC2-Instances
- VPC
Bitmovin Cloud Connect is available exclusively through private commercial agreements. Fore more details consult https://developer.bitmovin.com/encoding/docs/license-management.
Monitoring / Fault resolution / Additional support
Bitmovin offers customers various ways to monitor the health of the processed workloads. This is achieved through our exposed API endpoints, which are documented in our public API documentation. REST API Services
For example (but not limited to), the following Endpoints can be helpful to monitor the health and state of a workload:
- https://developer.bitmovin.com/encoding/reference/getencodingencodingsbyencodingid
- https://developer.bitmovin.com/encoding/reference/getencodingencodingslivebyencodingid
- https://developer.bitmovin.com/encoding/reference/getencodingencodingsliveencodingheartbeatbyencodingid
Additionally, our dashboard contains details about each job. This information can also be used to debug faulty jobs and allow you to troubleshoot configuration issues.
Please also consult your commercial agreement for details about SLAs and available support tiers.
If something goes wrong our support team is here to help, please contact us: https://bitmovin.com/contact-bitmovin/
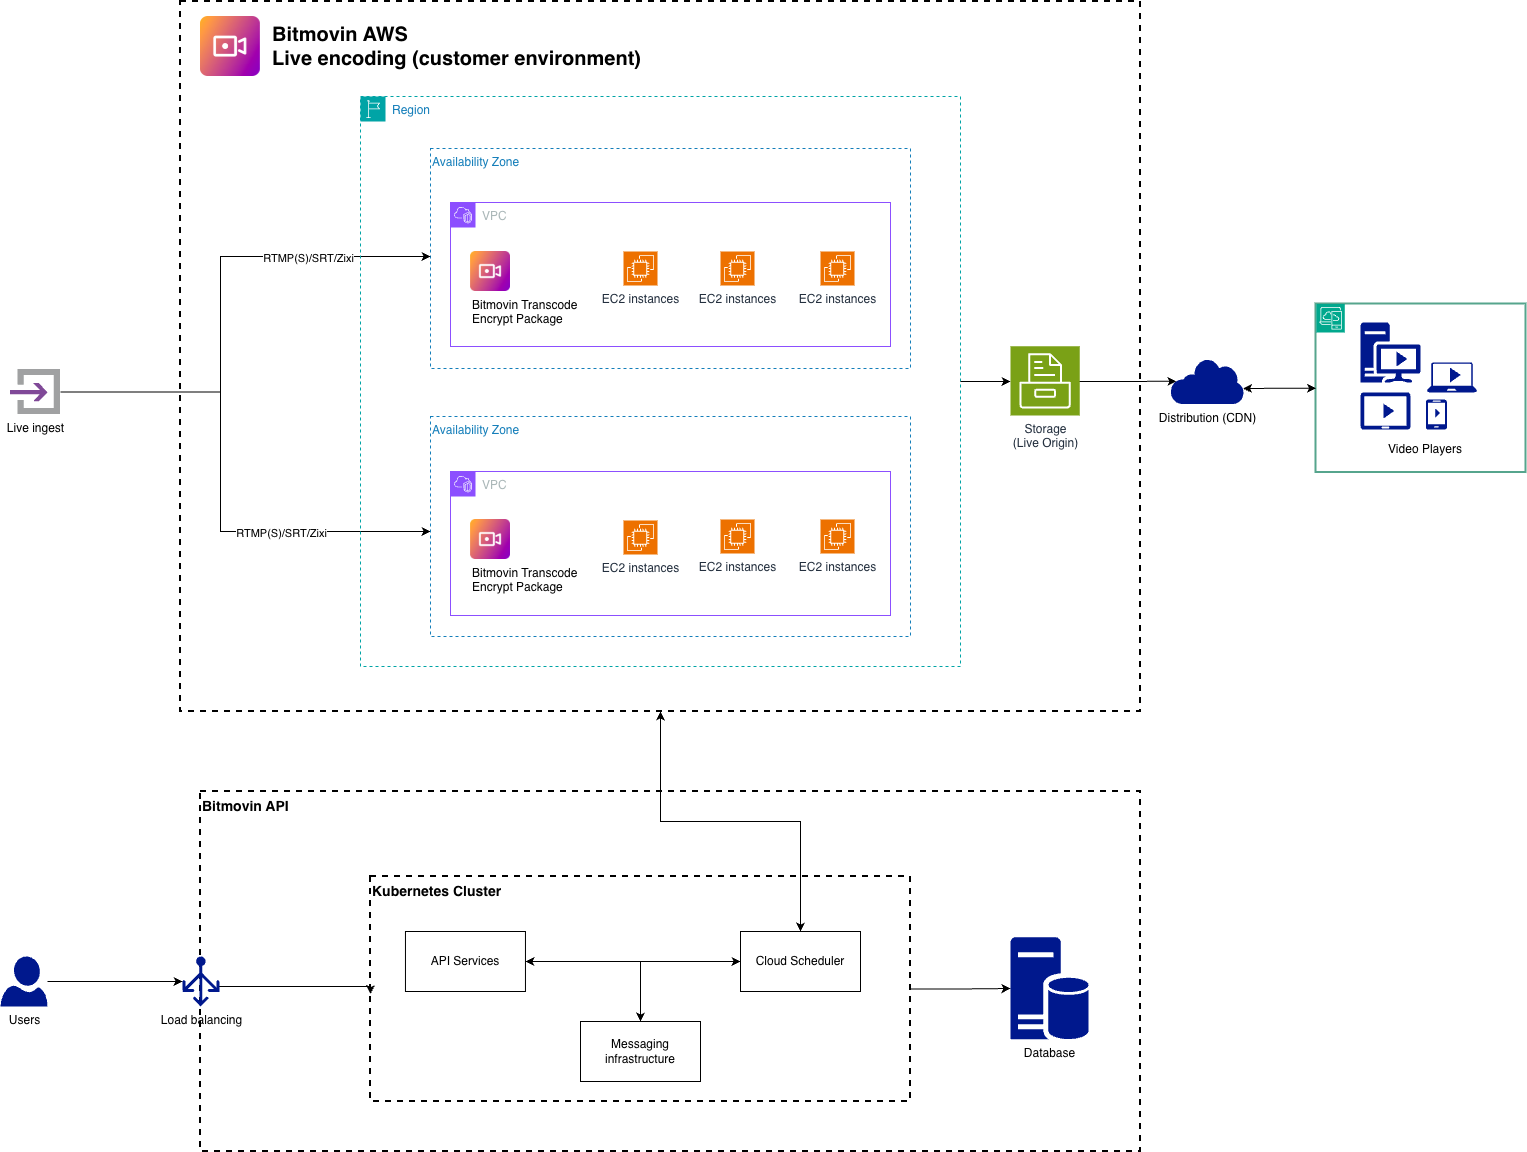
Architecture Diagram
This describes the architecture of the resources and the main workflow
Usage of sensitive Data
Sensitive data is not processed by encoding workload if not explicitly provided by the customer as an input. For encoding jobs Bitmovin is not storing any data that was provided by the customer.
Patching and Upgrades
See our https://developer.bitmovin.com/encoding/docs/bitmovin-encoder-lifecycle for details.
For Encoder versions older than 2.241.0
Create an Amazon IAM user
Do not use multi-factor authentication (MFA)Please make sure not to use any IAM policies on this account that require the user to have a virtual multi-factor authentication (MFA) device set up.
The IAM user created here is used by the Bitmovin platform to get access to your AWS account and create compute resources to run parts of the the encoding service within it, including starting and stopping EC2 instances.
- In the AWS account where encodings are supposed to run, open the Identity and Access Management (IAM) console: https://console.aws.amazon.com/iam/
- Go to "Access management > Users", click the "Create user" button
- In "Specify user details" (Step 1), provide a "User name" of your choice
Note: Since this user is only used for programmatic access, you do not need to grant AWS Management Console access here.
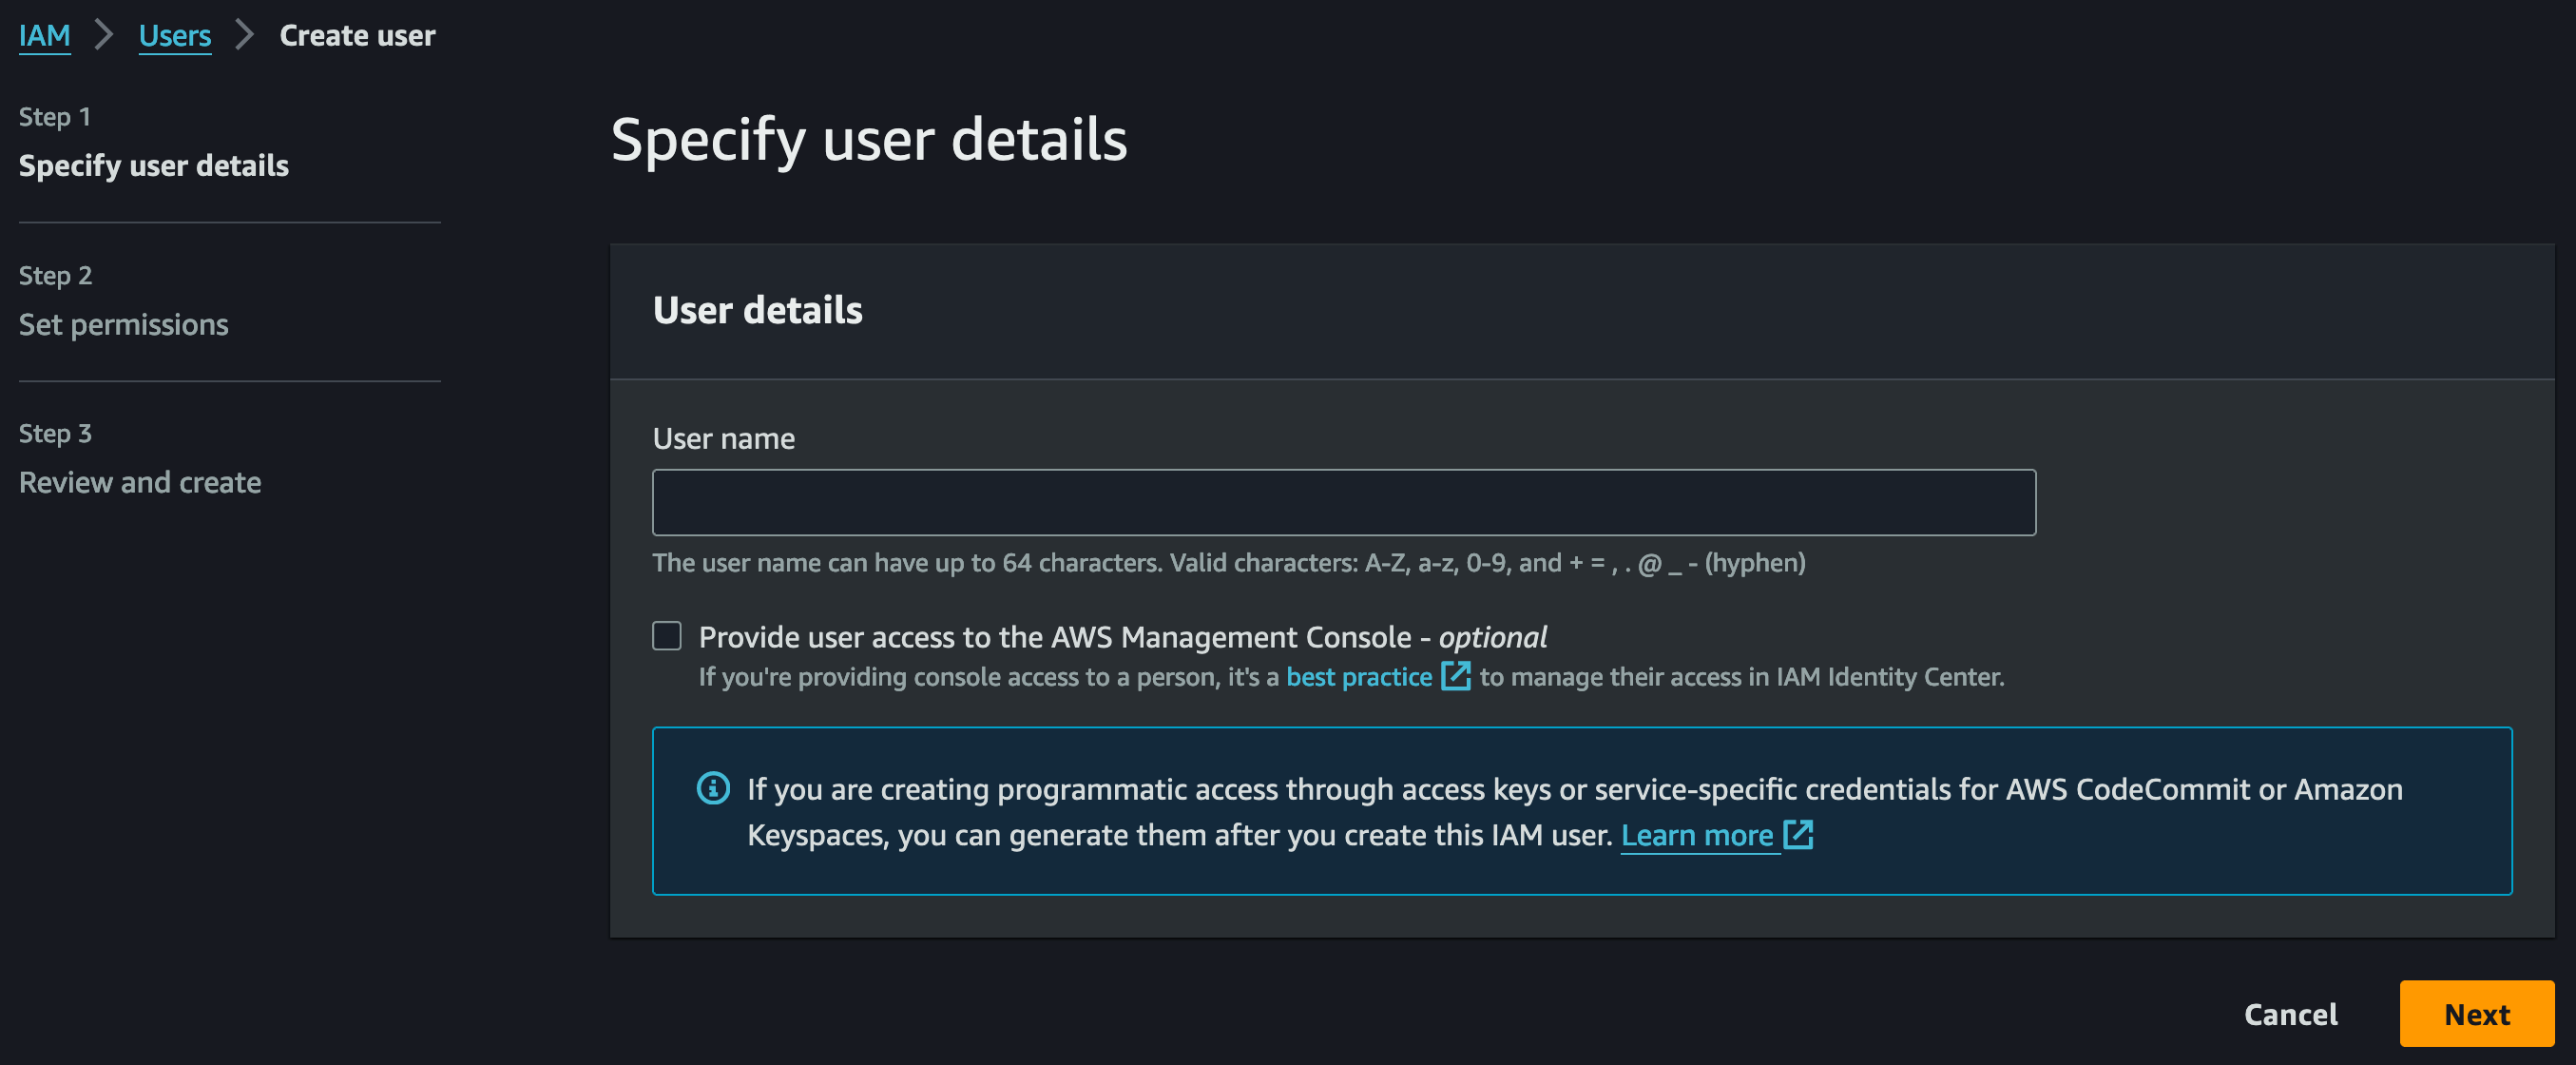
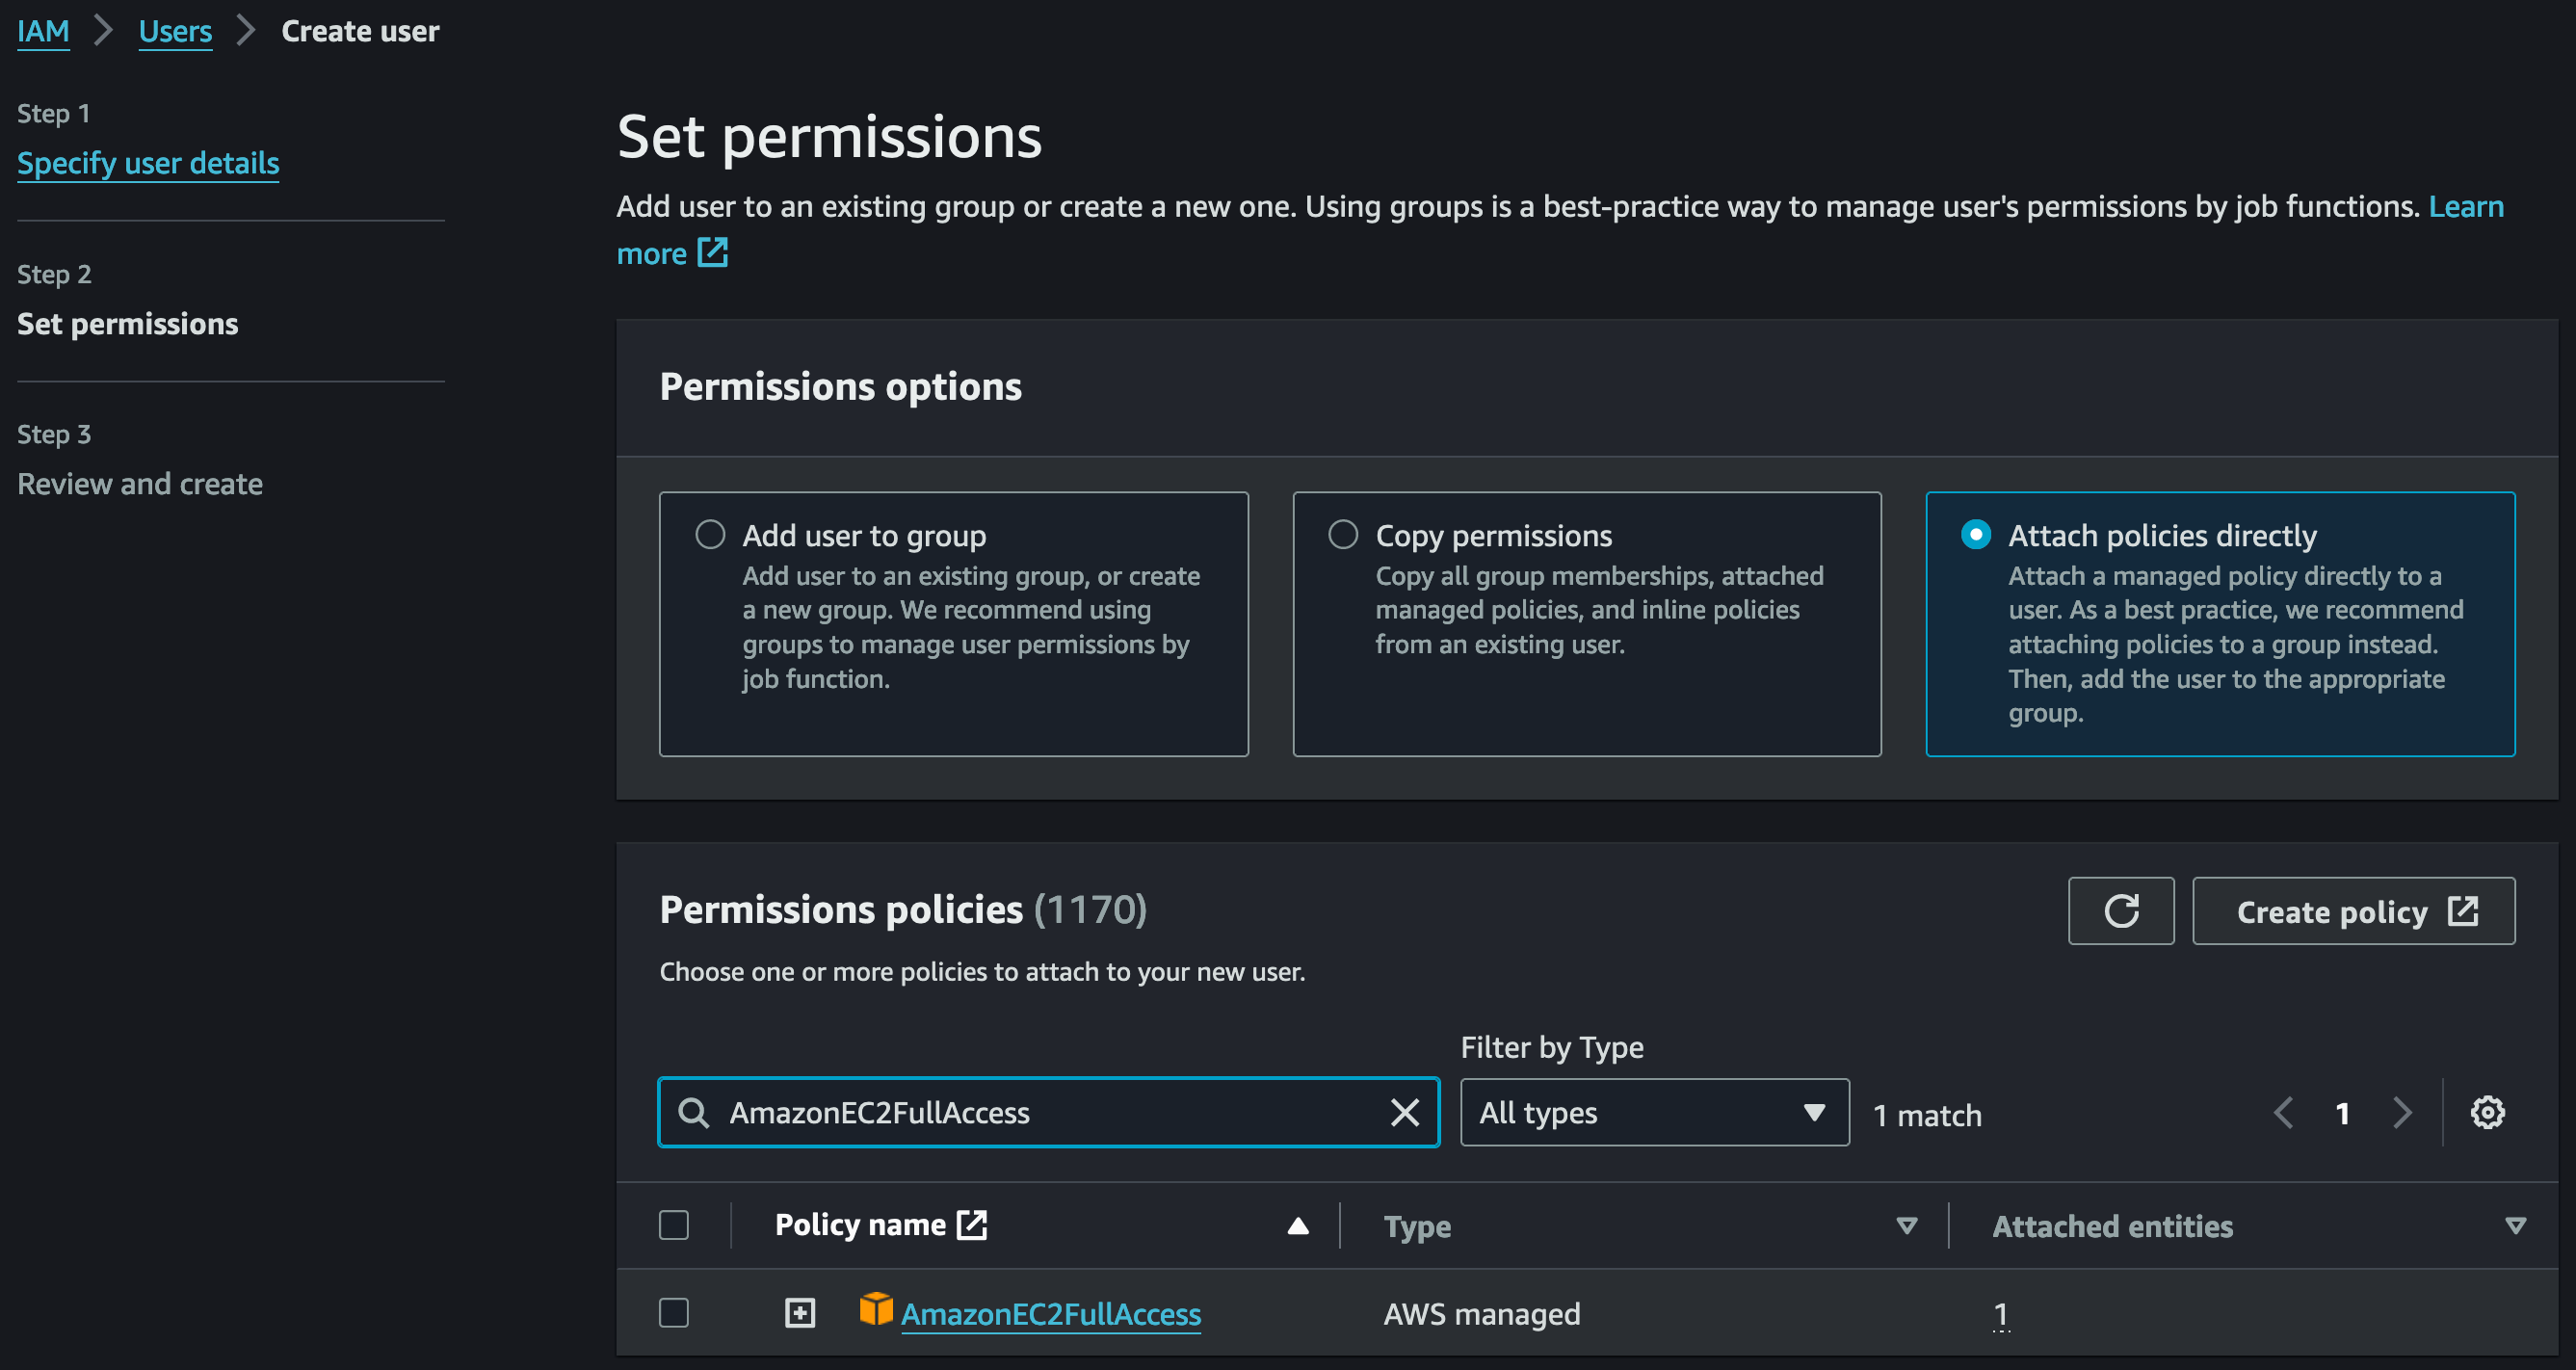
- In "Set permissions" (Step 2), ...
- select "Permissions options > Attach policies directly"
- search for and select the managed "Permissions policies >
AmazonEC2FullAccess" policy (recommended for testing/evaluation purposes only)
- In "Review and create" (Step 3) check if everything is configured as shown before, then click the "Create user" button
Tighten permissions for productionSince the managed
AmazonEC2FullAccesspolicy might not be suitable for security-aware production configurations, we recommend to use a tailored user policy. See "Appendix: Limited-access IAM user policy".
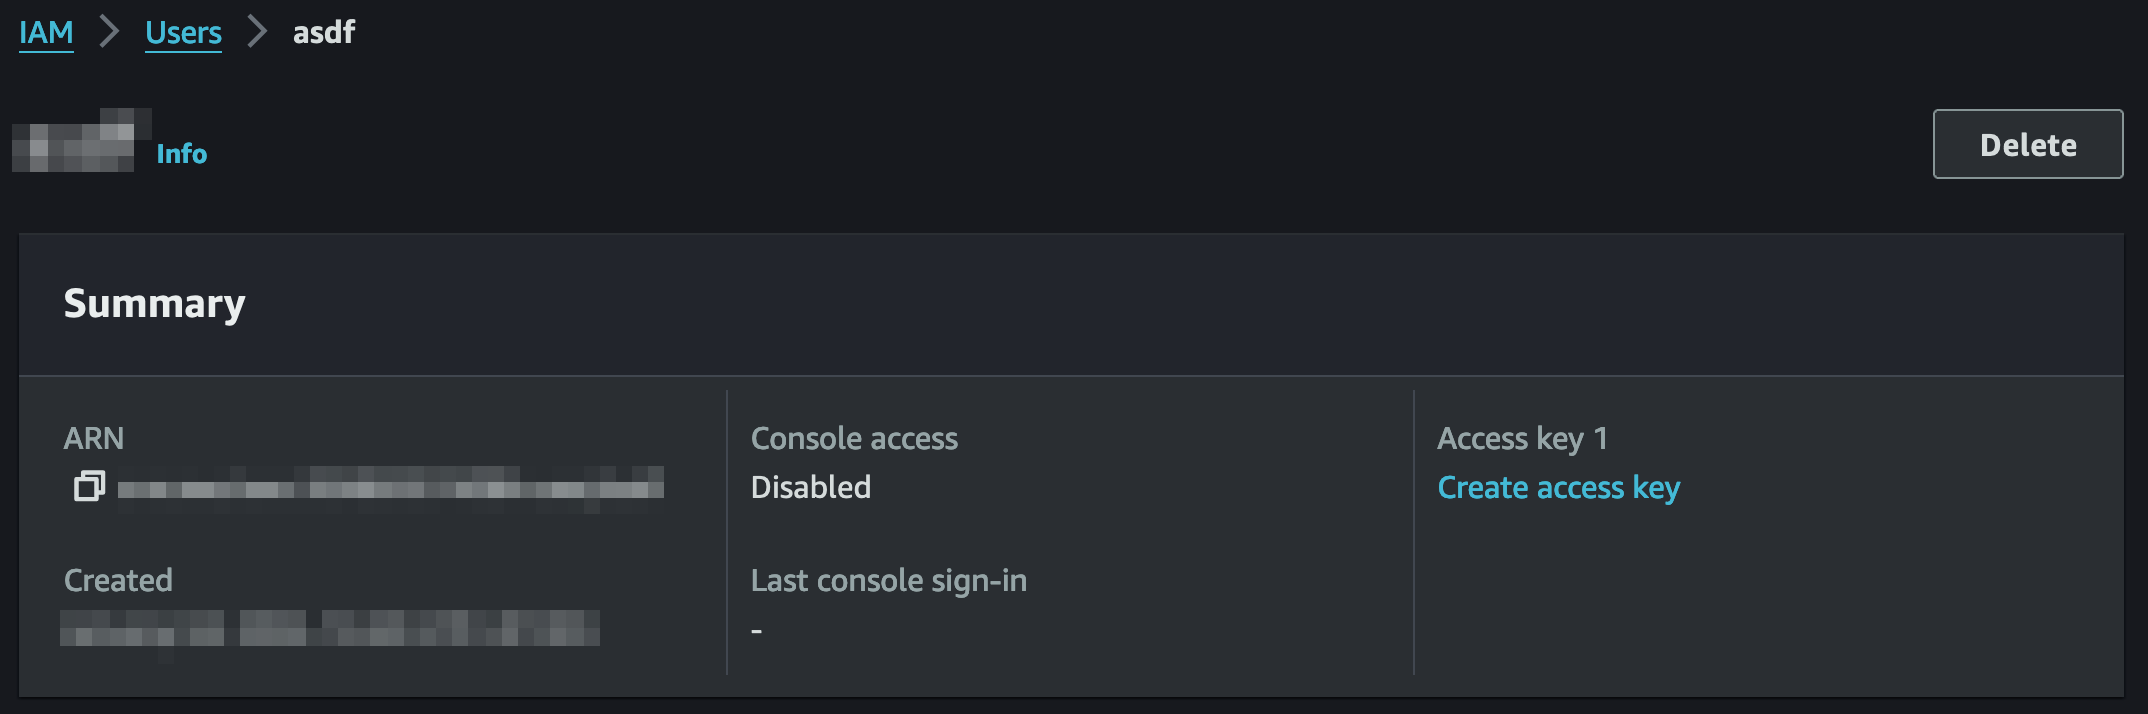
Get the Amazon IAM user credentials
This step will collect the access credentials to allow the Bitmovin platform to access your infrastructure.
- Under "IAM > Access management > Users", click on the name of your newly created user to open the details view
- At the top, click "Summary > Create access key"
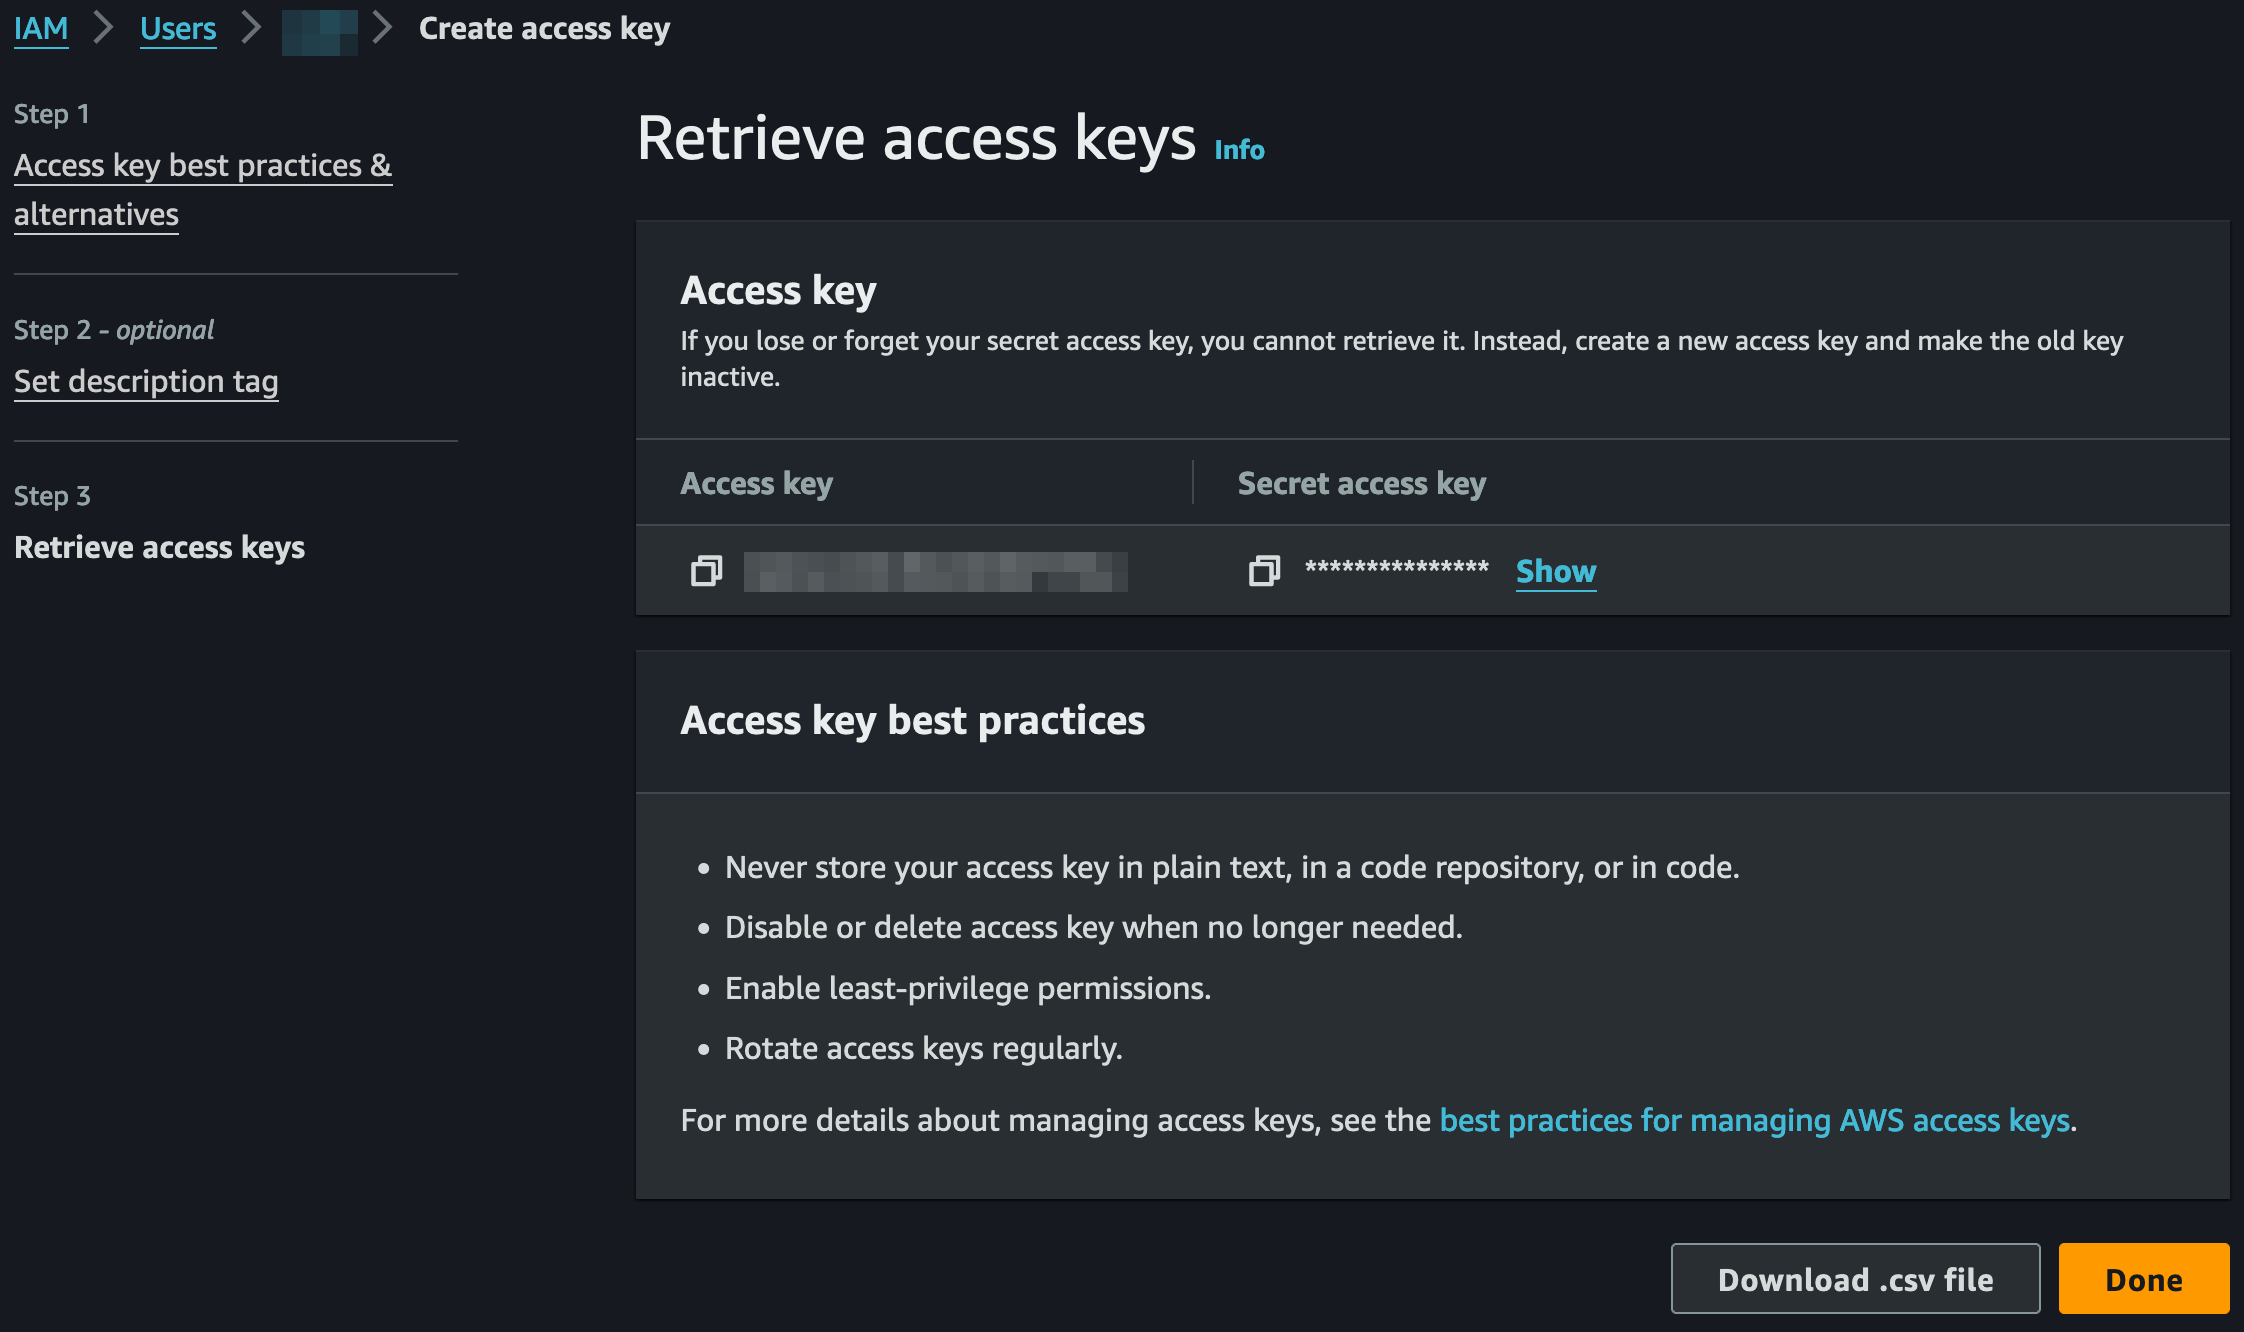
- In "Access key best practices & alternatives" (Step 1), select "Third-party service" and check "I understand the above recommendation and want to proceed to create an access key.", then click the "Next" button
- In "Set description tag" (Step 2), provide a "Description tag value" of your choice, then click the "Create access key" button
- In "Retrieve access keys" (Step 3), copy the "Access key" and "Secret access key", or click the "Download .csv file" button
- Then click the "Done" button
Updated 6 months ago