Stitching and Trimming - Getting started
Overview
Sometimes, you need to be able to manipulate multiple files or parts of files as input for an encoding job. For simple use cases, you might need to add a bumper highlighting your brand at the start of your assets. In more complex post-production scenarios, you may want to compose a final cut of your asset on the basis of a "recipe" of instructions (for example an EDL (edit decision list) or a CPL (composition playlist).
Since version 2.6.0, the Bitmovin encoding solution supports many such use cases, through a set of new APIs. There are a few principles to understand, which we will go through first, before going through a practical example.
Principles
If you have used the Bitmovin encoding solution before, you should be familiar with the simple mechanism that let the encoder know where to find the source file: all you had to do was to add configuration when creating a Stream object, pointing to an Input object's identifier representing the input storage (eg. an S3 bucket) as well as a path and input stream selection criteria. You can see this in many of the examples bundled with our SDKs.
With now multiple input files to consider and more flexibility required, there is a need to introduce a new concept and a new dedicated object: the Input Stream.
There are currently 3 types of Input Streams:
- The Ingest Input Stream: it is used to refer to an Input object and a path, in a way comparable to before.
- The Trimming Input Stream: this object defines how an input stream is to be trimmed. There are currently 3 ways to do so: based on time, on a timecode track, or based on the H264 picture timing
- The Concatenation Input Stream: used (unsurprisingly) to concatenate multiple input streams.
So, how do we put it all together in our encoding configuration? The rest of this tutorial will explain it in detail, but let's first create ourselves a realistic use case.
An example scenario
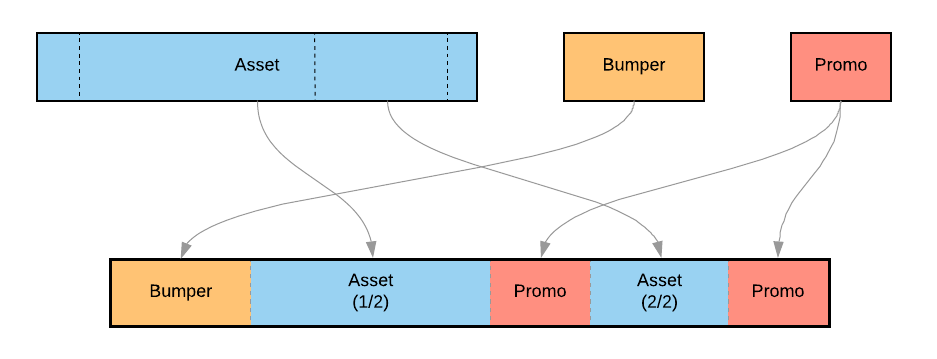
Let's assume that we are a content producer, and that for every asset that we distribute to content partners, we want to add a short bumper at the start of the file, which highlights our brand. In addition, somewhere in the middle of the asset and at the end of it, we want to also add some cross-promotional content. Often, our main content also needs to be topped and tailed to remove unnecessary editorial markers.
Let's represent this graphically:
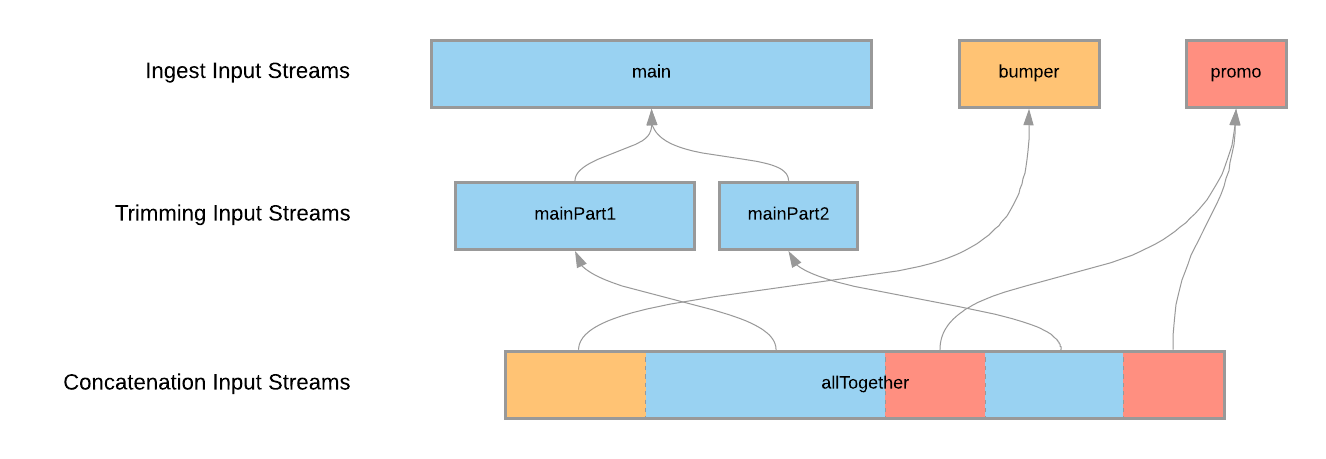
Ingesting streams
With this goal clear in our mind, all we need to do now if to configure our encoding. A few lines create the essential objects we need.
Encoding encoding = new Encoding();
encoding.setName("Concatenated and trimmed encoding with bumper and promo");
encoding.setCloudRegion(CloudRegion.AUTO);
encoding.setEncoderVersion("STABLE");
encoding = encodingApi.encodings.create(encoding);
In this example, let's just assume that all files are available through HTTPS URLs from the same server. We therefore first create an HttpsInput:
HttpsInput input = new HttpsInput();
input.setHost(HTTPS_INPUT_HOST);
input = encodingApi.inputs.https.create(input);
Since there are three files that we need to handle, we first create ingest input streams for them. It doesn't matter that the promo and main asset appear twice in the making of the final asset, we only need to register them once. In each case, we just let the encoder automatically select the audio and video streams from the input file.
IngestInputStream main = new IngestInputStream();
main.setInputId(input.getId());
main.setInputPath(HTTPS_MAIN_INPUT_PATH);
main.setSelectionMode(StreamSelectionMode.AUTO);
main = encodingApi.encodings.inputStreams.ingest.create(encoding.getId(), main);

IngestInputStream bumper = new IngestInputStream();
bumper.setInputId(input.getId());
bumper.setInputPath(HTTPS_BUMPER_INPUT_PATH);
bumper.setSelectionMode(StreamSelectionMode.AUTO);
bumper = encodingApi.encodings.inputStreams.ingest.create(encoding.getId(), bumper);

IngestInputStream promo = new IngestInputStream();
promo.setInputId(input.getId());
promo.setInputPath(HTTPS_PROMO_INPUT_PATH);
promo.setSelectionMode(StreamSelectionMode.AUTO);
promo = encodingApi.encodings.inputStreams.ingest.create(encoding.getId(), promo);
Trimming the main stream
Next, we need to let the encoder know how the main asset is to be trimmed. This time, we need two separate objects to represent the 2 parts of the asset that will make it to the final cut. To do this, we create time-based trimming input streams, and link them to the previously created ingest input stream.
Our main asset has 10 seconds at the start that we don't need. Part 1 is 90 seconds, and part 2 is 60 seconds, starting directly after part 1. Translated into the appropriate offset and duration parameters, this means:
TimeBasedTrimmingInputStream mainPart1 = new TimeBasedTrimmingInputStream();
mainPart1.setInputStreamId(main.getId());
mainPart1.setOffset(10D);
mainPart1.setDuration(90D);
mainPart1 = encodingApi.encodings.inputStreams.trimming.timeBased.create(encoding.getId(), mainPart1);

TimeBasedTrimmingInputStream mainPart2 = new TimeBasedTrimmingInputStream();
mainPart2.setInputStreamId(main.getId());
mainPart2.setOffset(100D);
mainPart2.setDuration(60D);
mainPart2 = encodingApi.encodings.inputStreams.trimming.timeBased.create(encoding.getId(), mainPart2);
Concatenating the streams
We are now ready to put it all together into one concatenation input stream object:
ConcatenationInputStream allTogether = new ConcatenationInputStream();

ConcatenationInputConfiguration bumperConfig = new ConcatenationInputConfiguration();
bumperConfig.setInputStreamId(bumper.getId());
bumperConfig.setPosition(0);
bumperConfig.setIsMain(false);
allTogether.addConcatenationItem(bumperConfig);

ConcatenationInputConfiguration part1Config = new ConcatenationInputConfiguration();
part1Config.setInputStreamId(mainPart1.getId());
part1Config.setPosition(1);
part1Config.setIsMain(true);
allTogether.addConcatenationItem(part1Config);

ConcatenationInputConfiguration promo1Config = new ConcatenationInputConfiguration();
promo1Config.setInputStreamId(promo.getId());
promo1Config.setPosition(2);
promo1Config.setIsMain(false);
allTogether.addConcatenationItem(promo1Config);

ConcatenationInputConfiguration part2Config = new ConcatenationInputConfiguration();
part2Config.setInputStreamId(mainPart2.getId());
part2Config.setPosition(3);
part2Config.setIsMain(false);
allTogether.addConcatenationItem(part2Config);

ConcatenationInputConfiguration promo2Config = new ConcatenationInputConfiguration();
promo2Config.setInputStreamId(promo.getId());
promo2Config.setPosition(4);
promo2Config.setIsMain(false);
allTogether.addConcatenationItem(promo2Config);

allTogether = encodingApi.encodings.inputStreams.concatenation.create(encoding.getId(), allTogether);
The position property for each of the items defines the order in which they will appear in the final output. Note how the item for Part 1 is defined as being the main item. Only one of the input streams can be set in this way, and it is used as reference for scaling, aspect ratio, frame rate, sample rate, etc.
A summary at this stage would be useful, for which a simple diagram should hopefully be sufficient
Finalising the encoding
It's now all in place to finalise our encoding.
From this point on, the rest of the encoding configuration works in the usual way: define your codec configurations, streams, muxings and start your encoding.
There is just one last thing of interest to highlight in those steps. When you define your input streams, instead of providing an input ID and file path as you'd have done before, you now just need to provide the identifier of the input stream:
StreamInput streamInput = new StreamInput();
streamInput.setInputStreamId(allTogether.getId());

Stream audioStream = new Stream();
audioStream.addInputStreamsItem(streamInput);
audioStream.setCodecConfigId(aacConfiguration.getId());
audioStream = encodingApi.encodings.streams.create(encoding.getId(), audioStream);

Stream videoStream = new Stream();
videoStream.addInputStreamsItem(inputStream);
videoStream.setCodecConfigId(videoConfiguration1080p.getId());
videoStream = encodingApi.encodings.streams.create(encoding.getId(), videoStream);
Added flexibility
For best results, it is recommended to try and ensure that all the files being stitched together have similar specs, primarily when it comes to frame rate, resolution and aspect ratio for video streams, and sample rate and audio layout for audio streams.
However, since v2.36, the Bitmovin encoder will also allow you to concatenate files with different specs. In that case, the input stream flagged as being the main one in the ConcatenationInputConfiguration will be considered as the model to which all other input streams will be conformed, before any encoding configuration is applied.
In case aspect ratios are different, you can use the aspectMode parameter of the ConcatenationInputConfiguration to dictate how the input streams should be transformed.
Additionally, with the paddingBefore and paddingAfter parameters, you can also introduce black padding between the stitched sections.
Updated 5 months ago