Separating and Combining Audio Streams
Introduction
This tutorial illustrates the different ways to handle multi-channel audio, specifically for when you have multiple source files, different audio layouts, and a need to transform your inputs into streamable audio streams.
- First, we go through terminology, and some simple use cases, to introduce the main concepts and API resources that are involved in the encoding configuration when it comes to audio.
- Then, we look at use cases that involve channel (re-)mixing from an input stream to an output stream.
- Following that, we look at how to (re-)map multiple streams between inputs and outputs.
- Finally, in the last section, we put it all together and look at how to merge or blend multiple multi-channel streams into a single output stream.
Terminology
But first, it helps to understand what we are talking about and agree on the vocabulary.
- A channel is the real audio signal, which is usually associated with a speaker in a multi-speaker setup.
- Multiple channels are often grouped together into streams. For example a 5.1 surround sound audio stream contains 6 channels. We will often talk about channel layout to refer to the number and order of channels in the stream. Sometimes the term track is used as well: a track refers to the logical entity, the stream refers to the track encoded with a specific codec.
- A Stream is contained in a file, and a file can contain multiple streams. A file can also contain video streams alongside audio streams.
For this tutorial, we will use illustrations such as the following to help depict the concepts:
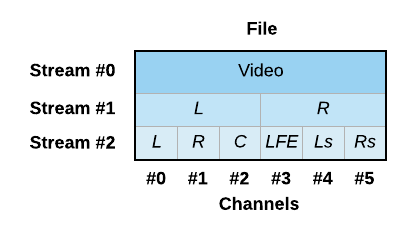
This represents a single file, with 3 streams.
- The first stream (stream 0) is a video stream.
- The next stream (stream 1) is a stereo audio stream with 2 channels: left and right
- The last stream (stream 2) is a surround audio stream with 6 channels: front left, front right, center, low frequency effects (for a subwoofer), back left and back right
Simple Stream Handling
Use Case 1 - Implicit Handling
In the simplest case, there is no real audio manipulation taking place. You have an input with an audio stream with a particular channel layout, and you want basically the same to be in your output, with the appropriate codec and bitrate. This use case is our baseline, which we’ll need in order to introduce additional concepts for the following, more complex use cases. Note that we do not currently support a passthrough options in most cases; an input audio stream still needs to be encoded in order to be properly aligned to the encoded video content, especially when creating segmented content.
Let’s take the following example, with a single stereo stream:

We will not go into all aspects of the encoding configuration (there are other tutorials on our website that cover that), but will look specifically at the audio aspect of the configuration. For that, you will need a similar set of resources as for other streams:
- An
IngestInputStream, which defines where your source file is located on theInputstorage - An audio
CodecConfigurationfor the codec of your choice, configured appropriately - An (output)
Streamthat defines how the configuration is applied to the input stream - One or more
Muxingsto define how the stream is containerised in a file and transferred to theOutput
Note: For the purpose of this tutorial and in the example code files associated with it, we will always generate a single MP4 file as output, with all audio streams multiplexed with the video stream. In most situations that involve adaptive bitrate streaming with manifests such as HLS and DASH, each stream will need to be output in its own separate muxing.
configurations:
  audio:
    aac:
      audio_aac_128:
        properties:
          name: AAC 128 kbit/s
          bitrate: 128000

encodings:
  main-encoding:
    properties:
      # ...

    inputStreams:
      ingest:
        ingest_1:
          properties:
            inputId: # id of the input
            inputPath: # path of the input
            selectionMode: AUTO

    streams:
      stream_1:
        properties:
          inputStreams:
            - inputId: $/encodings/main-encoding/inputStreams/ingest/ingest_1
          codecConfigId: $/configurations/audio/aac/audio_aac_128

    muxings:
      mp4:
        mp4_output:
          properties:
            streams:
              - streamId: $/encodings/main-encoding/streams/stream_1
            # ... then add video stream, define the encoding output, define a filename, etc.
    # ...
IngestInputStream ingestInputStream = new IngestInputStream();
ingestInputStream.setInputId(input.getId());
ingestInputStream.setInputPath(inputPath);
ingestInputStream.setSelectionMode(StreamSelectionMode.AUTO);
ingestInputStream = bitmovinApi.encoding.encodings.inputStreams.ingest.create(encoding.getId(), ingestInputStream);

AacAudioConfiguration config = new AacAudioConfiguration();
config.setName("AAC 128 kbit/s");
config.setBitrate(128_000L);
config = bitmovinApi.encoding.configurations.audio.aac.create(config);

StreamInput streamInput = new StreamInput();
streamInput.setInputStreamId(ingestInputStream.getId());

Stream stream = new Stream();
stream.addInputStreamsItem(streamInput);
stream.setCodecConfigId(codecConfiguration.getId());
stream = bitmovinApi.encoding.encodings.streams.create(encoding.getId(), stream);

Mp4Muxing muxing = new Mp4Muxing();
MuxingStream muxingStream = new MuxingStream();
muxingStream.setStreamId(stream.getId());
muxing.addStreamsItem(muxingStream);

// ... then add video stream, define the encoding output, define a filename, etc.

muxing = bitmovinApi.encoding.encodings.muxings.mp4.create(encoding.getId(), muxing);
As you can see from this snippet of code, there was no need to handle any aspect of the channel mapping between the input and output for this simple use case. StreamSelectionMode.AUTO (which is the default mode so does not even need to be specified) tells the encoder to do its best at finding an audio stream in the source that makes sense to use as input stream.
Note: if you have previously configured encodings without anIngestInputStreamand instead referred to the input file directly in the Stream's creation payload, read this FAQ to understand why we recommend that you switch to the first method.
A full code sample with our various SDKs is provided in our example repository.
Use Case 2 - Distinct Input Files
A situation that occurs regularly is one in which each input stream comes in a distinct file. In particular, this is what you will have if you are receiving IMF packages from your content provider, since they store each track in a separate “essence” (hear: file).
Bitmovin also allows you to work with streams that are in separate files, whether or not the files also contain a video stream.
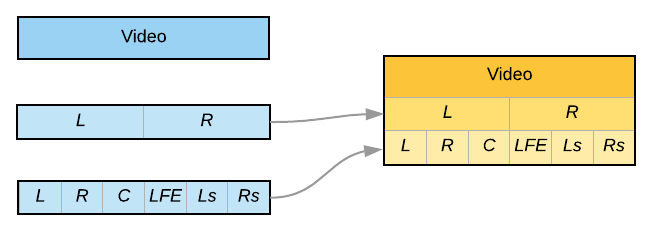
This is handled in much the same way as in the previous example, but now you need to have multiple IngestInputStreams, CodecConfigurations and Streams. If we refactor the code to have functions for creation of each of the resources above, the code might therefore look like the following:
AacAudioConfiguration aacConfig = createAacStereoAudioConfig();
Ac3AudioConfiguration ac3Config = createAc3SurroundAudioConfig();

IngestInputStream stereoIngestInputStream = createIngestInputStream(encoding, input, "source_audio_stereo.xmf");
IngestInputStream surroundIngestInputStream = createIngestInputStream(encoding, input, "source_audio_surround.xmf");

Stream audioStream1 = createStream(encoding, stereoIngestInputStream, aacConfig);
Stream audioStream2 = createStream(encoding, surroundIngestInputStream, ac3Config);

// ... do the same for the video stream ...
createMp4Muxing(encoding, output, Arrays.asList(videoStream, audioStream1, audioStream2));
A full code sample can be found in our example repository.
Channel Mixing
In this section, we look at use cases that require manipulation of the audio channels present in the input audio stream.
Use Case 3 - Swapping Channels
As before, let’s imagine that your input file has a stereo audio stream, but that somehow, the left and right channels have been reversed. It’s more of a theoretical use case (or you should have a serious word with your content provider), but it helps us illustrate in a simple way the next concept: Audio Mixing
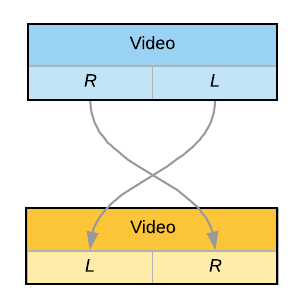
With Audio Mixing, you can go down to the level of the channel (instead of the stream itself), and manipulate the channel layout.
Just as before, you will need an IngestInputStream to point to the source file. But in addition, you now also need to involve an AudioMixInputStream to apply a transformation to that input stream, before generating your output Stream.
The transformation here is simple: take each channel (by position in the input stream) and re-map it to the opposite output channel.
// create the IngestInputStream
IngestInputStream audioIngestInputStream = createIngestInputStream(encoding, input, "source.mp4");

// define the source channels
AudioMixInputStreamSourceChannel sourceChannel0 = new AudioMixInputStreamSourceChannel();
sourceChannel0.setType(AudioMixSourceChannelType.CHANNEL_NUMBER);
sourceChannel0.setChannelNumber(0);

AudioMixInputStreamSourceChannel sourceChannel1 = new AudioMixInputStreamSourceChannel();
sourceChannel1.setType(AudioMixSourceChannelType.CHANNEL_NUMBER);
sourceChannel1.setChannelNumber(1);

// define the mapping to output channels
AudioMixInputStreamChannel outputChannel0 = new AudioMixInputStreamChannel();
outputChannel0.setOutputChannelType(AudioMixChannelType.CHANNEL_NUMBER);
outputChannel0.setOutputChannelNumber(0);
outputChannel0.setInputStreamId(audioIngestInputStream.getId());
outputChannel0.addSourceChannelsItem(sourceChannel1);

AudioMixInputStreamChannel outputChannel1 = new AudioMixInputStreamChannel();
outputChannel1.setOutputChannelType(AudioMixChannelType.CHANNEL_NUMBER);
outputChannel1.setOutputChannelNumber(1);
outputChannel1.setInputStreamId(audioIngestInputStream.getId());
outputChannel1.addSourceChannelsItem(sourceChannel0);

// add it all to an AudioMixInputStream and define the output channel layout
AudioMixInputStream audioMixInputStream = new AudioMixInputStream();
audioMixInputStream.setName("Swapping channels 0 and 1");
audioMixInputStream.setChannelLayout(AudioMixInputChannelLayout.CL_STEREO);
audioMixInputStream.setAudioMixChannels(Arrays.asList(outputChannel0, outputChannel1));
audioMixInputStream = bitmovinApi.encoding.encodings.inputStreams.audioMix.create(
  encoding.getId(), audioMixInputStream);

// Configure an audio codec
AacAudioConfiguration aacConfig = createAacStereoAudioConfig();

// And finally, create an output Stream with the AudioMaxInputStream and the codec
Stream stream = new Stream();
StreamInput streamInput = new StreamInput();
streamInput.setInputStreamId(audioMixInputStream.getId());
stream.addInputStreamsItem(streamInput);
stream.setCodecConfigId(codecConfiguration.getId());
stream = bitmovinApi.encoding.encodings.streams.create(encoding.getId(), stream);
Let’s highlight a couple of important points from that snippet of code:
- where before we created the
Streamfrom anIngestInputStream, it is now from theAudioMixInputStreamthat we do so, since it represents the result of the transformation of the input stream (line 40). - the same audio
IngestInputStreamis used in the definition of both output channels in the configuration above (lines 17 and 23).
You can find a full code sample in our example repository
Another similar use case is if one of your logical source channels is hard “panned” to either the left or right channel of an input stereo pair, leaving the other channel empty. You can then simply select it and copy it to both output channels to center it.
Use Case 4 - Downmixing 5.1 to 2.0
Let’s look now at a more complex use case, which involves multiple source channels being combined into the same output channels.
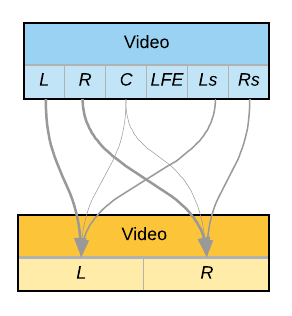
In this example, we have a source file with a 5.1 surround audio stream, which we want to convert into a stereo-only stream in the output. We have decided that the output channels should be mixing the corresponding front channel, the center channel at lower volume, and the corresponding back channel at even lower volume.
Warning: Note that we are not claiming that this is the right or only way of downmixing 5.1 to 2.0. You will need to discuss the correct mechanism with your content provider. The example above is only for the purpose of illustrating the advanced concepts of audio mixing.
Enter the concept of gain. This allows us to define at what level (volume) one of the source channels should be combined with others.
Code-wise, this looks fairly similar to the previous use case, but (naturally) with more configuration. Let’s look at just the left channel’s mixing definition:
// define the source channels
AudioMixInputStreamSourceChannel sourceChannelL = new AudioMixInputStreamSourceChannel();
sourceChannelL.setType(AudioMixSourceChannelType.FRONT_LEFT);
sourceChannelL.setGain(1.0);

AudioMixInputStreamSourceChannel sourceChannelC = new AudioMixInputStreamSourceChannel();
sourceChannelC.setType(AudioMixSourceChannelType.CENTER);
sourceChannelC.setGain(0.8);

AudioMixInputStreamSourceChannel sourceChannelLs = new AudioMixInputStreamSourceChannel();
sourceChannelC.setType(AudioMixSourceChannelType.BACK_LEFT);
sourceChannelC.setGain(0.5);

// define the mapping to output channels
AudioMixInputStreamChannel outputChannelL = new AudioMixInputStreamChannel();
outputChannel0.setOutputChannelType(AudioMixChannelType.FRONT_LEFT);
outputChannel0.setInputStreamId(audioIngestInputStream.getId());
outputChannel0.setSourceChannels(
  Arrays.asList(sourceChannelL, sourceChannelC, sourceChannelLs)
);
Notice also another difference with the previous use case. Instead of defining source channels by their position in the stream, we choose them by channel type. If your input file has been correctly tagged, this simplifies the code and also ensures that you can handle input files that may have slightly different channel layouts (since there are multiple ways of laying out 5.1 channels in a stream in the industry)
You can find a full code sample in our example repository, which streamlines the example above by using functions and helper classes to improve readability.
What about the AudioMix Filter?
You may have seen in our API documentation that we also support a filter for audio mixing. It is functionally equivalent to the AudioMixInputStream when it comes to audio mixing configurations and use cases and was our initial approach to provide this feature. AudioMixInputStreams are the successor of it, so it is highly recommended to use these instead of the AudiomixFilter going forward as the latter will be deprecated. In particular, if you are also intending to use other functionality enabled through InputStreams resources, such as trimming and concatenation, you will only be able to define the audio manipulation through an AudioMixInputStream in the chain of InputStreams.
Stream Mapping
In the previous section, we looked at how to (re-)mix audio channels in the audio input stream. In this third part, we now look at use cases that have a different number of audio streams between the input and output, and where multiple audio streams need to be combined with each other to generate an output stream.
Use Case 5 - Mono Input Tracks
It is a very frequent use case, particular in broadcast workflows. The source file has multiple (often PCM) streams/tracks, each with a single mono channel that represents one of the output channels. Let’s take a middle-of-the-road example here, with 8 mono streams that contain the channels for a stereo pair and a surround audio layout.
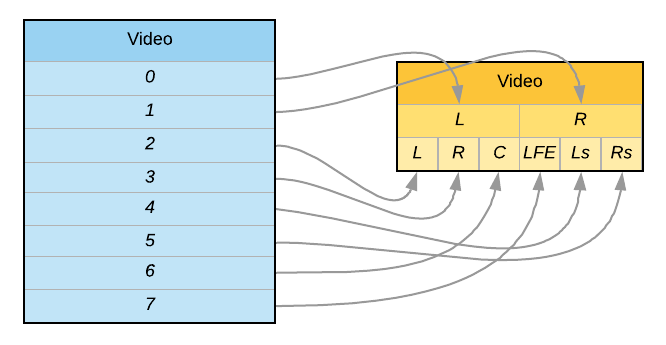
We have so far met all the resources and concepts necessary to configure an encoding for this use case, but this example allows us to revisit a couple of points highlighted earlier in the tutorial.
In use cases 3 and 4, we had a single IngestInputStream to select the single audio stream from the stream, which could be used in all aspects of the configuration thereafter. As shown in use case 1, we could also use the automatic StreamSelectionMode to let the encoder implicitly select that audio input stream in the source file.
We now will have to be more explicit, and select exactly the right audio stream as input stream for our configuration, and map it appropriately in the AudioMixInputStream configuration to the relevant output channel.
Let’s look at the code for the mapping of the first two channels into the stereo pair
// create distinct IngestInputStream for each input stream
IngestInputStream track0IngestInputStream = new IngestInputStream();
track0IngestInputStream.setInputId(input.getId());
track0IngestInputStream.setInputPath("source_8tracks.mp4");
track0IngestInputStream.setSelectionMode(StreamSelectionMode.AUDIO_RELATIVE);
track0IngestInputStream.setPosition(0);
track0IngestInputStream = bitmovinApi.encoding.encodings.inputStreams.ingest.create(encoding.getId(), track0IngestInputStream);

IngestInputStream track1IngestInputStream = new IngestInputStream();
track1IngestInputStream.setInputId(input.getId());
track1IngestInputStream.setInputPath("source_8tracks.mp4");
track1IngestInputStream.setSelectionMode(StreamSelectionMode.AUDIO_RELATIVE);
track1IngestInputStream.setPosition(1);
track1IngestInputStream = bitmovinApi.encoding.encodings.inputStreams.ingest.create(encoding.getId(), track1IngestInputStream);

// define how to select the single channel from a mono track
AudioMixInputStreamSourceChannel sourceChannelMono = new AudioMixInputStreamSourceChannel();
sourceChannelMono.setType(AudioMixSourceChannelType.CHANNEL_NUMBER);
sourceChannelMono.setChannelNumber(0);

// define output channels and mapping from source channels
AudioMixInputStreamChannel outputChannelL = new AudioMixInputStreamChannel();
outputChannelL.setOutputChannelType(AudioMixChannelType.FRONT_LEFT);
outputChannelL.setInputStreamId(track0IngestInputStream.getId());
outputChannelL.setSourceChannels(Collections.singletonList(sourceChannelMono));

AudioMixInputStreamChannel outputChannelR = new AudioMixInputStreamChannel();
outputChannelR.setOutputChannelType(AudioMixChannelType.FRONT_LEFT);
outputChannelR.setInputStreamId(track1IngestInputStream.getId());
outputChannelR.setSourceChannels(Collections.singletonList(sourceChannelMono));

// define and create the audio mix
AudioMixInputStream stereoMixInputStream = new AudioMixInputStream();
stereoMixInputStream.setChannelLayout(AudioMixInputChannelLayout.CL_STEREO);
stereoMixInputStream.setAudioMixChannels(Arrays.asList(outputChannelL, outputChannelR))

stereoMixInputStream = bitmovinApi.encoding.encodings.inputStreams.audioMix.create(
  encoding.getId(), stereoMixInputStream);
In this code sample, notice how each AudioMixInputStreamChannel uses a different IngestInputStream to grab a specific audio stream in the input file. As for each IngestInputStream, it selects the exact source stream by its position in the input file, in relative order between all audio streams. You could also use StreamSelectionMode.POSITION_ABSOLUTE if you prefer.
Tip: to determine how many streams your input file has, in what order, and with what audio layout, use
mediainfoorffprobe*
You can find a full code sample in our example repository, which streamlines the example above by using functions and helper classes to improve code readability.
Use Case 6 - Separate Input Files for different Channels
Although this use case is not frequent, it is just a special case of the previous example, and can be handled in the exact same way. The only difference is that the input file path may now be different for different IngestInputStreams, instead of (or in addition to) the source channel number.
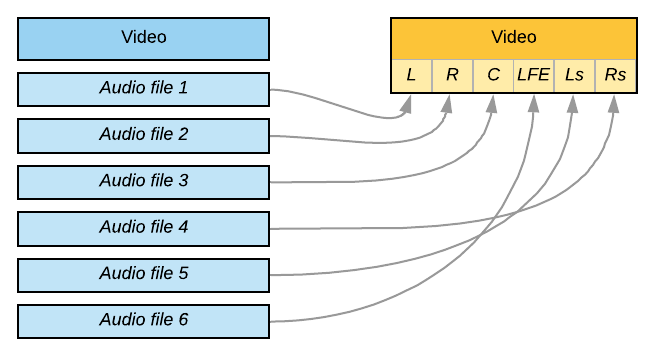
With the same mechanism, you can also now hopefully see how you could replace a single channel in a multi-channel stream with one from a different file. We will not even ask why you would want to do such a thing…
Stream Merging (or Blending)
In the previous section, we saw how we can map channels from distinct input streams onto output channels. In this fourth and final part, we will see how we can go one step further and use all the concepts seen so far together, and merge multiple input streams into output streams.
Use Case 7 - Voice-Over or Background Music
In this use case, let’s imagine that we have a source file containing a stereo audio track. In a separate file, we have another stereo track such as a voice-over commentary or background music. To combine those, we need one final tool at our disposal: the ability to blend streams together:
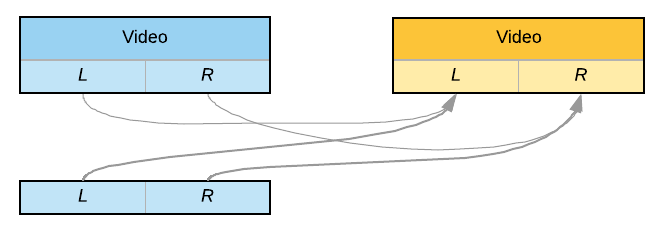
This can be achieved very simply by providing a list of InputStreams when creating a Stream. Blending is done channel by channel, so all input streams need to have identical channel layouts.
IngestInputStream mainAudioIngestInputStream = createIngestInputStreamWithPosition(encoding, input, "original.mp4", 1);
IngestInputStream voiceOverIngestInputStream = createIngestInputStreamWithPosition(encoding, input, "voiceover.mp4", 0);

Stream audioStream = createStream(encoding, Arrays.asList(mainAudioIngestInputStream, voiceOverIngestInputStream), aacConfig);
Note: The behavior is different if all input streams are mono: In this case, they will not be blended but combined into a multi-channel stream (e.g. stereo for 2 input streams, 5.1 for 6 input streams)
With volume adjustment
To make this example a little more advanced, and to show how all features can be combined, let’s also reduce the volume on the original track, so that the voice-over can be heard more clearly. To apply a volume adjustment, we need to pass the original track trough an AudioMixInputStream and define the gain value for each channel, as demonstrated earlier.
IngestInputStream videoIngestInputStream = createIngestInputStreamWithPosition(encoding, input, "original.mp4", 0);
IngestInputStream mainAudioIngestInputStream = createIngestInputStreamWithPosition(encoding, input, "original.mp4", 1);
IngestInputStream voiceOverIngestInputStream = createIngestInputStreamWithPosition(encoding, input, "voiceover.mp4", 0);

AudioMixInputStream gainAdjustedAudioMixInputStream = new AudioMixInputStream();
gainAdjustedAudioMixInputStream.setChannelLayout(AudioMixInputChannelLayout.CL_STEREO);

for (int i=0; i<=1; i++)
{
  AudioMixInputStreamSourceChannel sourceChannel = new AudioMixInputStreamSourceChannel();
  sourceChannel.setType(AudioMixSourceChannelType.CHANNEL_NUMBER);
  sourceChannel.setChannelNumber(i);
  sourceChannel.setGain(0.5);   // reduce volume to 50%

  AudioMixInputStreamChannel inputStreamChannel = new AudioMixInputStreamChannel();
  inputStreamChannel.setOutputChannelType(AudioMixChannelType.CHANNEL_NUMBER);
  inputStreamChannel.setOutputChannelNumber(i);
  inputStreamChannel.setInputStreamId(mainAudioIngestInputStream.getId());
  inputStreamChannel.addSourceChannelsItem(sourceChannel);

  gainAdjustedAudioMixInputStream.addAudioMixChannelsItem(inputStreamChannel);
}

gainAdjustedAudioMixInputStream = bitmovinApi.encoding.encodings.inputStreams.audioMix.create(
  encoding.getId(), gainAdjustedAudioMixInputStream);

Stream videoStream = createStream(encoding, Collections.singletonList(videoIngestInputStream), h264Config);
Stream audioStream = createStream(encoding, Arrays.asList(voiceOverIngestInputStream, gainAdjustedAudioMixInputStream), aacConfig);
You can find a full code sample in our example repository, which shows a slightly different use case, in which the same source file contains 2 stereo streams, instead of them coming from different files.
Summary
To conclude, let’s summarise the concepts involved and how they translate into the Bitmovin API:
- Use an
IngestInputStream(endpoint) to define where your input file is- and set an explicit
StreamSelectionModeif you need to select a specific stream from that file - use multiple
IngestInputStreamsif you have multiple streams that contain your source channels
- and set an explicit
- Add an
AudioMixInputStream(endpoint) if you need to mix and map different input channels into output channels- and set a
gainon individual source channels if you want to alter their volume
- and set a
- Merge multiple input streams with the same audio layout by adding them to the output
Stream(endpoint)
Tip: Remember also that if you want your encoding workflow to be able to cater for inputs with different audio layouts (for example if you receive some files with 1 stream with 6 channels, and some with 6 mono streams), you could use Stream Conditions to apply the correct logic.
Updated 7 days ago