Custom Chromecast CAFv3 receiver use cases
In some scenarios, you may want to deliver a more tailored Chromecast experience for your users. The recommended approach for this is to create a custom Chromecast CAFv3 receiver. While it is still possible to use receiver Version 2, this version has been deprecated by Google and is no longer recommended for new development.
A custom receiver is essentially an HTML application hosted on a publicly accessible server. It can define any desired behaviour using standard web technologies such as HTML, CSS, and JavaScript. When a Cast session is initiated, this receiver app is loaded and executed directly on the Cast device’s built-in browser.
⚠️ Note: The Google CAFv3 (Google Cast Application Framework v3) receiver requires the use of its native player implementation, which is based on the Shaka Player. Therefore, CAFv3 doesn't allow the usage of the Bitmovin Player, or any other, on the receiver side.
How to Create a Custom Receiver
1. Customize and host your receiver
Bitmovin provides a reference implementation of a custom CAFv3 receiver on GitHub: bitmovin/bitmovin-player-caf-receiver
Clone the repository and modify it to fit your specific requirements.
Once customized, follow the setup instructions in the repository’s README to host your receiver on a publicly accessible web server.
2. Register and publish your receiver
Next, register and publish your custom receiver through the Google Cast SDK Developer Console.
For detailed instructions, refer to Google’s official guide: Registration | Cast | Google for Developers
After successful registration, Google will assign a Receiver App ID to your custom receiver.
3. Update the Bitmovin Player configuration
Once you have your Receiver App ID, update your Bitmovin Player configuration accordingly.
You can find detailed instructions for your specific platform, whether you’re using the Web SDK, Android SDK, or iOS SDK, in the following guide: CAF Support
Example use cases
Here are some example use cases you can achieve:
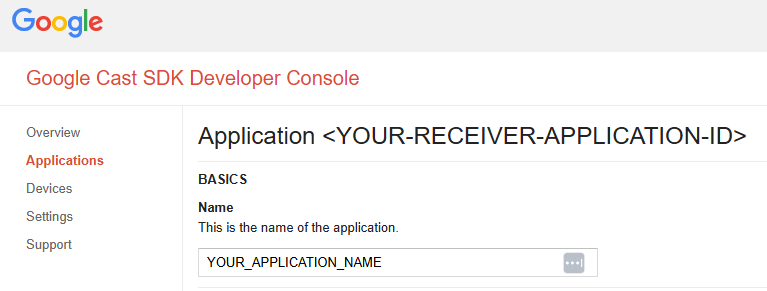
Change the Application name shown on the Chromecast Receiver
When using Bitmovin’s Default Receiver Application (receiverApplicationId: 'FFE417E5'), the message “CAF Receiver V3 – Stable” appears on the Chromecast device at the end of playback. This is the name of the Application and cannot be changed programmatically.
To display a custom name, define it during the receiver registration process in the Google Cast Developer Console by setting the Name field to your preferred application name.
This is the name that will be shown to users on the Chromecast device.
Use MPL instead of Shaka for HLS
Google has started migrating Chromecast CAFv3 receivers from using the Media Player Library (MPL) to Shaka Player for HLS playback. You can learn more about this change in Google’s migration guide: HLS On Shaka Player Migration | Cast | Google for Developers.
If you are encountering playback issues with HLS streams on Chromecast during this transition, you can report them directly to Google as described in their guide.
In the meantime, you can use a custom CAF receiver to explicitly continue using MPL (instead of Shaka) for HLS playback. This allows your content to continue playing reliably while the migration-related issues are resolved.
The only required change in our default application is shown below:
 import {
   CastReceiverContext,
+  CastReceiverOptions,
   ContentProtection,
   NetworkRequestInfo,
   PlayerManager,
 } from 'chromecast-caf-receiver/cast.framework';

 export default class CAFReceiver {
   private readonly player: PlayerManager;
   private readonly context: CastReceiverContext;
+  private readonly castReceiverOptions: CastReceiverOptions;

   constructor() {
     this.context = cast.framework.CastReceiverContext.getInstance();
+    this.castReceiverOptions = new cast.framework.CastReceiverOptions();
     this.player = this.context.getPlayerManager();
   }

   public init() {
     // cast.framework.CastReceiverContext.getInstance().setLoggerLevel(cast.framework.LoggerLevel.DEBUG);
+    this.castReceiverOptions.useShakaForHls = false;

     this.attachEvents();
-    this.context.start();
+    this.context.start(this.castReceiverOptions);
   }
Having issues?
Check out How to debug streams on Chromecast devices for detailed troubleshooting steps.
Updated 5 months ago